One of my favorite features of ClickHouse 25.12 was the HMAC function for message authentication using a shared key.
ClickHouse has always been able to act as a webhook endpoint, but with the HMAC function we can now verify webhook requests, filtering out those that didn't come from the expected source. We'll start by seeing how this works with a local example, before moving onto a real-life example using ClickHouse Cloud as a GitHub webhook endpoint.
The webhook pattern
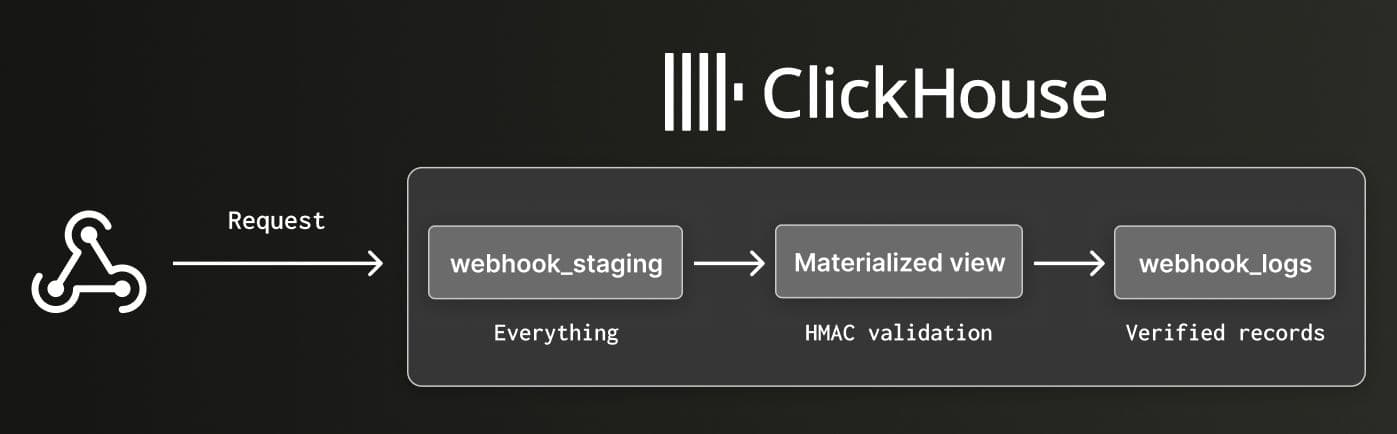
One cool thing about ClickHouse is the ability to chain tables together using materialized views. Data gets ingested into one table, a materialized view acts as a SQL trigger, and the results are written to another table.
This becomes especially powerful when combined with the Null table engine. Rather than storing data, the Null table engine forwards everything it receives to any connected materialized views — making it the perfect staging layer.
The result is a clean three-step pattern:
- A staging table receives all incoming data
- A materialized view validates and transforms it
- A final table stores only the verified data
Create the tables
Let's have a look at how to set this all up in ClickHouse. If you want to follow along, you'll need to have a ClickHouse server or ClickHouse Cloud service running.
First, let's create the staging table:
CREATE TABLE webhook_staging (
received_at DateTime DEFAULT now(),
raw_payload String,
signature String DEFAULT getClientHTTPHeader('X-Hub-Signature-256')
) ENGINE = MergeTree()
ORDER BY received_at
SETTINGS allow_get_client_http_header=1;The allow_get_client_http_header setting is required because reading client headers is disabled by default.
We're creating the
webhook_stagingtable with theMergeTreeengine, so that we can debug incoming requests. In a production system we would use theNullengine and might also have a second materialized view that captures invalid requests.
Next, we have a table that's going to store only verified rows:
CREATE TABLE webhook_logs (
received_at DateTime,
payload JSON
) ENGINE = MergeTree()
ORDER BY received_at;And finally, we have a materialized view that validates the data:
CREATE MATERIALIZED VIEW webhook_validator TO webhook_logs AS
SELECT
received_at,
raw_payload::JSON as payload
FROM webhook_staging
WHERE signature = 'sha256=' || lower(hex(HMAC('SHA256', raw_payload, 'my_secret_key')));We're comparing the signature from the request header to the expected signature computed using the shared secret key.
Our shared secret key is my_secret_key.
If the incoming row doesn't match the expected signature, it won't be written to the webhook_logs table.
Create a restricted user
When experimenting on our own machine, we could use the default admin user, but for a production system it's safer to create a dedicated user with minimal permissions. The user that we create will be used in the webhook URL that we construct later.
First, let's create the user:
CREATE USER webhook_receiver
IDENTIFIED WITH sha256_hash
BY 'e3b0c44298fc1c149afbf4c8996fb92427ae41e4649b934ca495991b7852b855';The hash is the SHA256 of an empty string, so no password is needed when we construct the webhook URL.
Next, let's grant the user the permissions it needs:
GRANT INSERT ON default.webhook_staging TO webhook_receiver;
GRANT SELECT ON default.webhook_staging TO webhook_receiver;
GRANT SHOW TABLES ON default.webhook_staging TO webhook_receiver;
GRANT SHOW DATABASES ON default.* TO webhook_receiver;If we want to be extra cautious, we could also apply rate limits to this user to guard against abuse.
Construct the webhook URL
ClickHouse accepts inserts over HTTP, which means the whole webhook endpoint is a URL with the INSERT query embedded:
http://localhost:8123/?user=webhook_receiver&query=INSERT+INTO+webhook_staging+(raw_payload)+FORMAT+RawBLOBThe key parts:
user=webhook_receiver-the restricted user we createdquery=INSERT INTO webhook_staging (raw_payload) FORMAT RawBLOB-the URL-encoded query that inserts the raw request body
FORMAT RawBLOB tells ClickHouse to treat the entire request body as a single string value rather than trying to parse it.
We can then test it out by sending a valid request i.e. one where the signature is computed with the correct key:
PAYLOAD='{"event":"user_login","user_id":456}'
SIGNATURE=$(echo -n "$PAYLOAD" | openssl dgst -sha256 -hmac "my_secret_key" | cut -d' ' -f2)
curl -X POST "http://localhost:8123/?user=webhook_receiver&allow_get_client_http_header=1&query=INSERT%20INTO%20webhook_staging%20(raw_payload)%20FORMAT%20RawBLOB" \
-H "X-Hub-Signature-256: sha256=$SIGNATURE" \
-d "$PAYLOAD"Let's now connect to our ClickHouse Server using ClickHouse Client:
clienthouse clientAnd we can return the contents of webhook_staging and webhook_logs:
SELECT * FROM webhook_staging;Row 1:
──────
received_at: 2026-02-20 15:42:22
raw_payload: {"event":"user_login","user_id":456}
signature: sha256=5a23c796b6248c725a6ec7fc2cf0788117d69d376ee6241f411a8887297d3ca4
1 row in set. Elapsed: 0.001 sec.SELECT * FROM webhook_logs;Row 1:
──────
received_at: 2026-02-20 15:42:22
payload: {
"event": "user_login",
"user_id": 456
}
1 row in set. Elapsed: 0.003 sec.Both tables have the data. Now how about we send a request where we've computed the signature with a different key:
PAYLOAD='{"event":"user_login","user_id":456}'
SIGNATURE=$(echo -n "$PAYLOAD" | openssl dgst -sha256 -hmac "rogue_key" | cut -d' ' -f2)
curl -X POST "http://localhost:8123/?user=webhook_receiver&allow_get_client_http_header=1&query=INSERT%20INTO%20webhook_staging%20(raw_payload)%20FORMAT%20RawBLOB" \
-H "X-Hub-Signature-256: sha256=$SIGNATURE" \
-d "$PAYLOAD"Let's run our queries against webhook_staging:
Row 1:
──────
received_at: 2026-02-20 15:43:21
raw_payload: {"event":"user_login","user_id":456}
signature: sha256=01f65041f2505f2b245f3caff410913a22a0ff8c7e8414c9fe1e861359973a7a
Row 2:
──────
received_at: 2026-02-20 15:42:22
raw_payload: {"event":"user_login","user_id":456}
signature: sha256=5a23c796b6248c725a6ec7fc2cf0788117d69d376ee6241f411a8887297d3ca4
2 rows in set. Elapsed: 0.002 sec.And now, webhook_logs:
Row 1:
──────
received_at: 2026-02-20 15:42:22
payload: {
"event": "user_login",
"user_id": 456
}
1 row in set. Elapsed: 0.004 sec.webhook_staging gets a new row, webhook_logs doesn't - the signatures didn't match so the materialized view dropped it.
GitHub webhook
With the pattern established locally, let's wire it up to a real GitHub repository using ClickHouse Cloud. The structure is almost identical, with just one difference - the staging table picks up an extra event_type column (from the X-GitHub-Event header GitHub sends) and webhook_logs picks an event_type column as well.
The queries below create our tables and materialized view.
CREATE TABLE webhook_staging (
received_at DateTime DEFAULT now(),
raw_payload String,
event_type String DEFAULT getClientHTTPHeader('X-GitHub-Event'),
signature String DEFAULT getClientHTTPHeader('X-Hub-Signature-256')
) ENGINE = MergeTree()
ORDER BY received_at
SETTINGS allow_get_client_http_header=1;CREATE TABLE webhook_logs (
received_at DateTime,
event_type String,
payload JSON
) ENGINE = MergeTree()
ORDER BY received_at;CREATE MATERIALIZED VIEW webhook_validator TO webhook_logs AS
SELECT
received_at,
event_type,
raw_payload::JSON as payload
FROM webhook_staging
WHERE signature = 'sha256=' || lower(hex(HMAC('SHA256', raw_payload, 'my_secret_key')));In ClickHouse Cloud, click Connect to get your cluster URL, then build the webhook URL the same way - just swap localhost:8123 for your Cloud host and add allow_get_client_http_header=1:
https://<host>:8443/?user=webhook_receiver&allow_get_client_http_header=1&query=INSERT+INTO+webhook_staging+(raw_payload)+FORMAT+RawBLOBConfigure the GitHub webhook
In your GitHub repository, go to Settings → Webhooks → Add webhook:
- Paste your ClickHouse URL into Payload URL
- Set Content type to
application/json - Enter your secret key in the Secret field -this must match
my_secret_keyfrom the materialized view - Choose which events to send (push events are fine to start)
- Click Add webhook

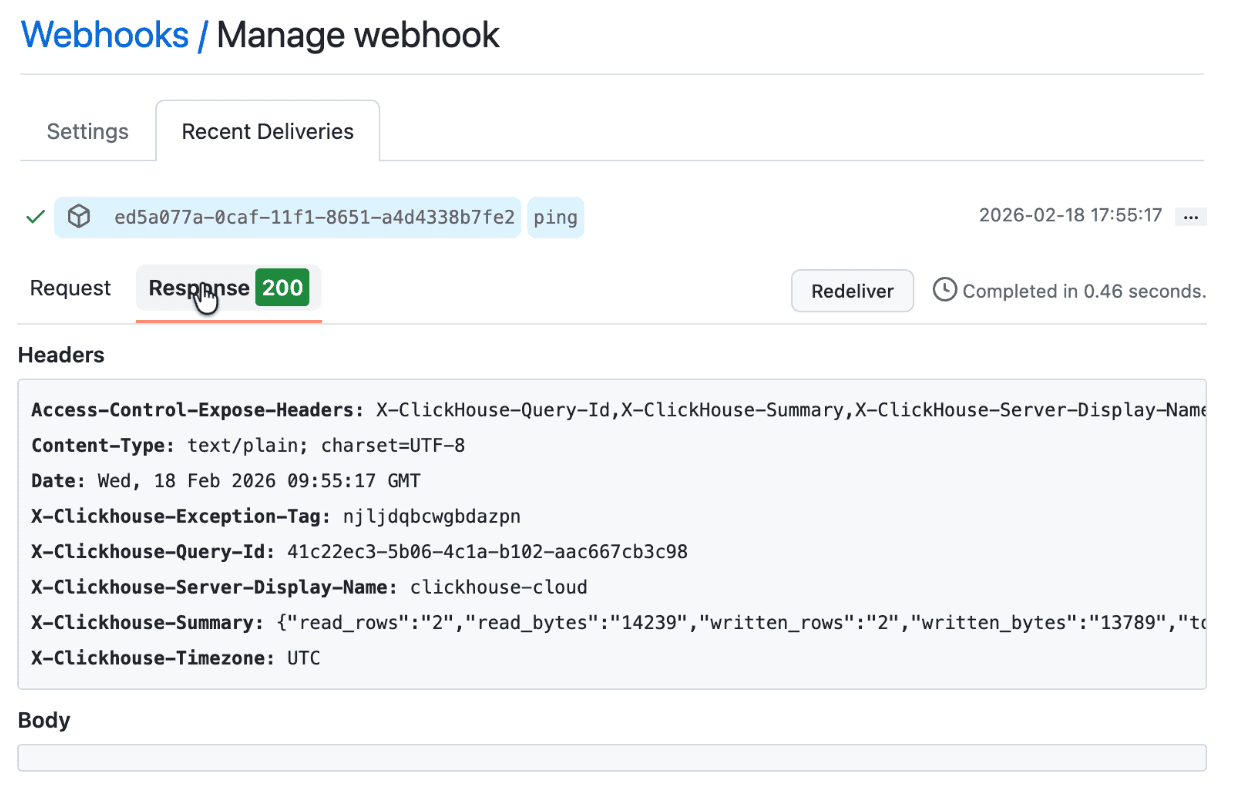
GitHub will immediately send a ping event. Refresh the webhook page and you should see "Last delivery was successful".
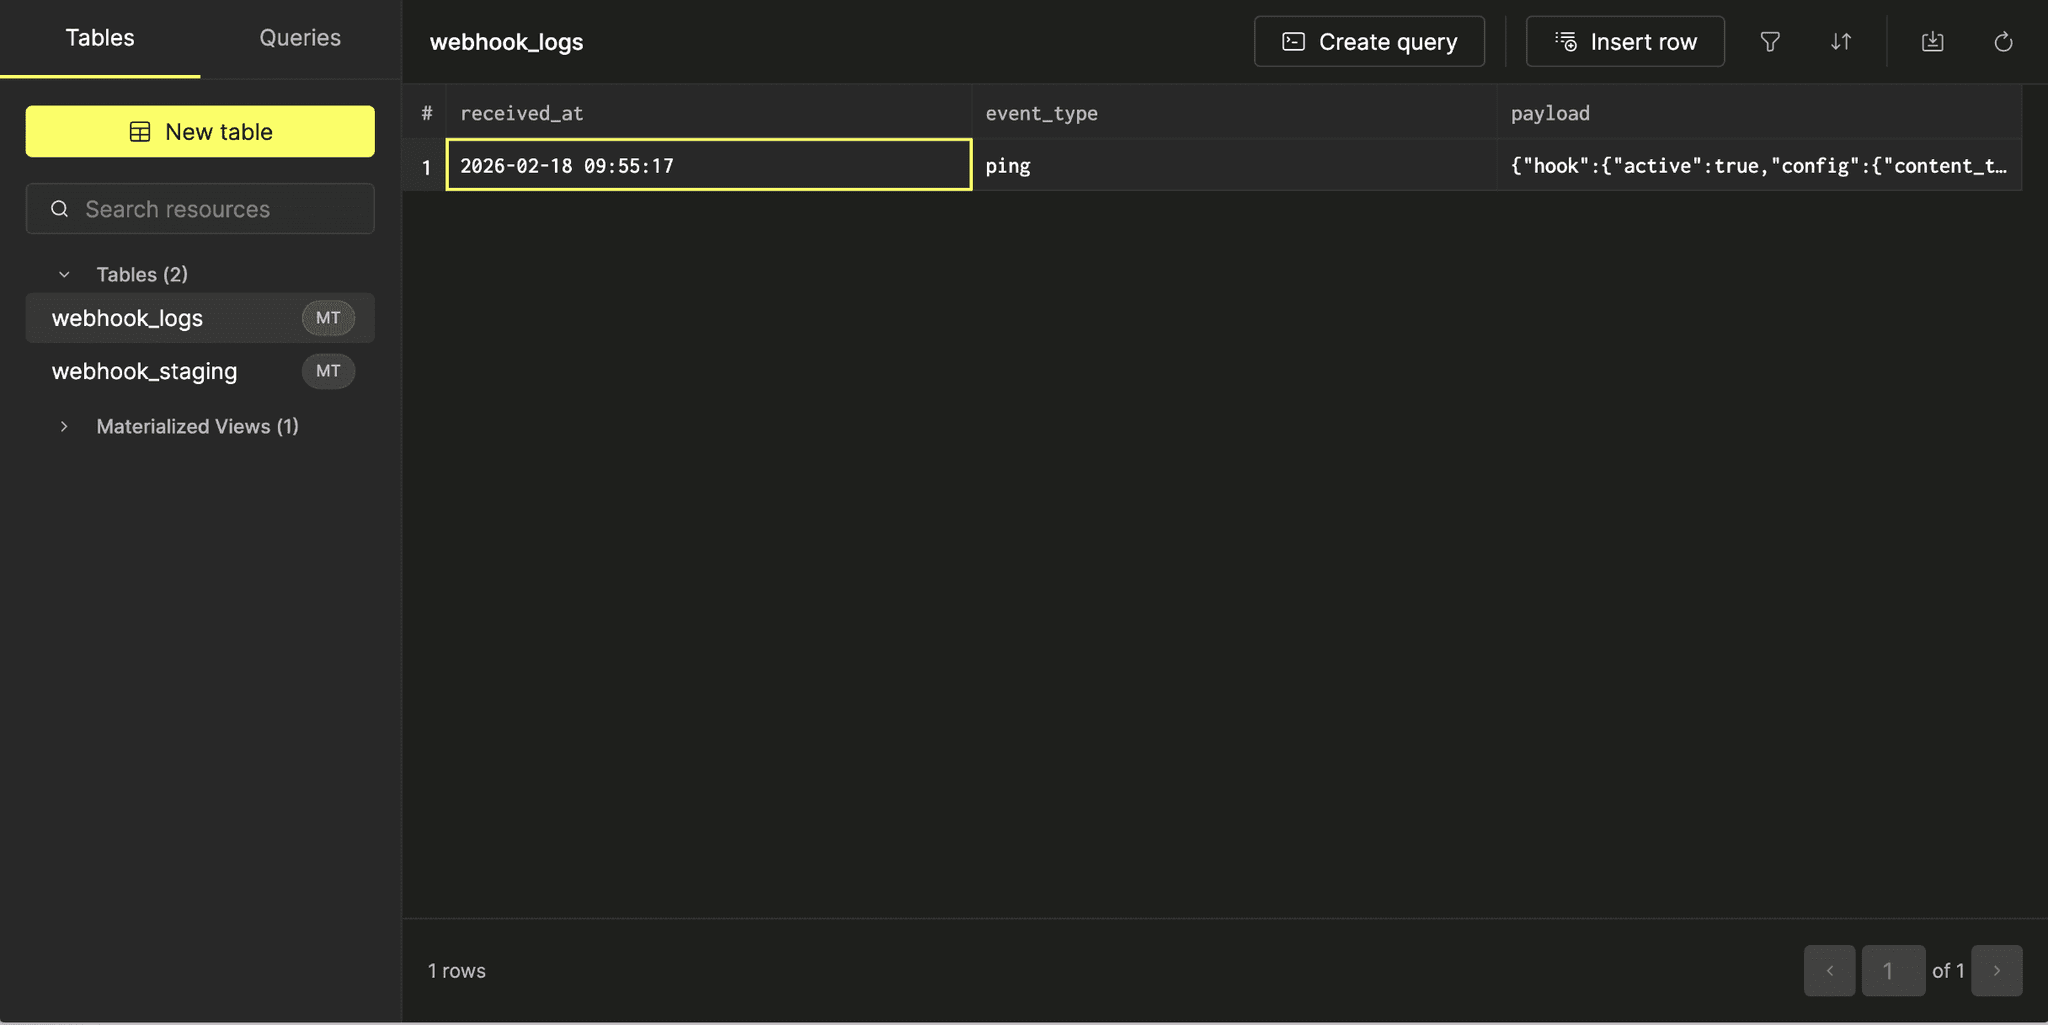
Verify it's working
We can then explore the contents of each table by clicking their name.
You should see the ping event in both, which confirms the HMAC validation passed. Now make a change to your repository -commit to a branch, open a PR, merge it -and push events will appear in both tables.
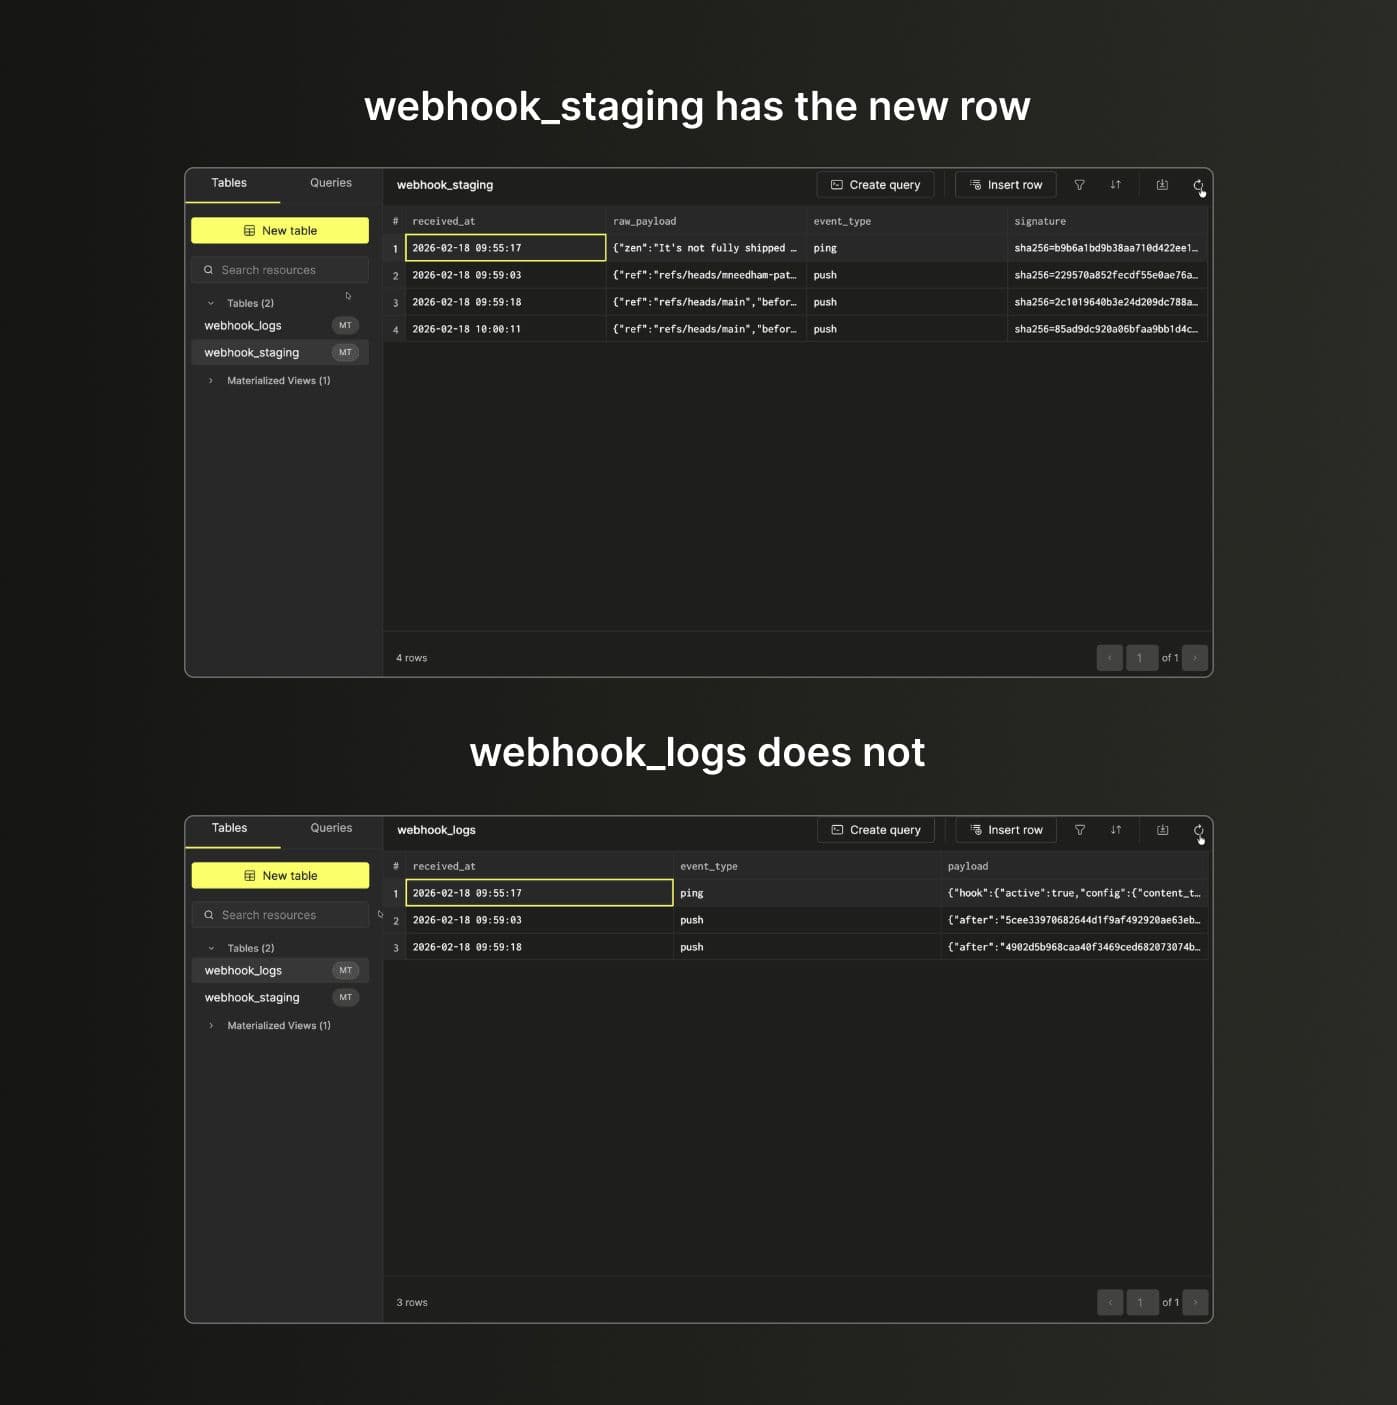
Testing signature validation
To confirm the validation is working, go back to GitHub, change the webhook secret to something different, then make another commit.
webhook_staging will have the new rows but webhook_logs won't - the materialized view computed a different HMAC and filtered them out.
Ready to create your own webhook endoint?
Interested in seeing how ClickHouse works on your data? Get started with ClickHouse Cloud in minutes and receive $300 in free credits.
Sign up