> ## Documentation Index
> Fetch the complete documentation index at: https://clickhouse.com/docs/llms.txt
> Use this file to discover all available pages before exploring further.
> 用于连接到 ClickHouse 的官方 JavaScript 客户端。
# ClickHouse JS
用于连接 ClickHouse 的官方 JavaScript 客户端。
该客户端使用 TypeScript 编写,并为客户端公开 API 提供类型定义。
它无任何依赖项,针对极致性能进行了优化,并已在多种 ClickHouse 版本和配置下完成测试 (本地部署单节点、本地部署集群以及 ClickHouse Cloud) 。
针对不同环境,提供了两个不同版本的客户端:
* `@clickhouse/client` - 仅限 Node.js
* `@clickhouse/client-web` - 浏览器 (Chrome/Firefox) 、Cloudflare workers
使用 TypeScript 时,请确保版本至少为 [4.5](https://www.typescriptlang.org/docs/handbook/release-notes/typescript-4-5.html),该版本支持[内联 import 和 export 语法](https://www.typescriptlang.org/docs/handbook/release-notes/typescript-4-5.html#type-modifiers-on-import-names)。
客户端源代码可在 [ClickHouse-JS GitHub 仓库](https://github.com/ClickHouse/clickhouse-js) 中获取。
**AI 智能体技能**
JavaScript 客户端附带了 AI 智能体技能,可帮助编程智能体使用该客户端。安装方式如下:
```sh theme={null}
npm skills add ClickHouse/clickhouse-js
```
## 环境要求 (Node.js)
运行客户端的环境中必须提供 Node.js。
该客户端兼容所有仍在维护中的 [Node.js 发行版](https://github.com/nodejs/release#readme)。
一旦某个 Node.js 版本接近生命周期结束,客户端就会停止对其提供支持,因为这类版本会被视为过期且不安全。
当前 Node.js 版本支持情况:
| Node.js 版本 | 是否支持? |
| ---------- | ----- |
| 24.x | ✔ |
| 22.x | ✔ |
| 20.x | ✔ |
| 18.x | 尽力支持 |
## 环境要求 (Web)
该客户端的 Web 版本已在最新版 Chrome/Firefox 浏览器中经过官方测试,并且可作为依赖项用于例如 React/Vue/Angular 应用程序或 Cloudflare workers。
## 安装
要安装最新版的稳定版 Node.js 客户端,请运行:
```sh theme={null}
npm i @clickhouse/client
```
Web 版安装:
```sh theme={null}
npm i @clickhouse/client-web
```
## 与 ClickHouse 的兼容性
| 客户端版本 | ClickHouse |
| ------ | ---------- |
| 1.12.0 | 24.8+ |
该客户端很可能也能在更早的版本上运行;不过,这类支持仅为尽力而为,不作保证。如果你使用的 ClickHouse 版本早于 23.3,请参阅 [ClickHouse 安全策略](https://github.com/ClickHouse/ClickHouse/blob/master/SECURITY.md) 并考虑升级。
## 示例
我们希望通过客户端代码仓库中的 [示例](https://github.com/ClickHouse/clickhouse-js/blob/main/examples),涵盖客户端使用的各种场景。
概览请参见 [examples README](https://github.com/ClickHouse/clickhouse-js/blob/main/examples/README.md#overview)。
如果示例或下文档中的某些内容不清楚,或有所遗漏,欢迎随时[联系我们](/docs/zh/integrations/language-clients/js/index#contact-us)。
### 客户端 API
除非明确另有说明,否则大多数示例同时适用于 Node.js 版和 Web 版客户端。
#### 创建客户端实例
你可以使用 `createClient` 工厂按需创建任意数量的客户端实例:
```ts theme={null}
import { createClient } from '@clickhouse/client' // or '@clickhouse/client-web'
const client = createClient({
/* configuration */
})
```
如果您的环境不支持 ESM 模块,也可以改用 CJS 语法:
```ts theme={null}
const { createClient } = require('@clickhouse/client');
const client = createClient({
/* configuration */
})
```
客户端实例可在实例化时进行[预配置](/docs/zh/integrations/language-clients/js/index#configuration)。
#### 配置
创建客户端实例时,可以调整以下连接设置:
| Setting | Description | Default Value | See Also | |
| ------------------------------------------------------------------------ | ------------------------------------------ | -------------------------- | -------------------------------------------------------------------------------------------- | ------------------------------------------------------------------------------------------------------ |
| **url**?: string | ClickHouse 实例的 URL。 | `http://localhost:8123` | [URL 配置文档](/docs/zh/integrations/language-clients/js/index#url-configuration) | |
| **pathname**?: string | 可选路径名,客户端解析 ClickHouse URL 后会将其附加到 URL 之后。 | `''` | [带路径名的代理文档](/docs/zh/integrations/language-clients/js/index#proxy-with-a-pathname) | |
| **request\_timeout**?: number | 请求超时时间 (毫秒) 。 | `30_000` | - | |
| **compression**?: `{ **response**?: boolean; **request**?: boolean }` | 启用压缩。 | - | [压缩文档](/docs/zh/integrations/language-clients/js/index#compression) | |
| **username**?: string | 发出请求时所代表的用户名。 | `default` | - | |
| **password**?: string | 用户密码。 | `''` | - | |
| **application**?: string | 使用 Node.js 客户端的应用程序名称。 | `clickhouse-js` | - | |
| **database**?: string | 要使用的数据库名称。 | `default` | - | |
| **clickhouse\_settings**?: ClickHouseSettings | 应用于所有请求的 ClickHouse settings。 | `{}` | - | |
| **log**?: `{ **LoggerClass**?: Logger, **level**?: ClickHouseLogLevel }` | 客户端内部日志配置。 | - | [日志文档](/docs/zh/integrations/language-clients/js/index#logging-nodejs-only) | |
| **session\_id**?: string | 可选的 ClickHouse 会话 ID,会随每个请求一起发送。 | - | - | |
| **keep\_alive**?: `{ **enabled**?: boolean }` | 在 Node.js 和 Web 版本中默认启用。 | - | - | |
| **http\_headers**?: `Record` | 发往 ClickHouse 请求的附加 HTTP 请求头。 | - | [带身份验证的反向代理文档](/docs/zh/integrations/language-clients/js/index#reverse-proxy-with-authentication) | |
| **roles**?: string | string\[] | 要随发出请求附带的 ClickHouse 角色名称。 | - | [在 HTTP interface 中使用 roles](/docs/zh/concepts/features/interfaces/http#setting-role-with-query-parameters) |
#### Node.js 专用配置参数
| 设置 | 说明 | 默认值 | 另见 | |
| --------------------------------------------------------------------------------------------------- | ------------------------------------------------------------------------ | ------------------- | ------------------------------------------------------------------------------------------------------------------ | ----------------------------------------------------------------------------------------------------------- |
| **max\_open\_connections**?: number | 每个主机允许打开的最大套接字连接数。 | `10` | - | |
| **tls**?: `{ **ca_cert**: Buffer, **cert**?: Buffer, **key**?: Buffer }` | 配置 TLS 证书。 | - | [TLS 文档](/docs/zh/integrations/language-clients/js/index#tls-certificates-nodejs-only) | |
| **keep\_alive**?: `{ **enabled**?: boolean, **idle_socket_ttl**?: number }` | - | - | [Keep-Alive 文档](/docs/zh/integrations/language-clients/js/index#keep-alive-configuration-nodejs-only) | |
| **http\_agent**?: http.Agent | https.Agent
Experimental | 为客户端自定义 HTTP agent。 | - | [HTTP agent 文档](/docs/zh/integrations/language-clients/js/index#custom-httphttps-agent-experimental-nodejs-only) |
| **set\_basic\_auth\_header**?: boolean
Experimental | 将基本身份验证凭据设置到 `Authorization` 请求头中。 | `true` | [HTTP agent 文档中的此设置用法](/docs/zh/integrations/language-clients/js/index#custom-httphttps-agent-experimental-nodejs-only) | |
### URL 配置
URL 配置会*始终*覆盖硬编码的值,并且在这种情况下会记录一条警告日志。
大多数客户端实例参数都可以通过 URL 配置。URL 格式为 `http[s]://[username:password@]hostname:port[/database][?param1=value1¶m2=value2]`。在绝大多数情况下,某个参数的名称都对应其在配置选项接口中的路径,但也有少数例外。支持以下参数:
| Parameter | Type |
| ----------------------------------------- | ------------------------------------------------- |
| `pathname` | 任意字符串。 |
| `application_id` | 任意字符串。 |
| `session_id` | 任意字符串。 |
| `request_timeout` | 非负数。 |
| `max_open_connections` | 大于零的非负数。 |
| `compression_request` | 布尔值。见下文 (1) |
| `compression_response` | 布尔值。 |
| `log_level` | 允许的值:`OFF`、`TRACE`、`DEBUG`、`INFO`、`WARN`、`ERROR`。 |
| `keep_alive_enabled` | 布尔值。 |
| `clickhouse_setting_*` or `ch_*` | 见下文 (2) |
| `http_header_*` | 见下文 (3) |
| (仅限 Node.js) `keep_alive_idle_socket_ttl` | 非负数。 |
* (1) 对于布尔值,有效值为 `true`/`1` 和 `false`/`0`。
* (2) 任何带有 `clickhouse_setting_` 或 `ch_` 前缀的参数,都会移除该前缀,并将剩余部分添加到客户端的 `clickhouse_settings` 中。例如,`?ch_async_insert=1&ch_wait_for_async_insert=1` 等同于以下配置:
```ts theme={null}
createClient({
clickhouse_settings: {
async_insert: 1,
wait_for_async_insert: 1,
},
})
```
注意:`clickhouse_settings` 的布尔值在 URL 中应以 `1`/`0` 形式传递。
* (3) 与 (2) 类似,不过是用于 `http_header` 配置。例如,`?http_header_x-clickhouse-auth=foobar` 等价于:
```ts theme={null}
createClient({
http_headers: {
'x-clickhouse-auth': 'foobar',
},
})
```
### 建立连接
#### 获取连接信息
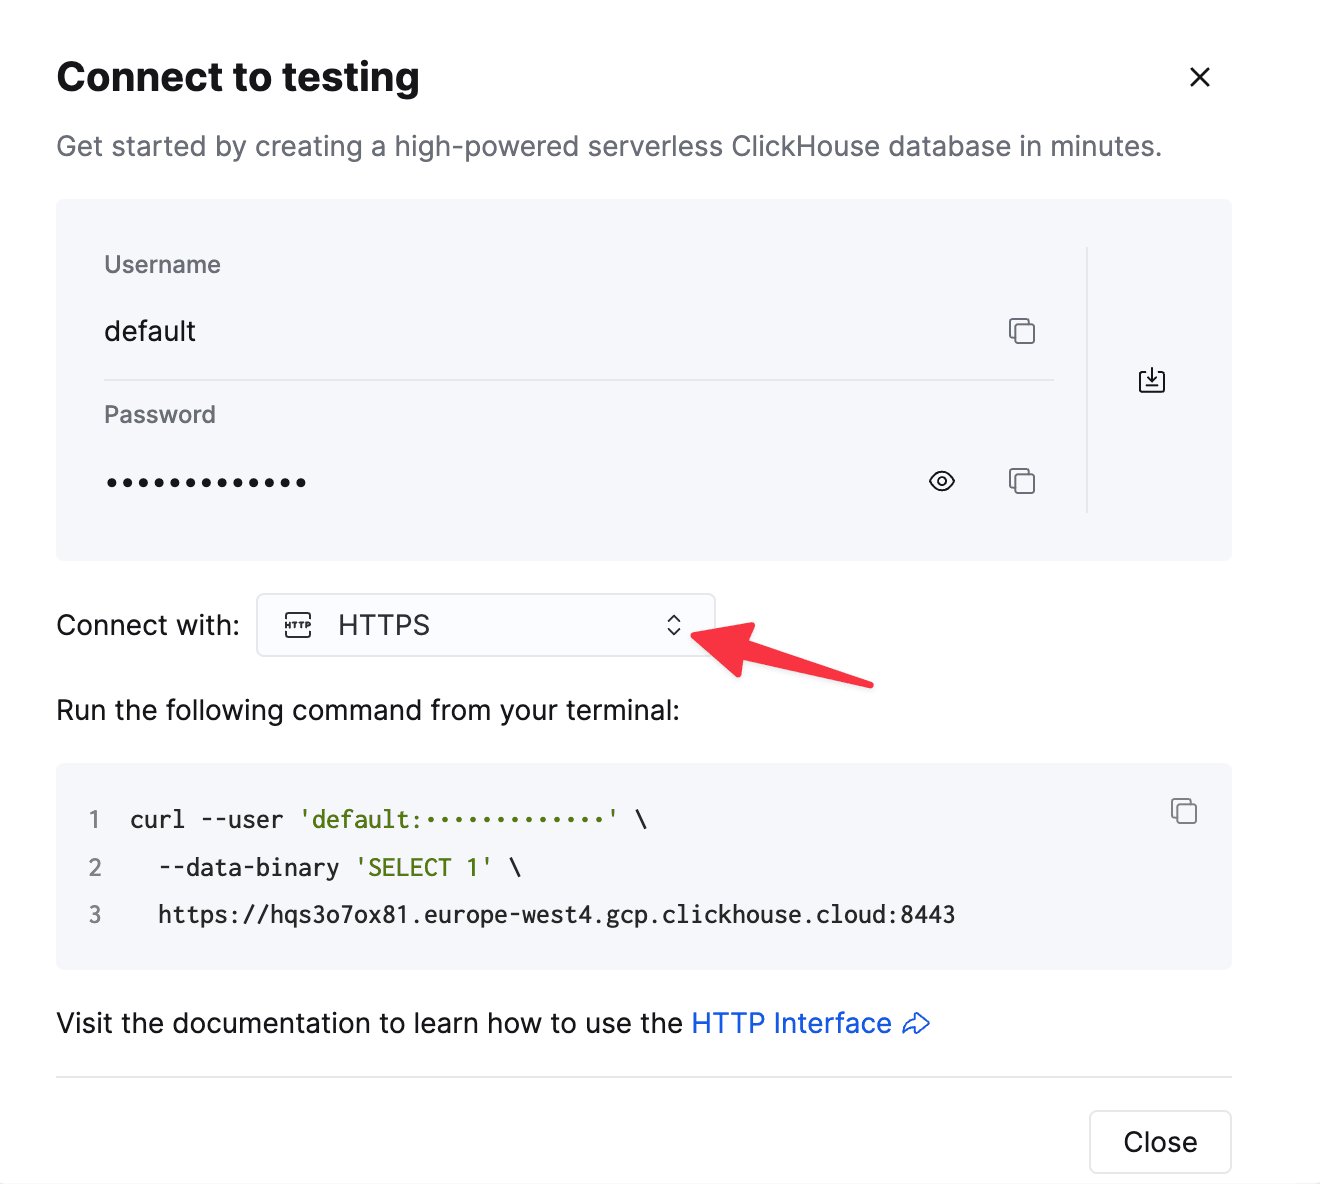
要通过 HTTP(S) 连接到 ClickHouse,你需要以下信息:
| Parameter(s) | Description |
| ------------------------- | ------------------------------------------ |
| `HOST` and `PORT` | 通常,使用 TLS 时端口为 8443;不使用 TLS 时端口为 8123。 |
| `DATABASE NAME` | 默认情况下,存在一个名为 `default` 的数据库。请使用你要连接的数据库名称。 |
| `USERNAME` and `PASSWORD` | 默认情况下,用户名为 `default`。请根据你的使用场景使用相应的用户名。 |
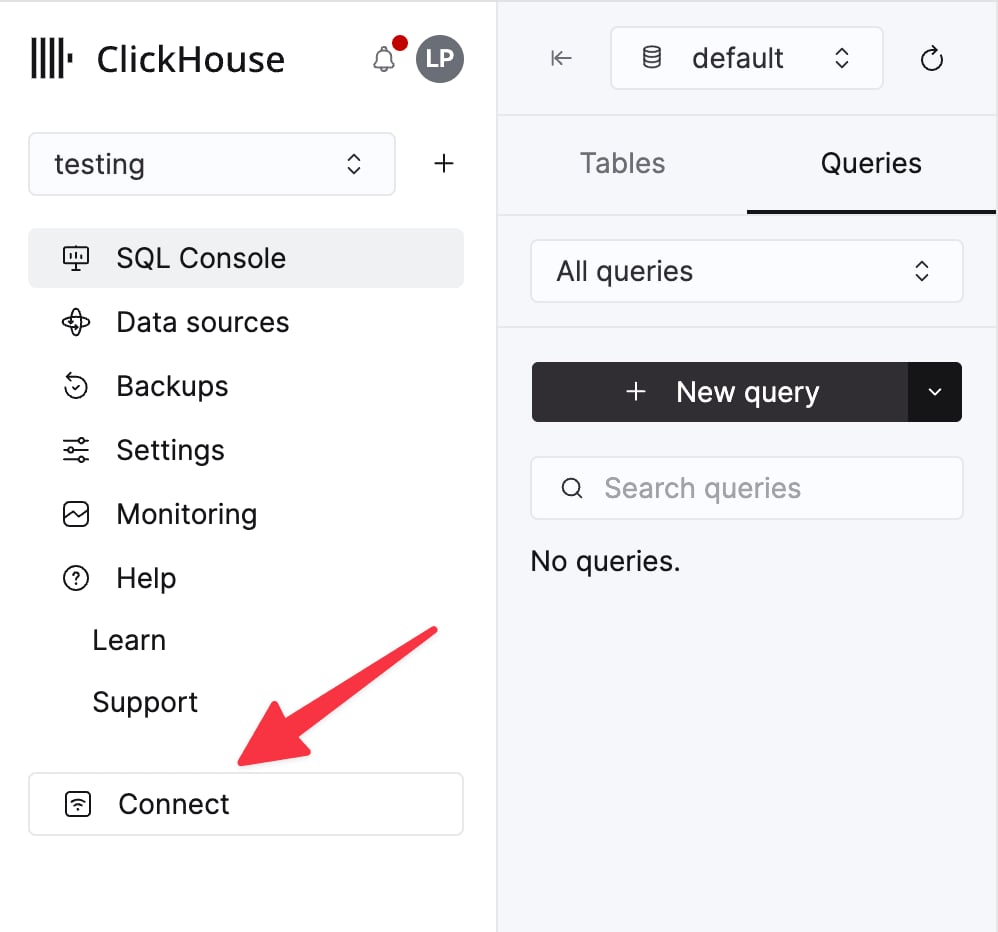
你的 ClickHouse Cloud 服务的连接信息可在 ClickHouse Cloud 控制台中查看。
选择一个服务,然后点击 **Connect**:
选择 **HTTPS**。连接信息会显示在示例 `curl` 命令中。
如果你使用的是自管理 ClickHouse,则连接信息由你的 ClickHouse 管理员配置。
#### 连接概览
该客户端通过 HTTP 或 HTTPS 协议进行连接。RowBinary 支持正在推进中,参见[相关 issue](https://github.com/ClickHouse/clickhouse-js/issues/216)。
以下示例演示了如何连接到 ClickHouse Cloud。示例假定已通过环境变量指定 `url` (包括
协议和端口) 和 `password` 值,并使用 `default` 用户。
\*\*示例:\*\*使用环境变量作为配置创建 Node.js 客户端实例。
```ts theme={null}
import { createClient } from '@clickhouse/client'
const client = createClient({
url: process.env.CLICKHOUSE_HOST ?? 'http://localhost:8123',
username: process.env.CLICKHOUSE_USER ?? 'default',
password: process.env.CLICKHOUSE_PASSWORD ?? '',
})
```
客户端代码仓库包含多个使用环境变量的示例,例如[在 ClickHouse Cloud 中创建表](https://github.com/ClickHouse/clickhouse-js/blob/main/examples/node/schema-and-deployments/create_table_cloud.ts)、[使用异步插入](https://github.com/ClickHouse/clickhouse-js/blob/main/examples/node/coding/async_insert.ts)等,还有不少其他示例。
#### 连接池 (仅限 Node.js)
为避免每次请求都建立连接带来的额外开销,客户端会创建一个到 ClickHouse 的连接池,利用 Keep-Alive 机制进行复用。默认情况下,Keep-Alive 处于启用状态,连接池大小设为 `10`,但你可以通过 `max_open_connections` [配置选项](/docs/zh/integrations/language-clients/js/index#configuration) 进行更改。
除非用户将 `max_open_connections` 设为 `1`,否则无法保证连接池中的同一个连接会用于后续查询。这种情况很少需要,但在用户使用临时表时可能是必需的。
另请参阅:[Keep-Alive 配置](/docs/zh/integrations/language-clients/js/index#keep-alive-configuration-nodejs-only)。
### 查询 ID
每个发送查询或语句的方法 (`command`、`exec`、`insert`、`select`) 都会在结果中返回 `query_id`。这个唯一标识符由客户端为每个查询分配;如果在[服务器配置](/docs/zh/reference/settings/server-settings/settings)中启用了 `system.query_log`,它可用于从中获取数据,
也可用于取消长时间运行的查询 (参见[该示例](https://github.com/ClickHouse/clickhouse-js/blob/main/examples/node/troubleshooting/cancel_query.ts)) 。如有需要,用户也可以在 `command`/`query`/`exec`/`insert` 方法的 params 中覆盖 `query_id`。
如果你要覆盖 `query_id` 参数,则需要确保它在每次调用时都是唯一的。随机 UUID 是一个不错的选择。
### Base parameters for all client methods
有几个参数适用于所有 client 方法 ([query](/docs/zh/integrations/language-clients/js/index#query-method)/[command](/docs/zh/integrations/language-clients/js/index#command-method)/[insert](/docs/zh/integrations/language-clients/js/index#insert-method)/[exec](/docs/zh/integrations/language-clients/js/index#exec-method)) 。
```ts theme={null}
interface BaseQueryParams {
// ClickHouse settings that can be applied on query level.
clickhouse_settings?: ClickHouseSettings
// Parameters for query binding.
query_params?: Record
// AbortSignal instance to cancel a query in progress.
abort_signal?: AbortSignal
// query_id override; if not specified, a random identifier will be generated automatically.
query_id?: string
// session_id override; if not specified, the session id will be taken from the client configuration.
session_id?: string
// credentials override; if not specified, the client's credentials will be used.
auth?: { username: string, password: string }
// A specific list of roles to use for this query. Overrides the roles set in the client configuration.
role?: string | Array
}
```
### 查询方法
该方法适用于大多数会返回响应的语句,例如 `SELECT`,也可用于发送 DDL 语句 (如 `CREATE TABLE`) ,并且应使用 await 等待其完成。返回的结果集应在应用程序中进行处理。
此外,还有专门用于插入数据的 [insert](/docs/zh/integrations/language-clients/js/index#insert-method) 方法,以及用于 DDL 语句的 [command](/docs/zh/integrations/language-clients/js/index#command-method) 方法。
```ts theme={null}
interface QueryParams extends BaseQueryParams {
// Query to execute that might return some data.
query: string
// Format of the resulting dataset. Default: JSON.
format?: DataFormat
}
interface ClickHouseClient {
query(params: QueryParams): Promise
}
```
另请参见:[Base parameters for all client methods](/docs/zh/integrations/language-clients/js/index#base-parameters-for-all-client-methods)。
请勿在 `query` 中指定 FORMAT 子句,请改用 `format` 参数。
#### 结果集和行抽象
`ResultSet` 提供了多种便捷方法,便于在应用程序中处理数据。
Node.js 中的 `ResultSet` 实现底层使用 `Stream.Readable`,而 Web 版本使用 Web API `ReadableStream`。
你可以在 `ResultSet` 上调用 `text` 或 `json` 方法来消费 `ResultSet`,并将查询返回的全部行加载到内存中。
你应尽早开始消费 `ResultSet`,因为它会保持响应流处于打开状态,从而使底层连接始终处于忙碌状态。客户端不会缓冲传入的数据,以避免应用程序出现过高的内存占用。
或者,如果数据量太大,无法一次全部装入内存,你可以调用 `stream` 方法,以流式模式处理数据。这样,响应中的每个 chunk 都会被转换为一个相对较小的行数组 (该数组的大小取决于客户端从服务端接收到的特定 chunk 的大小——这可能会变化——以及单行的大小) ,并逐个 chunk 进行处理。
请参阅[支持的数据格式](/docs/zh/integrations/language-clients/js/index#supported-data-formats)列表,以确定哪种格式最适合你的流式场景。例如,如果你想流式传输 JSON 对象,可以选择 [JSONEachRow](/docs/zh/reference/formats/JSON/JSONEachRow),这样每一行都会被解析为一个 JS 对象;或者,也可以选择更紧凑的 [JSONCompactColumns](/docs/zh/reference/formats/JSON/JSONCompactColumns) 格式,这样每一行都会成为一个紧凑的值数组。另请参见:[streaming files](/docs/zh/integrations/language-clients/js/index#streaming-files-nodejs-only)。
如果 `ResultSet` 或其 stream 未被完全消费,则会在空闲超过 `request_timeout` 后被销毁。
```ts theme={null}
interface BaseResultSet {
// See "Query ID" section above
query_id: string
// Consume the entire stream and get the contents as a string
// Can be used with any DataFormat
// Should be called only once
text(): Promise
// Consume the entire stream and parse the contents as a JS object
// Can be used only with JSON formats
// Should be called only once
json(): Promise
// Returns a readable stream for responses that can be streamed
// Every iteration over the stream provides an array of Row[] in the selected DataFormat
// Should be called only once
stream(): Stream
}
interface Row {
// Get the content of the row as a plain string
text: string
// Parse the content of the row as a JS object
json(): T
}
```
**示例:** (Node.js/Web) 一个查询示例:结果数据集采用 `JSONEachRow` 格式,读取整个流,并将内容解析为 JS 对象。
[源代码](https://github.com/ClickHouse/clickhouse-js/blob/main/examples/node/coding/array_json_each_row.ts)。
```ts theme={null}
const resultSet = await client.query({
query: 'SELECT * FROM my_table',
format: 'JSONEachRow',
})
const dataset = await resultSet.json() // or `row.text` to avoid parsing JSON
```
**示例:** (仅适用于 Node.js) 使用经典的 `on('data')` 方式,以 `JSONEachRow` 格式流式处理查询结果。这种方式可与 `for await const` 语法互换使用。[源代码](https://github.com/ClickHouse/clickhouse-js/blob/main/examples/node/performance/select_streaming_json_each_row.ts)。
```ts theme={null}
const rows = await client.query({
query: 'SELECT number FROM system.numbers_mt LIMIT 5',
format: 'JSONEachRow', // or JSONCompactEachRow, JSONStringsEachRow, etc.
})
const stream = rows.stream()
stream.on('data', (rows: Row[]) => {
rows.forEach((row: Row) => {
console.log(row.json()) // or `row.text` to avoid parsing JSON
})
})
await new Promise((resolve, reject) => {
stream.on('end', () => {
console.log('Completed!')
resolve(0)
})
stream.on('error', reject)
})
```
**示例:** (仅限 Node.js) 使用经典的 `on('data')` 方式,以 `CSV` 格式流式处理查询结果。这与 `for await const` 语法可以互换使用。
[源代码](https://github.com/ClickHouse/clickhouse-js/blob/main/examples/node/performance/select_streaming_text_line_by_line.ts)
```ts theme={null}
const resultSet = await client.query({
query: 'SELECT number FROM system.numbers_mt LIMIT 5',
format: 'CSV', // or TabSeparated, CustomSeparated, etc.
})
const stream = resultSet.stream()
stream.on('data', (rows: Row[]) => {
rows.forEach((row: Row) => {
console.log(row.text)
})
})
await new Promise((resolve, reject) => {
stream.on('end', () => {
console.log('Completed!')
resolve(0)
})
stream.on('error', reject)
})
```
**示例:** (仅限 Node.js) 使用 `for await const` 语法,以 `JSONEachRow` 格式将流式查询结果作为 JS 对象进行消费。这可与经典的 `on('data')` 方式互换使用。
[源代码](https://github.com/ClickHouse/clickhouse-js/blob/main/examples/node/performance/select_streaming_json_each_row_for_await.ts).
```ts theme={null}
const resultSet = await client.query({
query: 'SELECT number FROM system.numbers LIMIT 10',
format: 'JSONEachRow', // or JSONCompactEachRow, JSONStringsEachRow, etc.
})
for await (const rows of resultSet.stream()) {
rows.forEach(row => {
console.log(row.json())
})
}
```
`for await const` 语法比 `on('data')` 方式所需的代码略少,但可能会对性能产生负面影响。
更多详情请参见 [Node.js 仓库中的这个 issue](https://github.com/nodejs/node/issues/31979)。
**示例:** (仅限 Web) 遍历对象 `ReadableStream`。
```ts theme={null}
const resultSet = await client.query({
query: 'SELECT * FROM system.numbers LIMIT 10',
format: 'JSONEachRow'
})
const reader = resultSet.stream().getReader()
while (true) {
const { done, value: rows } = await reader.read()
if (done) { break }
rows.forEach(row => {
console.log(row.json())
})
}
```
### Insert 方法
这是执行数据插入的主要方法。
```ts theme={null}
export interface InsertResult {
query_id: string
executed: boolean
}
interface ClickHouseClient {
insert(params: InsertParams): Promise
}
```
返回类型非常精简,因为我们不预期服务器会返回任何数据,并且会立即耗尽响应流。
如果向 insert 方法传入的是空数组,则 insert 语句不会发送到服务器;相反,该方法会立即返回 `{ query_id: '...', executed: false }`。在这种情况下,如果没有在方法参数 `params` 中提供 `query_id`,那么结果中的它将是空字符串,因为返回由客户端生成的随机 UUID 可能会造成混淆——毕竟,带有该 `query_id` 的查询并不存在于 `system.query_log` 表中。
如果 insert 语句已发送到服务器,则 `executed` 将为 `true`。
#### Node.js 中的 Insert 方法 与流式传输
根据为 `insert` 方法指定的[数据格式](/docs/zh/integrations/language-clients/js/index#supported-data-formats),它既可以接受 `Stream.Readable`,也可以接受普通的 `Array`。另请参阅关于[文件流式传输](/docs/zh/integrations/language-clients/js/index#streaming-files-nodejs-only)的这一节。
通常应使用 `await` 等待 Insert 方法;不过,也可以先指定一个输入流,等到流完成后再等待 `insert` 操作 (这也会使 `insert` promise resolve) 。这在事件监听器及类似场景中可能很有用,但错误处理并不简单,而且客户端会有很多边界情况需要处理。作为替代方案,建议考虑使用[异步插入](/docs/zh/concepts/features/operations/insert/asyncinserts),如[此示例](https://github.com/ClickHouse/clickhouse-js/blob/main/examples/node/performance/async_insert_without_waiting.ts)所示。
如果你有自定义的 INSERT 语句,而此方法难以表达这种场景,可以考虑使用 [command method](/docs/zh/integrations/language-clients/js/index#command-method)。
你可以在 [INSERT INTO ... VALUES](https://github.com/ClickHouse/clickhouse-js/blob/main/examples/node/coding/insert_values_and_functions.ts) 或 [INSERT INTO ... SELECT](https://github.com/ClickHouse/clickhouse-js/blob/main/examples/node/coding/insert_from_select.ts) 示例中查看其用法。
```ts theme={null}
interface InsertParams extends BaseQueryParams {
// Table name to insert the data into
table: string
// A dataset to insert.
values: ReadonlyArray | Stream.Readable
// Format of the dataset to insert.
format?: DataFormat
// Allows to specify which columns the data will be inserted into.
// - An array such as `['a', 'b']` will generate: `INSERT INTO table (a, b) FORMAT DataFormat`
// - An object such as `{ except: ['a', 'b'] }` will generate: `INSERT INTO table (* EXCEPT (a, b)) FORMAT DataFormat`
// By default, the data is inserted into all columns of the table,
// and the generated statement will be: `INSERT INTO table FORMAT DataFormat`.
columns?: NonEmptyArray | { except: NonEmptyArray }
}
```
另请参见:[Base parameters for all client methods](/docs/zh/integrations/language-clients/js/index#base-parameters-for-all-client-methods)。
使用 `abort_signal` 取消请求时,并不能保证数据未被插入,因为服务器可能在取消前已经接收了部分流式传输的数据。
**示例:** (Node.js/Web) 插入值数组。
[源代码](https://github.com/ClickHouse/clickhouse-js/blob/main/examples/node/coding/array_json_each_row.ts)。
```ts theme={null}
await client.insert({
table: 'my_table',
// structure should match the desired format, JSONEachRow in this example
values: [
{ id: 42, name: 'foo' },
{ id: 42, name: 'bar' },
],
format: 'JSONEachRow',
})
```
**示例:** (仅限 Node.js) 从 CSV 文件中以流方式插入数据。
[源代码](https://github.com/ClickHouse/clickhouse-js/blob/main/examples/node/performance/insert_file_stream_csv.ts)。另请参阅:[文件流式传输](/docs/zh/integrations/language-clients/js/index#streaming-files-nodejs-only)。
```ts theme={null}
await client.insert({
table: 'my_table',
values: fs.createReadStream('./path/to/a/file.csv'),
format: 'CSV',
})
```
**示例**:从 INSERT 语句中排除某些列。
假设有如下表定义:
```sql theme={null}
CREATE OR REPLACE TABLE mytable
(id UInt32, message String)
ENGINE MergeTree()
ORDER BY (id)
```
仅插入指定列:
```ts theme={null}
// Generated statement: INSERT INTO mytable (message) FORMAT JSONEachRow
await client.insert({
table: 'mytable',
values: [{ message: 'foo' }],
format: 'JSONEachRow',
// `id` column value for this row will be zero (default for UInt32)
columns: ['message'],
})
```
排除某些列:
```ts theme={null}
// Generated statement: INSERT INTO mytable (* EXCEPT (message)) FORMAT JSONEachRow
await client.insert({
table: tableName,
values: [{ id: 144 }],
format: 'JSONEachRow',
// `message` column value for this row will be an empty string
columns: {
except: ['message'],
},
})
```
更多详细信息,请参见[源代码](https://github.com/ClickHouse/clickhouse-js/blob/main/examples/node/coding/insert_exclude_columns.ts)。
**示例**:插入到与提供给 client 实例的数据库不同的数据库中。[源代码](https://github.com/ClickHouse/clickhouse-js/blob/main/examples/node/coding/insert_into_different_db.ts)。
```ts theme={null}
await client.insert({
table: 'mydb.mytable', // Fully qualified name including the database
values: [{ id: 42, message: 'foo' }],
format: 'JSONEachRow',
})
```
#### Web 版本限制
目前,`@clickhouse/client-web` 中的插入操作仅支持 `Array` 和 `JSON*` 格式。
由于浏览器兼容性欠佳,Web 版本目前尚不支持流式插入。
因此,Web 版本的 `InsertParams` 接口与 Node.js 版本略有不同,
因为 `values` 仅限使用 `ReadonlyArray` 类型:
```ts theme={null}
interface InsertParams extends BaseQueryParams {
// Table name to insert the data into
table: string
// A dataset to insert.
values: ReadonlyArray
// Format of the dataset to insert.
format?: DataFormat
// Allows to specify which columns the data will be inserted into.
// - An array such as `['a', 'b']` will generate: `INSERT INTO table (a, b) FORMAT DataFormat`
// - An object such as `{ except: ['a', 'b'] }` will generate: `INSERT INTO table (* EXCEPT (a, b)) FORMAT DataFormat`
// By default, the data is inserted into all columns of the table,
// and the generated statement will be: `INSERT INTO table FORMAT DataFormat`.
columns?: NonEmptyArray | { except: NonEmptyArray }
}
```
此内容今后可能会有所变动。另请参见:[Base parameters for all client methods](/docs/zh/integrations/language-clients/js/index#base-parameters-for-all-client-methods)。
### 命令方法
它可用于无任何输出的语句、`FORMAT` 子句不适用的情况,或者你根本不关心响应内容的情况。这类语句的一个示例是 `CREATE TABLE` 或 `ALTER TABLE`。
应使用 `await` 等待。
响应流会立即销毁,这意味着底层套接字会被释放。
```ts theme={null}
interface CommandParams extends BaseQueryParams {
// Statement to execute.
query: string
}
interface CommandResult {
query_id: string
}
interface ClickHouseClient {
command(params: CommandParams): Promise
}
```
另见:[Base parameters for all client methods](/docs/zh/integrations/language-clients/js/index#base-parameters-for-all-client-methods)。
**示例:** (Node.js/Web) 在 ClickHouse Cloud 中创建表。
[源代码](https://github.com/ClickHouse/clickhouse-js/blob/main/examples/node/schema-and-deployments/create_table_cloud.ts)。
```ts theme={null}
await client.command({
query: `
CREATE TABLE IF NOT EXISTS my_cloud_table
(id UInt64, name String)
ORDER BY (id)
`,
// Recommended for cluster usage to avoid situations where a query processing error occurred after the response code,
// and HTTP headers were already sent to the client.
// See https://clickhouse.com/docs/interfaces/http/#response-buffering
clickhouse_settings: {
wait_end_of_query: 1,
},
})
```
**示例:** (Node.js/Web) 在自托管的 ClickHouse 实例中创建表。
[源代码](https://github.com/ClickHouse/clickhouse-js/blob/main/examples/node/schema-and-deployments/create_table_single_node.ts).
```ts theme={null}
await client.command({
query: `
CREATE TABLE IF NOT EXISTS my_table
(id UInt64, name String)
ENGINE MergeTree()
ORDER BY (id)
`,
})
```
**示例:** (Node.js/Web) INSERT FROM SELECT
```ts theme={null}
await client.command({
query: `INSERT INTO my_table SELECT '42'`,
})
```
使用 `abort_signal` 取消请求,并不意味着服务器一定没有执行该语句。
### Exec 方法
如果你有不适合使用 `query`/`insert` 的自定义查询,
并且需要获取返回结果,可以使用 `exec` 来替代 `command`。
`exec` 会返回一个可读流,必须在应用程序端消费或销毁。
```ts theme={null}
interface ExecParams extends BaseQueryParams {
// Statement to execute.
query: string
}
interface ClickHouseClient {
exec(params: ExecParams): Promise
}
```
另请参见:[Base parameters for all client methods](/docs/zh/integrations/language-clients/js/index#base-parameters-for-all-client-methods)。
在 Node.js 版本和 Web 版本中,stream 的返回类型不同。
Node.js:
```ts theme={null}
export interface QueryResult {
stream: Stream.Readable
query_id: string
}
```
网页:
```ts theme={null}
export interface QueryResult {
stream: ReadableStream
query_id: string
}
```
### Ping
用于检查连接状态的 `ping` 方法会在服务器可达时返回 `true`。
如果服务器不可达,结果中也会包含底层错误。
```ts theme={null}
type PingResult =
| { success: true }
| { success: false; error: Error }
/** Parameters for the health-check request - using the built-in `/ping` endpoint.
* This is the default behavior for the Node.js version. */
export type PingParamsWithEndpoint = {
select: false
/** AbortSignal instance to cancel a request in progress. */
abort_signal?: AbortSignal
/** Additional HTTP headers to attach to this particular request. */
http_headers?: Record
}
/** Parameters for the health-check request - using a SELECT query.
* This is the default behavior for the Web version, as the `/ping` endpoint does not support CORS.
* Most of the standard `query` method params, e.g., `query_id`, `abort_signal`, `http_headers`, etc. will work,
* except for `query_params`, which does not make sense to allow in this method. */
export type PingParamsWithSelectQuery = { select: true } & Omit<
BaseQueryParams,
'query_params'
>
export type PingParams = PingParamsWithEndpoint | PingParamsWithSelectQuery
interface ClickHouseClient {
ping(params?: PingParams): Promise
}
```
Ping 可作为应用启动时检查服务器是否可用的实用方法,尤其是在 ClickHouse Cloud 中,实例可能处于空闲状态,并会在收到 ping 后唤醒:在这种情况下,你可能需要在每次重试之间加上延迟,并重试几次。
请注意,默认情况下,Node.js 版本使用 `/ping` 端点,而 Web 版本则使用简单的 `SELECT 1` 查询来达到类似效果,因为 `/ping` 端点不支持 CORS。
**示例:** (Node.js/Web) 对 ClickHouse 服务器实例执行一次简单的 ping。注意:对于 Web 版本,捕获到的错误会有所不同。
[源代码](https://github.com/ClickHouse/clickhouse-js/blob/main/examples/ping.ts)。
```ts theme={null}
const result = await client.ping();
if (!result.success) {
// process result.error
}
```
\*\*示例:\*\*如果你还想在调用 `ping` 方法时一并检查凭据,或指定额外参数 (如 `query_id`) ,可以按如下方式使用:
```ts theme={null}
const result = await client.ping({ select: true, /* query_id, abort_signal, http_headers, or any other query params */ });
```
`ping` 方法允许使用大多数标准 `query` 方法参数——请参见 `PingParamsWithSelectQuery` 类型定义。
### Close (仅限 Node.js)
关闭所有已打开的连接并释放资源。在 Web 版本中为空操作。
```ts theme={null}
await client.close()
```
## 文件流式传输 (仅限 Node.js)
客户端代码仓库中提供了多个使用常见数据格式 (NDJSON、CSV、Parquet) 的文件流式传输示例。
* [从 NDJSON 文件流式传输](https://github.com/ClickHouse/clickhouse-js/blob/main/examples/node/performance/insert_file_stream_ndjson.ts)
* [从 CSV 文件流式传输](https://github.com/ClickHouse/clickhouse-js/blob/main/examples/node/performance/insert_file_stream_csv.ts)
* [从 Parquet 文件流式传输](https://github.com/ClickHouse/clickhouse-js/blob/main/examples/node/performance/insert_file_stream_parquet.ts)
* [流式传输到 Parquet 文件](https://github.com/ClickHouse/clickhouse-js/blob/main/examples/node/performance/select_parquet_as_file.ts)
将其他格式流式传输到文件的方法应与 Parquet 类似,
唯一的区别在于 `query` 调用中使用的格式 (`JSONEachRow`、`CSV` 等) 以及输出文件名。
## 支持的数据格式
客户端可按 JSON 或文本格式处理数据。
如果你将 `format` 指定为 JSON 格式家族中的某一种 (`JSONEachRow`、`JSONCompactEachRow` 等) ,客户端会在传输过程中对数据进行序列化和反序列化。
以“原始”文本格式 (`CSV`、`TabSeparated` 和 `CustomSeparated` 家族) 提供的数据会在传输过程中直接发送,不做额外转换。
JSON 这一通用格式与 [ClickHouse JSON 格式](/docs/zh/reference/formats/JSON/JSON) 之间可能会让人混淆。
客户端支持使用 [JSONEachRow](/docs/zh/reference/formats/JSON/JSONEachRow) 等格式流式传输 JSON 对象 (其他适合流式处理的格式请参见下表;另请参见[客户端代码仓库](https://github.com/ClickHouse/clickhouse-js/tree/main/examples/node)中的 `select_streaming_` 示例) 。
只是像 [ClickHouse JSON](/docs/zh/reference/formats/JSON/JSON) 以及少数其他几种格式,在响应中会表示为单个对象,因此客户端无法对其进行流式处理。
| Format | Input (数组) | Input (对象) | Input/Output (Stream) | Output (JSON) | Output (文本) |
| ------------------------------------------ | ---------- | ---------- | --------------------- | ------------- | ----------- |
| JSON | ❌ | ✔️ | ❌ | ✔️ | ✔️ |
| JSONCompact | ❌ | ✔️ | ❌ | ✔️ | ✔️ |
| JSONObjectEachRow | ❌ | ✔️ | ❌ | ✔️ | ✔️ |
| JSONColumnsWithMetadata | ❌ | ✔️ | ❌ | ✔️ | ✔️ |
| JSONStrings | ❌ | ❌️ | ❌ | ✔️ | ✔️ |
| JSONCompactStrings | ❌ | ❌ | ❌ | ✔️ | ✔️ |
| JSONEachRow | ✔️ | ❌ | ✔️ | ✔️ | ✔️ |
| JSONEachRowWithProgress | ❌️ | ❌ | ✔️ ❗- 见下文 | ✔️ | ✔️ |
| JSONStringsEachRow | ✔️ | ❌ | ✔️ | ✔️ | ✔️ |
| JSONCompactEachRow | ✔️ | ❌ | ✔️ | ✔️ | ✔️ |
| JSONCompactStringsEachRow | ✔️ | ❌ | ✔️ | ✔️ | ✔️ |
| JSONCompactEachRowWithNames | ✔️ | ❌ | ✔️ | ✔️ | ✔️ |
| JSONCompactEachRowWithNamesAndTypes | ✔️ | ❌ | ✔️ | ✔️ | ✔️ |
| JSONCompactStringsEachRowWithNames | ✔️ | ❌ | ✔️ | ✔️ | ✔️ |
| JSONCompactStringsEachRowWithNamesAndTypes | ✔️ | ❌ | ✔️ | ✔️ | ✔️ |
| CSV | ❌ | ❌ | ✔️ | ❌ | ✔️ |
| CSVWithNames | ❌ | ❌ | ✔️ | ❌ | ✔️ |
| CSVWithNamesAndTypes | ❌ | ❌ | ✔️ | ❌ | ✔️ |
| TabSeparated | ❌ | ❌ | ✔️ | ❌ | ✔️ |
| TabSeparatedRaw | ❌ | ❌ | ✔️ | ❌ | ✔️ |
| TabSeparatedWithNames | ❌ | ❌ | ✔️ | ❌ | ✔️ |
| TabSeparatedWithNamesAndTypes | ❌ | ❌ | ✔️ | ❌ | ✔️ |
| CustomSeparated | ❌ | ❌ | ✔️ | ❌ | ✔️ |
| CustomSeparatedWithNames | ❌ | ❌ | ✔️ | ❌ | ✔️ |
| CustomSeparatedWithNamesAndTypes | ❌ | ❌ | ✔️ | ❌ | ✔️ |
| Parquet | ❌ | ❌ | ✔️ | ❌ | ✔️❗- 见下文 |
对于 Parquet,`selects` 的主要用例很可能是将结果流写入文件。请参见客户端代码仓库中的[示例](https://github.com/ClickHouse/clickhouse-js/blob/main/examples/node/performance/select_parquet_as_file.ts)。
`JSONEachRowWithProgress` 是一种仅用于输出的格式,支持在流中报告进度。更多详情请参见[此示例](https://github.com/ClickHouse/clickhouse-js/blob/main/examples/node/performance/select_json_each_row_with_progress.ts)。
ClickHouse 完整的输入和输出格式列表可在
[此处](/docs/zh/reference/formats/index)查看。
## 支持的 ClickHouse 数据类型
对应的 JS 类型适用于所有 `JSON*` 格式,但将所有内容都表示为字符串的格式除外 (例如 `JSONStringEachRow`) 。
| 类型 | 状态 | JS 类型 |
| ---------------------- | --------- | ----------------------- |
| UInt8/16/32 | ✔️ | number |
| UInt64/128/256 | ✔️ ❗- 见下文 | string |
| Int8/16/32 | ✔️ | number |
| Int64/128/256 | ✔️ ❗- 见下文 | string |
| Float32/64 | ✔️ | number |
| Decimal | ✔️ ❗- 见下文 | number |
| 布尔值 | ✔️ | boolean |
| String | ✔️ | string |
| FixedString | ✔️ | string |
| UUID | ✔️ | string |
| Date32/64 | ✔️ | string |
| DateTime32/64 | ✔️ ❗- 见下文 | string |
| 枚举 | ✔️ | string |
| LowCardinality | ✔️ | string |
| Array(T) | ✔️ | T\[] |
| (new) JSON | ✔️ | object |
| Variant(T1, T2...) | ✔️ | T (取决于具体变体) |
| Dynamic | ✔️ | T (取决于具体变体) |
| Nested | ✔️ | T\[] |
| Tuple(T1, T2, ...) | ✔️ | \[T1, T2, ...] |
| Tuple(n1 T1, n2 T2...) | ✔️ | \{ n1: T1; n2: T2; ...} |
| Nullable(T) | ✔️ | T 对应的 JS 类型或 null |
| IPv4 | ✔️ | string |
| IPv6 | ✔️ | string |
| Point | ✔️ | \[ number, number ] |
| Ring | ✔️ | Array\ |
| Polygon | ✔️ | Array\ |
| MultiPolygon | ✔️ | Array\ |
| Map(K, V) | ✔️ | Record\ |
| Time/Time64 | ✔️ | string |
完整的受支持 ClickHouse 格式列表可在
[此处](/docs/zh/reference/data-types/index)查看。
另请参阅:
* [Dynamic/Variant/JSON 使用示例](https://github.com/ClickHouse/clickhouse-js/blob/main/examples/node/coding/dynamic_variant_json.ts)
* [Time/Time64 使用示例](https://github.com/ClickHouse/clickhouse-js/blob/main/examples/node/coding/time_time64.ts)
### Date/Date32 类型注意事项
由于客户端在插入值时不会进行额外的类型转换,因此 `Date`/`Date32` 类型的列只能以
字符串形式插入。
**示例:** 插入一个 `Date` 类型的值。
[源代码](https://github.com/ClickHouse/clickhouse-js/blob/ba387d7f4ce375a60982ac2d99cb47391cf76cec/__tests__/integration/date_time.test.ts)
```ts theme={null}
await client.insert({
table: 'my_table',
values: [ { date: '2022-09-05' } ],
format: 'JSONEachRow',
})
```
不过,如果你使用的是 `DateTime` 或 `DateTime64` 列,也可以同时使用字符串和 JS Date 对象。将 `date_time_input_format` 设为 `best_effort` 时,JS Date 对象可直接按原样传递给 `insert`。更多详情请参见此[示例](https://github.com/ClickHouse/clickhouse-js/blob/main/examples/node/coding/insert_js_dates.ts)。
### Decimal\* 类型注意事项
可以使用 `JSON*` 家族格式插入 Decimal 类型。假设我们定义了如下表:
```sql theme={null}
CREATE TABLE my_table
(
id UInt32,
dec32 Decimal(9, 2),
dec64 Decimal(18, 3),
dec128 Decimal(38, 10),
dec256 Decimal(76, 20)
)
ENGINE MergeTree()
ORDER BY (id)
```
我们可以使用字符串表示形式插入值,以避免精度损失:
```ts theme={null}
await client.insert({
table: 'my_table',
values: [{
id: 1,
dec32: '1234567.89',
dec64: '123456789123456.789',
dec128: '1234567891234567891234567891.1234567891',
dec256: '12345678912345678912345678911234567891234567891234567891.12345678911234567891',
}],
format: 'JSONEachRow',
})
```
但是,在以 `JSON*` 格式查询数据时,ClickHouse 默认会将 Decimal 以*数值*形式返回,这可能会导致精度丢失。为避免这种情况,可以在查询中将 Decimal 转换为 String:
```ts theme={null}
await client.query({
query: `
SELECT toString(dec32) AS decimal32,
toString(dec64) AS decimal64,
toString(dec128) AS decimal128,
toString(dec256) AS decimal256
FROM my_table
`,
format: 'JSONEachRow',
})
```
更多详情请参见[此示例](https://github.com/ClickHouse/clickhouse-js/blob/main/examples/node/coding/insert_decimals.ts)。
### 整数类型:Int64、Int128、Int256、UInt64、UInt128、UInt256
虽然 server 可以将其作为数值接收,但在 `JSON*` 家族的输出格式中,为避免整数溢出,它会以字符串形式返回,
因为这些类型的最大值大于 `Number.MAX_SAFE_INTEGER`。
不过,可以通过
[`output_format_json_quote_64bit_integers` 设置](/docs/zh/reference/settings/formats#output_format_json_quote_64bit_integers)
修改这一行为。
\*\*示例:\*\*调整 64 位数值的 JSON 输出格式。
```ts theme={null}
const resultSet = await client.query({
query: 'SELECT * from system.numbers LIMIT 1',
format: 'JSONEachRow',
})
expect(await resultSet.json()).toEqual([ { number: '0' } ])
```
```ts theme={null}
const resultSet = await client.query({
query: 'SELECT * from system.numbers LIMIT 1',
format: 'JSONEachRow',
clickhouse_settings: { output_format_json_quote_64bit_integers: 0 },
})
expect(await resultSet.json()).toEqual([ { number: 0 } ])
```
## ClickHouse 设置
客户端可以通过 [设置](/docs/zh/reference/settings/session-settings)
机制来调整 ClickHouse 的行为。
这些设置可以在客户端实例级别进行配置,从而应用于发送到
ClickHouse 的每个请求:
```ts theme={null}
const client = createClient({
clickhouse_settings: {}
})
```
或者,也可以在请求级别配置某项设置:
```ts theme={null}
client.query({
clickhouse_settings: {}
})
```
包含所有受支持的 ClickHouse 设置 的类型声明文件可在
[此处](https://github.com/ClickHouse/clickhouse-js/blob/main/packages/client-common/src/settings.ts)查看。
请确保代表其执行查询的用户拥有足够的权限来更改这些设置。
## 进阶主题
### 带参数的查询
您可以创建带参数的查询,并从客户端应用程序传入参数值。这样可以避免在客户端侧
使用特定的动态值拼接查询。
像往常一样编写查询,然后将希望从应用程序参数传递给查询的值放在花括号中,格式
如下:
```text theme={null}
{: }
```
其中:
* `name` — 占位标识符。
* `data_type` - 应用参数值的[数据类型](/docs/zh/reference/data-types/index)。
**示例:** 带参数的查询。
[源代码](https://github.com/ClickHouse/clickhouse-js/blob/main/examples/node/coding/query_with_parameter_binding.ts)
。
```ts theme={null}
await client.query({
query: 'SELECT plus({val1: Int32}, {val2: Int32})',
format: 'CSV',
query_params: {
val1: 10,
val2: 20,
},
})
```
更多详情,请参阅 [https://clickhouse.com/docs/interfaces/cli#cli-queries-with-parameters-syntax。](https://clickhouse.com/docs/interfaces/cli#cli-queries-with-parameters-syntax。)
### 压缩
注意:Web 版本目前不支持请求压缩。响应压缩可正常工作。Node.js 版本两者都支持。
对于通过网络传输大型数据集的数据应用,启用压缩会带来明显收益。目前仅支持通过 [zlib](https://nodejs.org/docs/latest-v14.x/api/zlib.html) 使用 `GZIP`。
```typescript theme={null}
createClient({
compression: {
response: true,
request: true
}
})
```
配置参数如下:
* `response: true` 表示 ClickHouse 服务器会返回压缩后的响应体。默认值:`response: false`
* `request: true` 启用客户端请求体压缩。默认值:`request: false`
### 日志 (仅限 Node.js)
日志功能属于 Experimental 功能,未来可能会发生变化。
默认的日志记录器实现会通过 `console.debug/info` 方法将日志记录输出到 `stdout`,并通过 `console.warn/error` 方法输出到 `stderr`。
你可以通过提供 `LoggerClass` 来自定义日志逻辑,并通过 `level` 参数选择所需的日志级别 (默认为 `WARN`) :
```typescript theme={null}
import type { Logger } from '@clickhouse/client'
// All three LogParams types are exported by the client
interface LogParams {
module: string
message: string
args?: Record
}
type ErrorLogParams = LogParams & { err: Error }
type WarnLogParams = LogParams & { err?: Error }
class MyLogger implements Logger {
trace({ module, message, args }: LogParams) {
// ...
}
debug({ module, message, args }: LogParams) {
// ...
}
info({ module, message, args }: LogParams) {
// ...
}
warn({ module, message, args }: WarnLogParams) {
// ...
}
error({ module, message, args, err }: ErrorLogParams) {
// ...
}
}
const client = createClient({
log: {
LoggerClass: MyLogger,
level: ClickHouseLogLevel.DEBUG,
}
})
```
当前,客户端会记录以下事件:
* `TRACE` - 有关 Keep-Alive 套接字生命周期的底层信息
* `DEBUG` - 响应信息 (不包含授权请求头和主机信息)
* `INFO` - 基本不用,会在客户端初始化时输出当前日志级别
* `WARN` - 非致命错误;失败的 `ping` 请求会记录为 warning,因为底层错误已包含在返回结果中
* `ERROR` - `query`/`insert`/`exec`/`command` 方法中的致命错误,例如请求失败
你可以在[这里](https://github.com/ClickHouse/clickhouse-js/blob/main/packages/client-common/src/logger.ts)找到默认的日志记录器实现。
### TLS 证书 (仅限 Node.js)
Node.js 客户端可选择支持基本 TLS (仅 CA)
和双向 TLS (CA 和客户端证书) 。
基本 TLS 配置示例,假设你的证书位于 `certs` 文件夹中,
且 CA 文件名为 `CA.pem`:
```ts theme={null}
const client = createClient({
url: 'https://:',
username: '',
password: '', // if required
tls: {
ca_cert: fs.readFileSync('certs/CA.pem'),
},
})
```
使用客户端证书的双向 TLS 配置示例:
```ts theme={null}
const client = createClient({
url: 'https://:',
username: '',
tls: {
ca_cert: fs.readFileSync('certs/CA.pem'),
cert: fs.readFileSync(`certs/client.crt`),
key: fs.readFileSync(`certs/client.key`),
},
})
```
请在仓库中查看 [基本](https://github.com/ClickHouse/clickhouse-js/blob/main/examples/node/security/basic_tls.ts) 和 [双向](https://github.com/ClickHouse/clickhouse-js/blob/main/examples/node/security/mutual_tls.ts) TLS 的完整示例。
### Keep-alive 配置 (仅限 Node.js)
默认情况下,客户端会在底层 HTTP agent 中启用 Keep-Alive,这意味着已建立连接的套接字会复用于后续请求,并发送 `Connection: keep-alive` 请求头。默认情况下,空闲套接字会在连接池中保留 2500 毫秒 (请参阅[关于如何调整此选项的说明](/docs/zh/integrations/language-clients/js/index#adjusting-idle_socket_ttl)) 。
`keep_alive.idle_socket_ttl` 的值应明显低于服务器/LB 的配置。主要原因是,HTTP/1.1 允许服务器在不通知客户端的情况下关闭套接字;如果服务器或负载均衡器先于客户端关闭连接,客户端可能会尝试复用这个已关闭的套接字,从而导致 `socket hang up` 错误。
如果你要修改 `keep_alive.idle_socket_ttl`,请记住,它应始终与服务器/LB 的 Keep-Alive 配置相匹配,并且必须**始终更低**,以确保服务器不会先关闭仍处于打开状态的连接。
#### 调整 `idle_socket_ttl`
客户端将 `keep_alive.idle_socket_ttl` 设置为 2500 毫秒,因为这通常可以视为最稳妥的默认值;服务端的 `keep_alive_timeout` 在[23.11 之前的 ClickHouse 版本中甚至可能低至 3 秒](https://github.com/ClickHouse/ClickHouse/commit/1685cdcb89fe110b45497c7ff27ce73cc03e82d1),且无需修改 `config.xml`。
如果你对当前性能满意且没有遇到任何问题,建议**不要**调大 `keep_alive.idle_socket_ttl` 的值,因为这可能会导致潜在的“Socket hang-up”错误;另外,如果你的应用程序会发送大量查询,并且查询之间的间隔不长,那么默认值通常已经足够,因为这些套接字不会空闲太久,客户端会将它们保留在连接池中。
你可以运行以下命令,从服务端响应请求头中找到正确的 Keep-Alive 超时值:
```sh theme={null}
curl -is --data-binary "SELECT 1"
```
查看响应中 `Connection` 和 `Keep-Alive` 请求头的值。例如:
```text theme={null}
Connection: Keep-Alive
Keep-Alive: timeout=10
```
在这种情况下,`keep_alive_timeout` 为 10 秒,你可以尝试将 `keep_alive.idle_socket_ttl` 提高到 9000 甚至 9500 毫秒,让空闲套接字保持打开状态的时间比默认情况下稍长一些。请留意可能出现的 "Socket hang-up" 错误,这表明服务端会先于客户端关闭连接;请逐步调低该值,直到错误消失。
#### 故障排查
如果你在使用最新版 client 时仍然遇到 `socket hang up` 错误,可以通过以下几种方式解决:
* 启用至少为 `WARN` 的日志级别 (默认值) 。这样可以检查应用程序代码中是否存在未消费或悬空的流:传输层会以 WARN 级别记录这类情况,因为它们可能导致套接字被 server 关闭。你可以按如下方式在 client 配置中启用日志:
```ts theme={null}
const client = createClient({
log: { level: ClickHouseLogLevel.WARN },
})
```
* 确保所需配置已应用到正确的 client instance。如果你的应用中有多个 client instance,请再次确认你实际用于 queries 的那个实例设置了正确的 `keep_alive.idle_socket_ttl` 值。
* 在 client 配置中将 `keep_alive.idle_socket_ttl` 调小 500 毫秒。在某些情况下,例如 client 与 server 之间网络延迟较高时,这样做可能会有帮助,可以排除这样一种情况:发出的 request 恰好拿到了一个即将被 server 关闭的套接字。
* 如果此错误发生在长时间运行且没有数据进出 (例如长时间运行的 `INSERT FROM SELECT`) 的 queries 期间,原因可能是 load balancer 或其他网络组件关闭了长连接或长时间运行的 requests。你可以尝试组合使用以下 ClickHouse 设置,在长时间运行的 queries 期间强制产生一些传入数据:
```ts theme={null}
const client = createClient({
// 这里我们假设某些 query 的执行时间会超过 5 分钟
request_timeout: 400_000,
/** 这些 settings 组合使用时,可以避免长时间运行且没有数据进出的 query 出现 LB timeout 问题,
* 例如 `INSERT FROM SELECT` 及类似 query,因为连接可能会被 LB 标记为空闲并被突然关闭。
* 在这里,我们假设 LB 的空闲连接 timeout 为 120s,因此将 110s 设置为一个“安全”值。 */
clickhouse_settings: {
send_progress_in_http_headers: 1,
http_headers_progress_interval_ms: '110000', // UInt64,应作为字符串传递
},
})
```
不过请注意,在较新的 Node.js 版本中,接收到的请求头总大小限制为 16KB;在接收到一定数量的进度请求头后 (根据我们的测试,大约是 70-80 个) ,会抛出异常。
也可以采用一种完全不同的方法,彻底避免线上传输中的等待时间;这可以利用 HTTP interface 的一个“特性”:连接丢失时,变更 不会被取消。更多详情请参见[这个示例 (第 2 部分) ](https://github.com/ClickHouse/clickhouse-js/blob/main/examples/long_running_queries_timeouts.ts)。
* 也可以完全禁用 Keep-Alive 功能。在这种情况下,client 还会为每个 request 添加 `Connection: close` 请求头,底层 HTTP agent 也不会复用连接。`keep_alive.idle_socket_ttl` 设置将被忽略,因为不会有空闲套接字。这会带来额外开销,因为每个 request 都需要建立一个新连接。
```ts theme={null}
const client = createClient({
keep_alive: {
enabled: false,
},
})
```
* 可以运行一个简单的命令行测试,排除网络技术栈其他部分 (包括 Node.js 本身) 的潜在问题。测试时使用同一个 ClickHouse instance 和相同的网络路径 (即同一台机器或同一网段,例如某个 Kubernetes pod) ,例如使用 `curl`:
```sh theme={null}
curl -is --user ':' --data-binary "SELECT 1"
```
你可能需要将其循环运行几分钟。如果你在 `curl` 中也看到类似错误,那么问题很可能与 client 配置无关,而是出在网络技术栈或 server configuration 上。
* 如果要使用原生 Node.js 功能测试连接,你可以尝试使用内置的 `fetch` API 向 ClickHouse server 发起一个简单的 HTTP request:
```ts theme={null}
const response = await fetch('?query=SELECT+1', {
method: 'POST',
headers: {
'Authorization': 'Basic ' + Buffer.from(':').toString('base64'),
}
})
```
* 在某些情况下,应用程序代码或框架适配器可能会在实际执行查询前先发起一次 `ping()`。这可能会导致这样一种情况:`ping()` 请求成功,但紧随其后的查询请求却因空闲连接的同一底层问题而失败,并报出 “socket hang up” 错误。如果你在日志中看到这种模式,请检查你的框架或应用程序代码中是否提供了禁用预先 `ping()` 的选项。这也有助于降低被中间网络组件限流的概率。
* 确保应用程序本身获得了足够的 CPU 时间,并且网络未被托管提供商限流。各种监控手段 (如 GC 暂停指标、事件循环延迟指标等) 也有助于排查潜在的资源饥饿问题。
* 尝试在启用 [no-floating-promises](https://typescript-eslint.io/rules/no-floating-promises/) ESLint 规则的情况下检查应用程序代码,这有助于识别未处理的 Promise,因为它们可能导致悬空的流和套接字。
### 只读用户
使用带有 [readonly=1 用户](/docs/zh/concepts/features/configuration/settings/permissions-for-queries#readonly) 的客户端时,无法启用响应压缩,因为这需要 `enable_http_compression` 设置。以下配置会导致错误:
```ts theme={null}
const client = createClient({
compression: {
response: true, // won't work with a readonly=1 user
},
})
```
请参阅[示例](https://github.com/ClickHouse/clickhouse-js/blob/main/examples/node/security/read_only_user.ts),其中更详细地展示了 readonly=1 用户的限制。
### 带路径名的代理
如果您的 ClickHouse 实例位于代理后面,且其 URL 中包含路径名,例如 `http://proxy:8123/clickhouse_server`,请将 `clickhouse_server` 指定为 `pathname` 配置选项 (可以带前导斜杠,也可以不带) ;否则,如果直接在 `url` 中提供,它会被视为 `database` 选项。支持多段路径,例如 `/my_proxy/db`。
```ts theme={null}
const client = createClient({
url: 'http://proxy:8123',
pathname: '/clickhouse_server',
})
```
### 使用身份验证的反向代理
如果您在 ClickHouse 部署前配置了启用身份验证的反向代理,可以使用 `http_headers` 设置在其中提供所需的请求头:
```ts theme={null}
const client = createClient({
http_headers: {
'My-Auth-Header': '...',
},
})
```
### 自定义 HTTP/HTTPS agent (Experimental,仅限 Node.js)
这是一个 Experimental 功能,未来的发行版中可能会发生向后不兼容的变更。客户端提供的默认实现和设置对于大多数用例来说应该已经足够。只有在你确定确实需要时,才应使用此功能。
默认情况下,客户端会使用客户端配置中提供的设置 (例如 `max_open_connections`、`keep_alive.enabled`、`tls`) 来配置底层 HTTP 或 HTTPS agent,并由其处理与 ClickHouse server 的连接。此外,如果使用了 TLS 证书,底层 agent 还会配置所需的证书,并强制使用正确的 TLS 认证请求头。
从 1.2.0 版本开始,可以为客户端提供自定义 HTTP 或 HTTPS agent,以替换默认的底层 agent。这在网络配置较为复杂时可能会很有用。如果提供了自定义 agent,则适用以下条件:
* `max_open_connections` 和 `tls` 选项将\_不起作用\_,并会被客户端忽略,因为它们属于底层 agent 配置的一部分。
* `keep_alive.enabled` 只会控制 `Connection` 请求头的默认值 (`true` -> `Connection: keep-alive`,`false` -> `Connection: close`) 。
* 虽然空闲 keep-alive 套接字管理仍然会继续生效 (因为它不依赖于 agent,而是依赖于具体的套接字本身) ,但现在可以通过将 `keep_alive.idle_socket_ttl` 的值设置为 `0` 来完全禁用它。
#### 自定义代理的用法示例
在不使用证书的情况下使用自定义 HTTP 或 HTTPS Agent:
```ts theme={null}
const agent = new http.Agent({ // or https.Agent
keepAlive: true,
keepAliveMsecs: 2500,
maxSockets: 10,
maxFreeSockets: 10,
})
const client = createClient({
http_agent: agent,
})
```
使用自定义 HTTPS Agent,配合基础 TLS 和 CA 证书:
```ts theme={null}
const agent = new https.Agent({
keepAlive: true,
keepAliveMsecs: 2500,
maxSockets: 10,
maxFreeSockets: 10,
ca: fs.readFileSync('./ca.crt'),
})
const client = createClient({
url: 'https://myserver:8443',
http_agent: agent,
// With a custom HTTPS agent, the client won't use the default HTTPS connection implementation; the headers should be provided manually
http_headers: {
'X-ClickHouse-User': 'username',
'X-ClickHouse-Key': 'password',
},
// Important: authorization header conflicts with the TLS headers; disable it.
set_basic_auth_header: false,
})
```
在自定义 HTTPS Agent 中使用 mutual TLS:
```ts theme={null}
const agent = new https.Agent({
keepAlive: true,
keepAliveMsecs: 2500,
maxSockets: 10,
maxFreeSockets: 10,
ca: fs.readFileSync('./ca.crt'),
cert: fs.readFileSync('./client.crt'),
key: fs.readFileSync('./client.key'),
})
const client = createClient({
url: 'https://myserver:8443',
http_agent: agent,
// With a custom HTTPS agent, the client won't use the default HTTPS connection implementation; the headers should be provided manually
http_headers: {
'X-ClickHouse-User': 'username',
'X-ClickHouse-Key': 'password',
'X-ClickHouse-SSL-Certificate-Auth': 'on',
},
// Important: authorization header conflicts with the TLS headers; disable it.
set_basic_auth_header: false,
})
```
使用证书 *并* 配合自定义 *HTTPS* Agent 时,很可能需要通过 `set_basic_auth_header` 设置禁用默认的授权请求头 (于 1.2.0 引入) ,因为它会与 TLS 请求头发生冲突。所有 TLS 请求头都应手动提供。
## 已知限制 (Node.js/web)
* 结果集暂无数据映射器,因此仅使用语言的基本类型。计划在支持 [RowBinary format](https://github.com/ClickHouse/clickhouse-js/issues/216) 后引入部分数据类型映射器。
* 某些 [Decimal\* 和 Date\* / DateTime\* 数据类型有一些注意事项](/docs/zh/integrations/language-clients/js/index#datedate32-types-caveats)。
* 使用 JSON\* 家族格式时,大于 Int32 的数字会以字符串表示,因为 Int64+ 类型的最大值超过了 `Number.MAX_SAFE_INTEGER`。更多详情请参见 [整数类型](/docs/zh/integrations/language-clients/js/index#integral-types-int64-int128-int256-uint64-uint128-uint256) 部分。
## 已知限制 (Web)
* `select` 查询支持流式处理,但对插入操作不支持 (在类型层面也是如此) 。
* 请求压缩已禁用,相关配置会被忽略。响应压缩可正常工作。
* 暂不支持日志。
## 性能优化提示
* 为减少应用程序的内存占用,在适用的情况下,可考虑对大型插入 (例如从文件进行插入) 以及 select 查询使用流。对于事件监听器和类似用例,[异步插入](/docs/zh/concepts/features/operations/insert/asyncinserts) 也是一个不错的选择,它可以尽量减少,甚至完全避免在客户端进行批处理。异步插入示例可在[客户端代码仓库](https://github.com/ClickHouse/clickhouse-js/tree/main/examples/node)中找到,文件名前缀为 `async_insert_`。
* 该 client 默认不启用请求或响应压缩。不过,在查询或插入大型数据集时,你可以考虑通过 `ClickHouseClientConfigOptions.compression` 启用压缩 (仅针对 `request` 或 `response`,或同时启用两者) 。
* 压缩会带来明显的性能开销。对 `request` 或 `response` 启用压缩,分别会降低插入或查询的速度,但会减少应用程序传输的网络流量。
## 联系我们
如果你有任何问题或需要帮助,欢迎通过 [Community Slack](https://clickhouse.com/slack) (`#clickhouse-js` 频道) 或在 [GitHub issues](https://github.com/ClickHouse/clickhouse-js/issues) 中联系我们。