> ## Documentation Index
> Fetch the complete documentation index at: https://clickhouse.com/docs/llms.txt
> Use this file to discover all available pages before exploring further.
> 将 Vector 与 Kafka 和 ClickHouse 结合使用
# 将 Vector 与 Kafka 和 ClickHouse 结合使用
## 将 Vector 与 Kafka 和 ClickHouse 结合使用
Vector 是一个与厂商无关的数据管道,能够从 Kafka 读取数据并将事件发送到 ClickHouse。
面向 Vector 与 ClickHouse 的[入门](/docs/zh/integrations/connectors/data-ingestion/etl-tools/vector-to-clickhouse)指南主要聚焦于日志场景以及从文件中读取事件。这里我们使用 [GitHub 示例数据集](https://datasets-documentation.s3.eu-west-3.amazonaws.com/kafka/github_all_columns.ndjson),其中事件存放在 Kafka topic 中。
Vector 使用 [sources](https://vector.dev/docs/introduction/concepts/#sources) 通过 push 或 pull 模型获取数据;同时,[sinks](https://vector.dev/docs/introduction/concepts/#sinks) 则作为事件的目标端。因此,我们这里使用 Kafka source 和 ClickHouse sink。请注意,虽然 Kafka 支持作为 sink,但目前还没有可用的 ClickHouse source。因此,如果你想将数据从 ClickHouse 传输到 Kafka,就不适合使用 Vector。
Vector 还支持对数据进行[转换](https://vector.dev/docs/reference/configuration/transforms/)。这不在本指南的讨论范围内;如有需要,请参考 Vector 文档来处理你的数据集。
请注意,当前 ClickHouse sink 的实现使用的是 HTTP 接口。ClickHouse sink 目前还不支持使用 JSON schema。数据必须以纯 JSON 格式或 String 形式发布到 Kafka。
### 许可协议
Vector 依据 [MPL-2.0 License](https://github.com/vectordotdev/vector/blob/master/LICENSE) 发布
### 获取连接信息
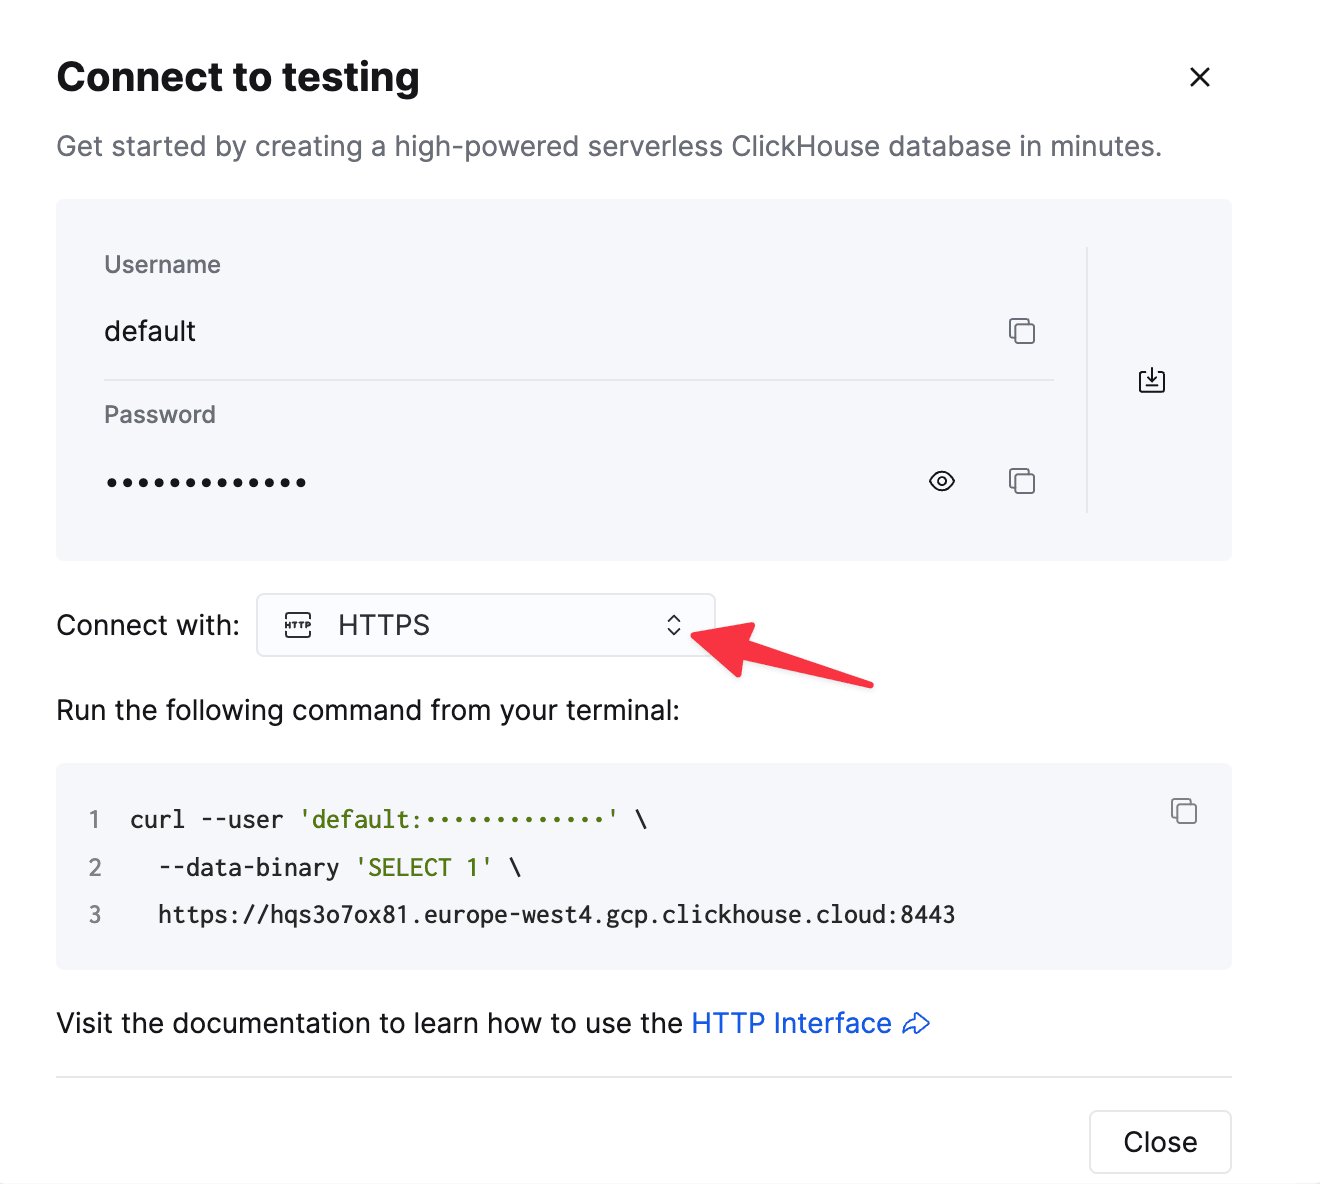
要通过 HTTP(S) 连接到 ClickHouse,你需要以下信息:
| Parameter(s) | Description |
| ------------------------- | ------------------------------------------ |
| `HOST` and `PORT` | 通常,使用 TLS 时端口为 8443;不使用 TLS 时端口为 8123。 |
| `DATABASE NAME` | 默认情况下,存在一个名为 `default` 的数据库。请使用你要连接的数据库名称。 |
| `USERNAME` and `PASSWORD` | 默认情况下,用户名为 `default`。请根据你的使用场景使用相应的用户名。 |
你的 ClickHouse Cloud 服务的连接信息可在 ClickHouse Cloud 控制台中查看。
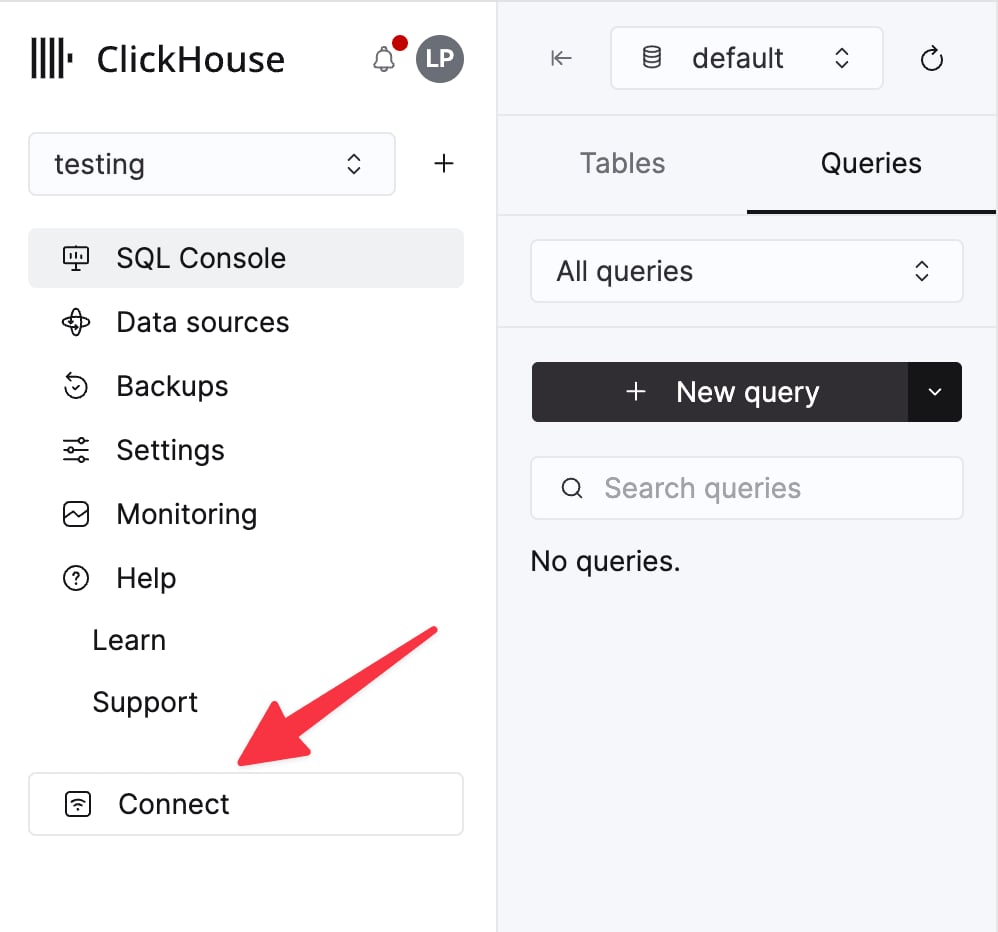
选择一个服务,然后点击 **Connect**:
选择 **HTTPS**。连接信息会显示在示例 `curl` 命令中。
如果你使用的是自管理 ClickHouse,则连接信息由你的 ClickHouse 管理员配置。
### 步骤
1. 创建 Kafka `github` topic,并写入 [GitHub 数据集](https://datasets-documentation.s3.eu-west-3.amazonaws.com/kafka/github_all_columns.ndjson)。
```bash theme={null}
cat /opt/data/github/github_all_columns.ndjson | kcat -b : -X security.protocol=sasl_ssl -X sasl.mechanisms=PLAIN -X sasl.username= -X sasl.password= -t github
```
该数据集包含 200,000 行,聚焦于 `ClickHouse/ClickHouse` 仓库。
2. 确保目标表已创建。下面我们使用默认数据库。
```sql theme={null}
CREATE TABLE github
(
file_time DateTime,
event_type Enum('CommitCommentEvent' = 1, 'CreateEvent' = 2, 'DeleteEvent' = 3, 'ForkEvent' = 4,
'GollumEvent' = 5, 'IssueCommentEvent' = 6, 'IssuesEvent' = 7, 'MemberEvent' = 8, 'PublicEvent' = 9, 'PullRequestEvent' = 10, 'PullRequestReviewCommentEvent' = 11, 'PushEvent' = 12, 'ReleaseEvent' = 13, 'SponsorshipEvent' = 14, 'WatchEvent' = 15, 'GistEvent' = 16, 'FollowEvent' = 17, 'DownloadEvent' = 18, 'PullRequestReviewEvent' = 19, 'ForkApplyEvent' = 20, 'Event' = 21, 'TeamAddEvent' = 22),
actor_login LowCardinality(String),
repo_name LowCardinality(String),
created_at DateTime,
updated_at DateTime,
action Enum('none' = 0, 'created' = 1, 'added' = 2, 'edited' = 3, 'deleted' = 4, 'opened' = 5, 'closed' = 6, 'reopened' = 7, 'assigned' = 8, 'unassigned' = 9, 'labeled' = 10, 'unlabeled' = 11, 'review_requested' = 12, 'review_request_removed' = 13, 'synchronize' = 14, 'started' = 15, 'published' = 16, 'update' = 17, 'create' = 18, 'fork' = 19, 'merged' = 20),
comment_id UInt64,
path String,
ref LowCardinality(String),
ref_type Enum('none' = 0, 'branch' = 1, 'tag' = 2, 'repository' = 3, 'unknown' = 4),
creator_user_login LowCardinality(String),
number UInt32,
title String,
labels Array(LowCardinality(String)),
state Enum('none' = 0, 'open' = 1, 'closed' = 2),
assignee LowCardinality(String),
assignees Array(LowCardinality(String)),
closed_at DateTime,
merged_at DateTime,
merge_commit_sha String,
requested_reviewers Array(LowCardinality(String)),
merged_by LowCardinality(String),
review_comments UInt32,
member_login LowCardinality(String)
) ENGINE = MergeTree ORDER BY (event_type, repo_name, created_at);
```
3. [下载并安装 Vector](https://vector.dev/docs/setup/quickstart/)。创建一个 `kafka.toml` 配置文件,并根据你的 Kafka 和 ClickHouse 实例修改其中的值。
```toml theme={null}
[sources.github]
type = "kafka"
auto_offset_reset = "smallest"
bootstrap_servers = ":"
group_id = "vector"
topics = [ "github" ]
tls.enabled = true
sasl.enabled = true
sasl.mechanism = "PLAIN"
sasl.username = ""
sasl.password = ""
decoding.codec = "json"
[sinks.clickhouse]
type = "clickhouse"
inputs = ["github"]
endpoint = "http://localhost:8123"
database = "default"
table = "github"
skip_unknown_fields = true
auth.strategy = "basic"
auth.user = "username"
auth.password = "password"
buffer.max_events = 10000
batch.timeout_secs = 1
```
关于此配置及 Vector 的行为,有几点需要特别说明:
* 此示例已针对 Confluent Cloud 进行测试。因此,`sasl.*` 和 `ssl.enabled` 安全选项在自管理场景中可能并不适用。
* 配置参数 `bootstrap_servers` 不需要协议前缀,例如 `pkc-2396y.us-east-1.aws.confluent.cloud:9092`
* source 参数 `decoding.codec = "json"` 可确保消息以单个 JSON 对象的形式传递到 ClickHouse sink。如果将消息作为 String 处理,并使用默认的 `bytes` 值,则消息内容会被追加到 `message` 字段中。在大多数情况下,这都需要像 [Vector 入门](/docs/zh/integrations/connectors/data-ingestion/etl-tools/vector-to-clickhouse#4-parse-the-logs) 指南中所述的那样,在 ClickHouse 中进行处理。
* Vector 会向消息中[添加多个字段](https://vector.dev/docs/reference/configuration/sources/kafka/#output-data)。在本示例中,我们通过配置参数 `skip_unknown_fields = true` 在 ClickHouse sink 中忽略这些字段。这会忽略不属于目标表 schema 的字段。你也可以根据需要调整 schema,以确保这些元字段 (如 `offset`) 被添加进去。
* 请注意,sink 通过参数 `inputs` 引用事件 source。
* 请注意 [此处](https://vector.dev/docs/reference/configuration/sinks/clickhouse/#buffers-and-batches) 所述的 ClickHouse sink 行为。为获得最佳吞吐量,你可能需要调优 `buffer.max_events`、`batch.timeout_secs` 和 `batch.max_bytes` 参数。根据 ClickHouse 的[建议](/docs/zh/reference/statements/insert-into#performance-considerations),单个批次中的事件数至少应为 1000。对于吞吐量稳定且较高的场景,你可以增大参数 `buffer.max_events`。而对于吞吐量波动较大的场景,则可能需要调整参数 `batch.timeout_secs`
* 参数 `auto_offset_reset = "smallest"` 会强制 Kafka source 从 topic 的起始位置开始消费,从而确保我们能消费步骤 (1) 中发布的消息。你可能需要不同的行为。更多详情请参见[这里](https://vector.dev/docs/reference/configuration/sources/kafka/#auto_offset_reset)。
4. 启动 Vector
```bash theme={null}
vector --config ./kafka.toml
```
默认情况下,在开始向 ClickHouse 插入数据之前,需要先执行[健康检查](https://vector.dev/docs/reference/configuration/sinks/clickhouse/#healthcheck)。这样可确保能够建立连接并读取 schema。若要获取更多日志,请在命令前加上 `VECTOR_LOG=debug`;如果你遇到问题,这些日志会很有帮助。
5. 确认数据已成功插入。
```sql theme={null}
SELECT count() AS count FROM github;
```
| 计数 |
| :----- |
| 200000 |