> ## Documentation Index
> Fetch the complete documentation index at: https://clickhouse.com/docs/llms.txt
> Use this file to discover all available pages before exploring further.

> 将 HTTP Sink 连接器与 Kafka Connect 和 ClickHouse 配合使用

# Confluent HTTP Sink 连接器

export const Image = ({img, alt, size = "lg"}) => {
  const normalizedSize = ["sm", "md", "lg"].includes(size) ? size : "lg";
  return <div className={`ch-image-${normalizedSize}`}>
      <Frame>
        <img src={img} alt={alt} />
      </Frame>
    </div>;
};

HTTP Sink 连接器与数据类型无关，因此既不需要 Kafka schema，也支持 ClickHouse 特有的数据类型，例如 Map 和 Array。这种额外的灵活性也会使配置稍微更复杂一些。

下面介绍一种简单的安装方式：从单个 Kafka topic 拉取消息，并将行插入 ClickHouse 表中。

<Note>
  HTTP 连接器依据 [Confluent Enterprise License](https://docs.confluent.io/kafka-connect-http/current/overview.html#license) 发布。
</Note>

<div id="quick-start-steps">
  ### 快速入门步骤
</div>

<Steps>
  <Step title="收集连接详细信息" id="1-gather-your-connection-details">
    要通过 HTTP(S) 连接到 ClickHouse，你需要以下信息：

    | Parameter(s)              | Description                                |
    | ------------------------- | ------------------------------------------ |
    | `HOST` and `PORT`         | 通常，使用 TLS 时端口为 8443；不使用 TLS 时端口为 8123。     |
    | `DATABASE NAME`           | 默认情况下，存在一个名为 `default` 的数据库。请使用你要连接的数据库名称。 |
    | `USERNAME` and `PASSWORD` | 默认情况下，用户名为 `default`。请根据你的使用场景使用相应的用户名。    |

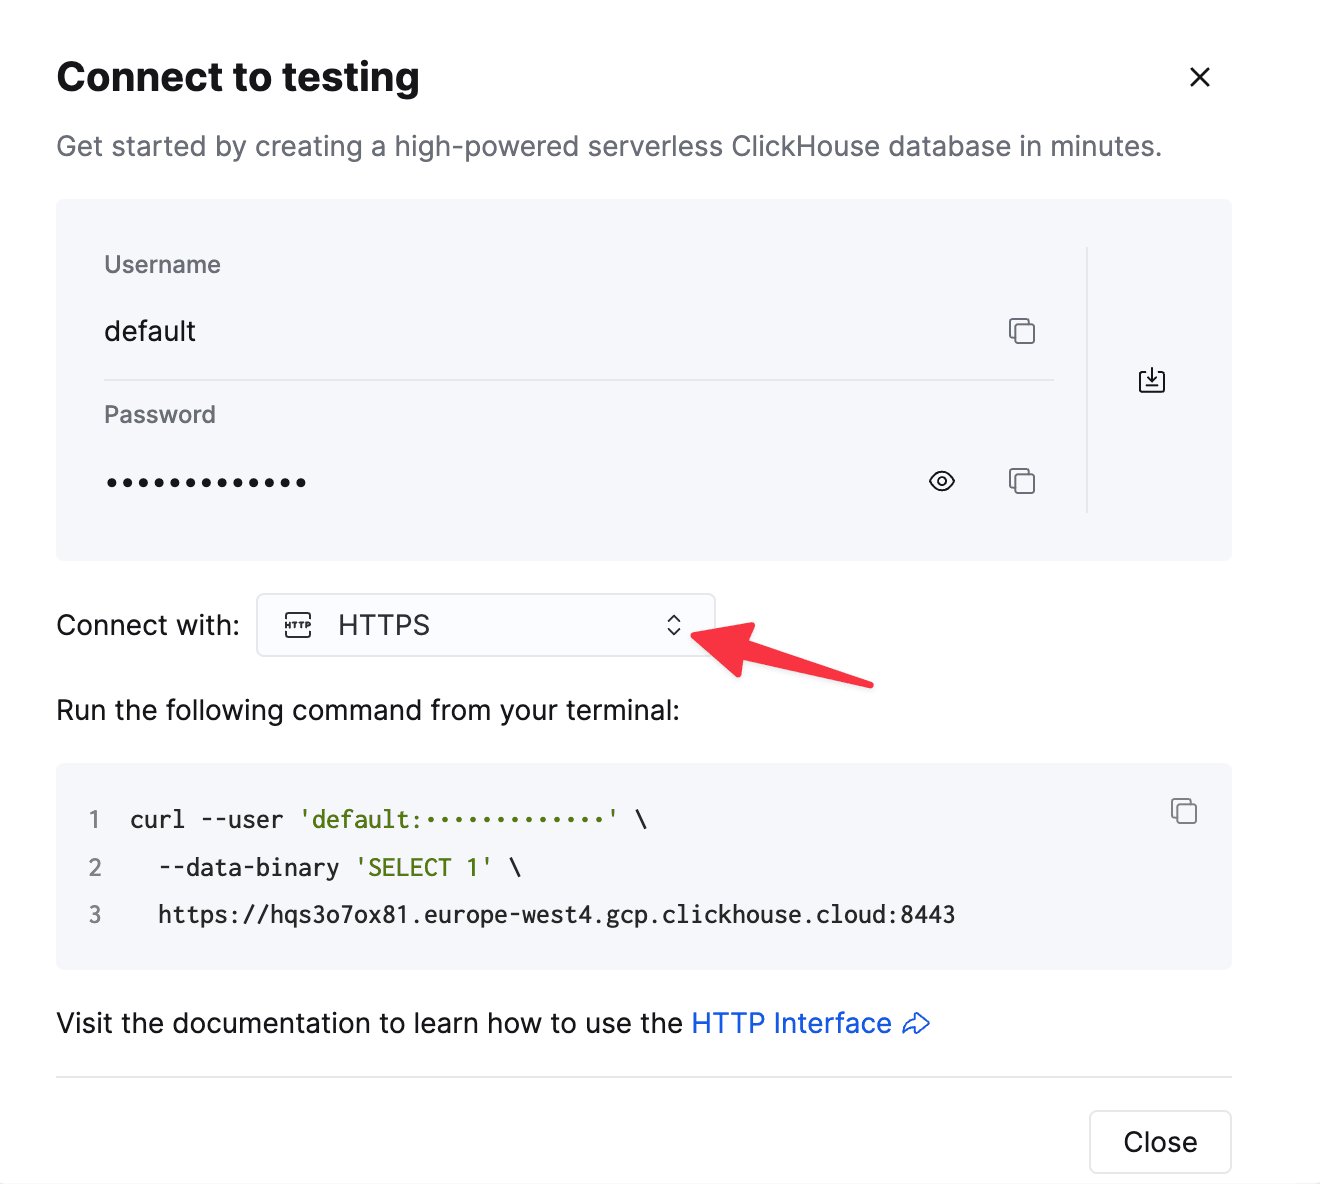
    你的 ClickHouse Cloud 服务的连接信息可在 ClickHouse Cloud 控制台中查看。
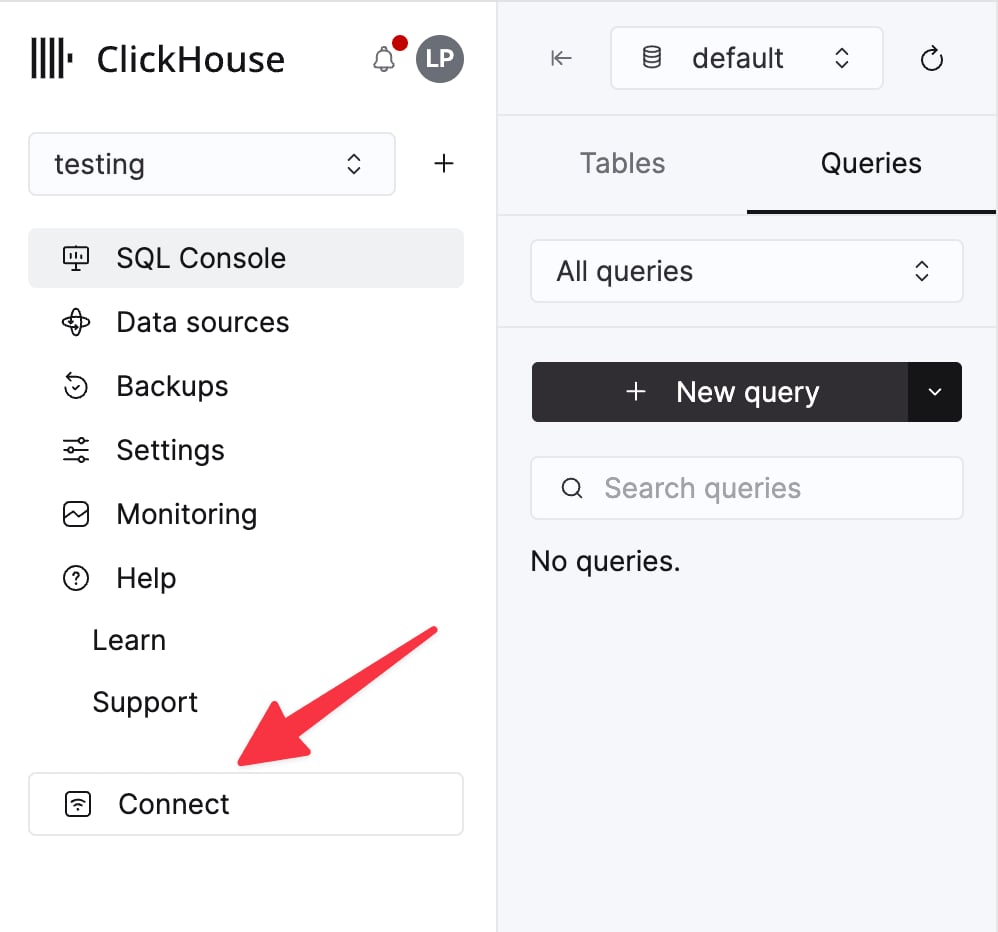
    选择一个服务，然后点击 **Connect**：

    <div className="ch-image-md">
      <Frame>
        <img src="https://mintcdn.com/private-7c7dfe99/CFFsa2agBPbviR4r/images/_snippets/cloud-connect-button.webp?fit=max&auto=format&n=CFFsa2agBPbviR4r&q=85&s=ec0a298a33ca841e947fa5e8bae47362" alt="ClickHouse Cloud 服务连接按钮" width="998" height="932" data-path="images/_snippets/cloud-connect-button.webp" />
      </Frame>
    </div>

    选择 **HTTPS**。连接信息会显示在示例 `curl` 命令中。

    <div className="ch-image-md">
      <Frame>
        <img src="https://mintcdn.com/private-7c7dfe99/CFFsa2agBPbviR4r/images/_snippets/connection-details-https.webp?fit=max&auto=format&n=CFFsa2agBPbviR4r&q=85&s=cb0fbd98aa2b5b7ca484c9f53395ee07" alt="ClickHouse Cloud HTTPS 连接信息" width="1320" height="1184" data-path="images/_snippets/connection-details-https.webp" />
      </Frame>
    </div>

    如果你使用的是自管理 ClickHouse，则连接信息由你的 ClickHouse 管理员配置。
  </Step>

  <Step title="运行 Kafka Connect 和 HTTP Sink 连接器" id="2-run-kafka-connect-and-the-http-sink-connector">
    你有两个选项：

    * **自管理：** 下载 Confluent 软件包并在本地安装。按照[此处](https://docs.confluent.io/kafka-connect-http/current/overview.html)所述的连接器安装说明进行操作。
      如果你使用 confluent-hub 安装方法，本地配置文件将会被更新。

    * **Confluent Cloud：** 对于使用 Confluent Cloud 托管 Kafka 的用户，可使用完全托管版本的 HTTP Sink。这要求你的 ClickHouse 环境可从 Confluent Cloud 访问。

    <Note>
      以下示例使用的是 Confluent Cloud。
    </Note>
  </Step>

  <Step title="在 ClickHouse 中创建目标端表" id="3-create-destination-table-in-clickhouse">
    在进行连通性测试之前，我们先在 ClickHouse Cloud 中创建一个测试表，该表将接收来自 Kafka 的数据：

    ```sql theme={null}
    CREATE TABLE default.my_table
    (
        `side` String,
        `quantity` Int32,
        `symbol` String,
        `price` Int32,
        `account` String,
        `userid` String
    )
    ORDER BY tuple()
    ```
  </Step>

  <Step title="配置 HTTP Sink" id="4-configure-http-sink">
    创建一个 Kafka topic 和一个 HTTP Sink 连接器实例：

    <Image img="https://mintcdn.com/private-7c7dfe99/pIetLsS_hOGHqoPJ/images/integrations/data-ingestion/kafka/confluent/create_http_sink.webp?fit=max&auto=format&n=pIetLsS_hOGHqoPJ&q=85&s=ade794478790411f406291f68f1f39a1" size="sm" alt="展示如何创建 HTTP Sink 连接器的 Confluent Cloud 界面" border width="718" height="736" data-path="images/integrations/data-ingestion/kafka/confluent/create_http_sink.webp" />

    <br />

    配置 HTTP Sink 连接器：

    * 填写你创建的 topic 名称
    * 身份验证
      * `HTTP Url` - 包含已指定 `INSERT` 查询的 ClickHouse Cloud URL：`<protocol>://<clickhouse_host>:<clickhouse_port>?query=INSERT%20INTO%20<database>.<table>%20FORMAT%20JSONEachRow`。**注意**：查询必须经过编码。
      * `Endpoint Authentication type` - BASIC
      * `Auth username` - ClickHouse 用户名
      * `Auth password` - ClickHouse 密码

    <Note>
      这个 HTTP Url 很容易出错。请确保转义准确无误，以避免问题。
    </Note>

    <Image img="https://mintcdn.com/private-7c7dfe99/pIetLsS_hOGHqoPJ/images/integrations/data-ingestion/kafka/confluent/http_auth.webp?fit=max&auto=format&n=pIetLsS_hOGHqoPJ&q=85&s=cd3fc19e3bd604dd88cff4b487fdddb7" size="lg" alt="展示 HTTP Sink 连接器身份验证设置的 Confluent Cloud 界面" border width="1944" height="878" data-path="images/integrations/data-ingestion/kafka/confluent/http_auth.webp" />

    <br />

    * 配置
      * `Input Kafka record value format` - 这取决于你的源数据，但大多数情况下为 JSON 或 Avro。以下设置中我们假定使用 `JSON`。
      * 在 `advanced configurations` 部分中：
        * `HTTP Request Method` - 设置为 POST
        * `Request Body Format` - json
        * `Batch batch size` - 根据 ClickHouse 的建议，将其设置为**至少 1000**。
        * `Batch json as array` - true
        * `Retry on HTTP codes` - 400-500，但应按需调整；例如，如果你在 ClickHouse 前面使用了 HTTP proxy，这个设置可能需要变更。
        * `Maximum Reties` - 默认值 (10) 比较合适，但也可根据需要调整，以获得更稳健的重试行为。

    <Image img="https://mintcdn.com/private-7c7dfe99/pIetLsS_hOGHqoPJ/images/integrations/data-ingestion/kafka/confluent/http_advanced.webp?fit=max&auto=format&n=pIetLsS_hOGHqoPJ&q=85&s=ec905e552defb0fe75a70dde123ecb24" size="sm" alt="展示 HTTP Sink 连接器高级配置选项的 Confluent Cloud 界面" border width="786" height="796" data-path="images/integrations/data-ingestion/kafka/confluent/http_advanced.webp" />
  </Step>

  <Step title="测试连通性" id="5-testing-the-connectivity">
    在你的 HTTP Sink 所配置的 topic 中创建一条消息

    <Image img="https://mintcdn.com/private-7c7dfe99/pIetLsS_hOGHqoPJ/images/integrations/data-ingestion/kafka/confluent/create_message_in_topic.webp?fit=max&auto=format&n=pIetLsS_hOGHqoPJ&q=85&s=60c5ffc663c30145519f583b0cbed9b8" size="md" alt="展示如何在 Kafka topic 中创建测试消息的 Confluent Cloud 界面" border width="2138" height="846" data-path="images/integrations/data-ingestion/kafka/confluent/create_message_in_topic.webp" />

    <br />

    并验证所创建的消息已写入你的 ClickHouse 实例。
  </Step>
</Steps>

<div id="troubleshooting">
  ### 故障排查
</div>

<div id="http-sink-doesnt-batch-messages">
  #### HTTP Sink 不会批量处理消息
</div>

摘自 [Sink documentation](https://docs.confluent.io/kafka-connectors/http/current/overview.html#http-sink-connector-for-cp)：

> 对于 Kafka 请求头值不同的消息，HTTP Sink 连接器不会将请求按批次发送。

1. 确认你的 Kafka 记录具有相同的键。
2. 向 HTTP API URL 添加参数时，每条记录都可能生成唯一的 URL。因此，使用额外的 URL 参数时会禁用批处理。

<div id="400-bad-request">
  #### 400 请求错误
</div>

<div id="cannot_parse_quoted_string">
  ##### CANNOT\_PARSE\_QUOTED\_STRING
</div>

如果 HTTP Sink 在将 JSON 对象插入 `String` 列时失败，并显示以下消息：

```response theme={null}
Code: 26. DB::ParsingException: Cannot parse JSON string: expected opening quote: (while reading the value of key key_name): While executing JSONEachRowRowInputFormat: (at row 1). (CANNOT_PARSE_QUOTED_STRING)
```

在 URL 中，使用编码字符串 `SETTINGS%20input_format_json_read_objects_as_strings%3D1` 设置 `input_format_json_read_objects_as_strings=1`

<div id="load-the-github-dataset-optional">
  ### 加载 GitHub 数据集 (可选)
</div>

请注意，此示例会保留 GitHub 数据集中的 Array 字段。我们假设在示例环境中已有一个空的 github topic，并使用 [kcat](https://github.com/edenhill/kcat) 向 Kafka 插入消息。

<Steps>
  <Step title="准备配置" id="1-prepare-configuration">
    请按照[这些说明](https://docs.confluent.io/cloud/current/cp-component/connect-cloud-config.html#set-up-a-local-connect-worker-with-cp-install)，根据你的安装类型设置 Connect，并注意独立模式与分布式集群之间的差异。如果使用的是 Confluent Cloud，则应采用分布式配置。

    最重要的参数是 `http.api.url`。ClickHouse 的 [HTTP interface](/docs/zh/concepts/features/interfaces/http) 要求你将 INSERT 语句编码为 URL 参数。该参数必须包含格式 (此处为 `JSONEachRow`) 和目标数据库。该格式必须与 Kafka 中的数据保持一致，因为这些数据会在 HTTP 载荷中被转换为字符串。这些参数都必须进行 URL 转义。下面展示了适用于 GitHub 数据集的此类格式示例 (假设你在本地运行 ClickHouse) ：

    ```response theme={null}
    <protocol>://<clickhouse_host>:<clickhouse_port>?query=INSERT%20INTO%20<database>.<table>%20FORMAT%20JSONEachRow

    http://localhost:8123?query=INSERT%20INTO%20default.github%20FORMAT%20JSONEachRow
    ```

    以下附加参数与 HTTP Sink 配合 ClickHouse 使用时相关。完整参数列表可在[此处](https://docs.confluent.io/kafka-connect-http/current/connector_config.html)查看：

    * `request.method` - 设置为 **POST**
    * `retry.on.status.codes` - 设置为 400-500，以便在出现任意错误状态码时重试。请根据数据中预期出现的错误进一步细化。
    * `request.body.format` - 大多数情况下应为 JSON。
    * `auth.type` - 如果为 ClickHouse 启用了安全机制，请设置为 BASIC。目前尚不支持其他与 ClickHouse 兼容的身份验证机制。
    * `ssl.enabled` - 如果使用 SSL，则设置为 true。
    * `connection.user` - ClickHouse 的用户名。
    * `connection.password` - ClickHouse 的密码。
    * `batch.max.size` - 单个批次发送的行数。请确保该值设置得足够大。根据 ClickHouse 的[建议](/docs/zh/reference/statements/insert-into#performance-considerations)，1000 应视为最低值。
    * `tasks.max` - HTTP Sink 连接器支持运行一个或多个任务，这可用于提升性能。结合批次大小，这是提高性能的主要方式。
    * `key.converter` - 根据键的类型进行设置。
    * `value.converter` - 根据 topic 中的数据类型进行设置。这些数据不需要 schema。此处的格式必须与参数 `http.api.url` 中指定的 FORMAT 保持一致。最简单的方式是使用 JSON 和 `org.apache.kafka.connect.json.JsonConverter` 转换器。也可以通过 `org.apache.kafka.connect.storage.StringConverter` 转换器将值视为字符串，不过这会要求用户在 INSERT 语句中使用函数提取值。如果使用 `io.confluent.connect.avro.AvroConverter` 转换器，ClickHouse 也支持 [Avro 格式](/docs/zh/reference/formats/Avro/Avro)。

    完整设置列表 (包括如何配置代理、重试和高级 SSL) 可在[此处](https://docs.confluent.io/kafka-connect-http/current/connector_config.html)查看。

    GitHub 样本数据的示例配置文件可在[此处](https://github.com/ClickHouse/clickhouse-docs/tree/main/docs/integrations/data-ingestion/kafka/code/connectors/http_sink)找到，前提是 Connect 以独立模式运行，且 Kafka 托管在 Confluent Cloud 中。
  </Step>

  <Step title="创建 ClickHouse 表" id="2-create-the-clickhouse-table">
    请确保该表已创建。下面展示了一个使用标准 MergeTree 的最小 GitHub 数据集示例。

    ```sql theme={null}
    CREATE TABLE github
    (
        file_time DateTime,
        event_type Enum('CommitCommentEvent' = 1, 'CreateEvent' = 2, 'DeleteEvent' = 3, 'ForkEvent' = 4,'GollumEvent' = 5, 'IssueCommentEvent' = 6, 'IssuesEvent' = 7, 'MemberEvent' = 8, 'PublicEvent' = 9, 'PullRequestEvent' = 10, 'PullRequestReviewCommentEvent' = 11, 'PushEvent' = 12, 'ReleaseEvent' = 13, 'SponsorshipEvent' = 14, 'WatchEvent' = 15, 'GistEvent' = 16, 'FollowEvent' = 17, 'DownloadEvent' = 18, 'PullRequestReviewEvent' = 19, 'ForkApplyEvent' = 20, 'Event' = 21, 'TeamAddEvent' = 22),
        actor_login LowCardinality(String),
        repo_name LowCardinality(String),
        created_at DateTime,
        updated_at DateTime,
        action Enum('none' = 0, 'created' = 1, 'added' = 2, 'edited' = 3, 'deleted' = 4, 'opened' = 5, 'closed' = 6, 'reopened' = 7, 'assigned' = 8, 'unassigned' = 9, 'labeled' = 10, 'unlabeled' = 11, 'review_requested' = 12, 'review_request_removed' = 13, 'synchronize' = 14, 'started' = 15, 'published' = 16, 'update' = 17, 'create' = 18, 'fork' = 19, 'merged' = 20),
        comment_id UInt64,
        path String,
        ref LowCardinality(String),
        ref_type Enum('none' = 0, 'branch' = 1, 'tag' = 2, 'repository' = 3, 'unknown' = 4),
        creator_user_login LowCardinality(String),
        number UInt32,
        title String,
        labels Array(LowCardinality(String)),
        state Enum('none' = 0, 'open' = 1, 'closed' = 2),
        assignee LowCardinality(String),
        assignees Array(LowCardinality(String)),
        closed_at DateTime,
        merged_at DateTime,
        merge_commit_sha String,
        requested_reviewers Array(LowCardinality(String)),
        merged_by LowCardinality(String),
        review_comments UInt32,
        member_login LowCardinality(String)
    ) ENGINE = MergeTree ORDER BY (event_type, repo_name, created_at)

    ```
  </Step>

  <Step title="向 Kafka 写入数据" id="3-add-data-to-kafka">
    将消息写入 Kafka。下面我们使用 [kcat](https://github.com/edenhill/kcat) 写入 1 万条消息。

    ```bash theme={null}
    head -n 10000 github_all_columns.ndjson | kcat -b <host>:<port> -X security.protocol=sasl_ssl -X sasl.mechanisms=PLAIN -X sasl.username=<username>  -X sasl.password=<password> -t github
    ```

    对目标表 "Github" 执行一次简单查询，应可确认数据已插入。

    ```sql theme={null}
    SELECT count() FROM default.github;

    | count\(\) |
    | :--- |
    | 10000 |

    ```
  </Step>
</Steps>