扩展
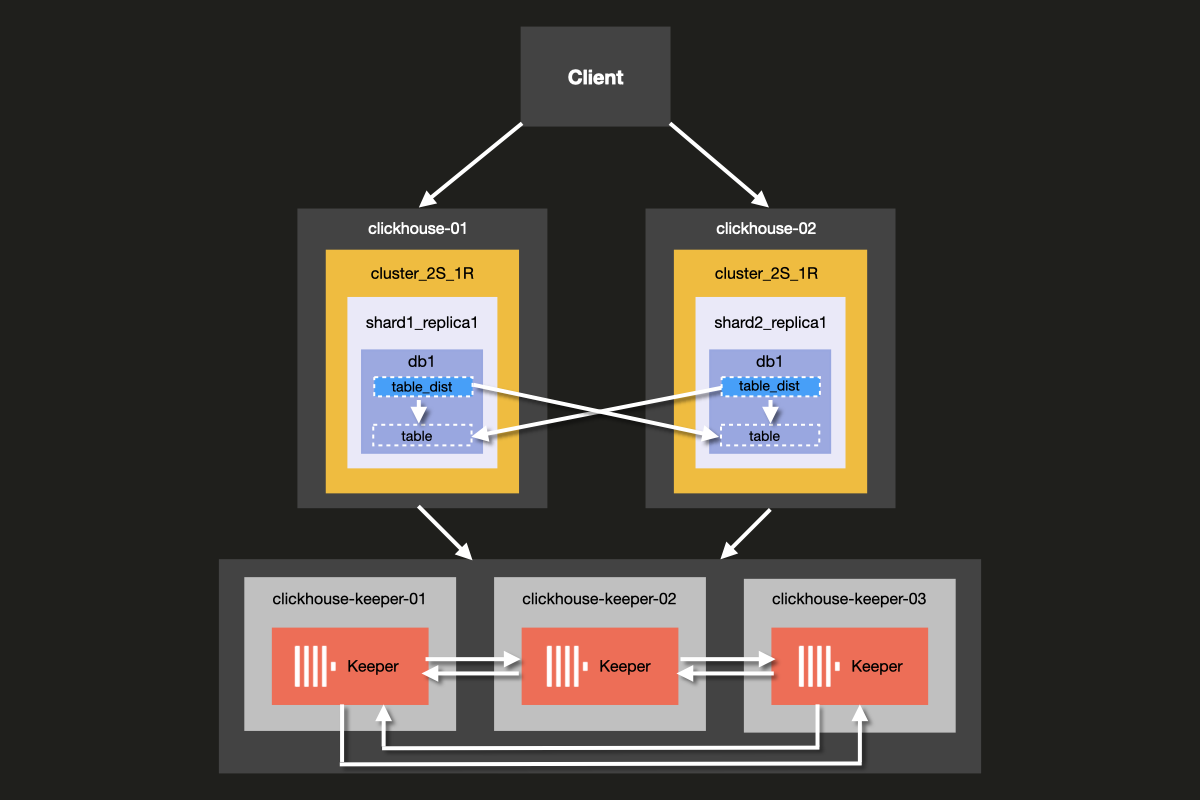
在本示例中,你将学习如何搭建一个简单且可扩展的 ClickHouse 集群。 集群中共配置了五台服务器,其中两台用于对数据进行分片。 另外三台服务器用于协调。
你将要搭建的集群架构如下所示:

虽然可以在同一台服务器上同时运行 ClickHouse Server 和 ClickHouse Keeper, 但我们强烈建议在生产环境中为 ClickHouse Keeper 使用 专用 主机, 本示例中展示的就是这种做法。
Keeper 服务器可以配置得更小,通常每个 Keeper 服务器配备 4GB 内存就足够使用, 直到 ClickHouse Server 规模显著增大为止。
前置条件
- 你已经在本地部署过 ClickHouse 服务器
- 你熟悉 ClickHouse 的基础配置概念,例如 配置文件
- 你的机器上已安装 Docker
设置目录结构和测试环境
以下步骤将引导从头开始设置集群。如果希望跳过这些步骤,直接运行集群,可以从 examples 仓库的 'docker-compose-recipes' 目录 获取示例文件。
在本教程中,您将使用 Docker compose 来 搭建 ClickHouse 集群。该配置同样可以修改后用于 独立的本地机器、虚拟机或云实例。
运行以下命令以设置本示例的目录结构:
将以下 docker-compose.yml 文件添加到 clickhouse-cluster 目录:
创建以下子目录和文件:
config.d目录包含 ClickHouse 服务器配置文件config.xml,其中为每个 ClickHouse 节点定义自定义配置。该配置会与每次安装 ClickHouse 时随附的默认config.xml配置文件合并。users.d目录包含用户配置文件users.xml,其中定义用户的自定义配置。该配置会与每次安装 ClickHouse 时随附的默认users.xml配置文件合并。
在编写自定义配置时,最佳实践是使用 config.d 和 users.d 目录,
而不是直接修改 /etc/clickhouse-server/config.xml 和
/etc/clickhouse-server/users.xml 中的默认配置。
这一行
确保在 config.d 和 users.d 目录中定义的配置节会覆盖默认 config.xml 和 users.xml 文件中定义的默认配置节。
配置 ClickHouse 节点
服务器配置
现在修改位于 fs/volumes/clickhouse-{}/etc/clickhouse-server/config.d 的每个空配置文件 config.xml。下面高亮显示的行需要根据每个节点的具体情况进行修改:
| 目录 | 文件 |
|---|---|
fs/volumes/clickhouse-01/etc/clickhouse-server/config.d | config.xml |
fs/volumes/clickhouse-02/etc/clickhouse-server/config.d | config.xml |
下文将详细说明上述配置文件的各个部分。
网络和日志记录
通过启用 listen_host 设置,可以为网络接口开启外部访问。这样可确保 ClickHouse 服务器主机可以被其他主机访问:
HTTP API 的端口设置为 8123:
使用 ClickHouse 原生协议进行交互的 TCP 端口(在 clickhouse-client 与其他原生 ClickHouse 工具之间,以及 clickhouse-server 与其他 clickhouse-server 之间)被设置为 9000:
日志记录在 <logger> 块中定义。此示例配置提供一个调试日志,该日志将在达到 1000M 时滚动三次:
有关日志配置的更多信息,请参阅默认 ClickHouse 配置文件中的注释说明。
集群配置
集群配置在 <remote_servers> 块中设置。
这里定义了集群名称 cluster_2S_1R。
<cluster_2S_1R></cluster_2S_1R> 块定义了集群的布局,
使用 <shard></shard> 和 <replica></replica> 设置,并作为
分布式 DDL 查询的模板。分布式 DDL 查询是指使用 ON CLUSTER 子句在整个
集群中执行的查询。默认情况下,分布式 DDL 查询
处于启用状态,但也可以通过设置 allow_distributed_ddl_queries 来禁用。
internal_replication 默认设置为 false,因为每个分片仅有一个副本。
对于每个服务器,需要指定以下参数:
| 参数 | 描述 | 默认值 |
|---|---|---|
host | 远程服务器的地址。可以使用域名或 IPv4/IPv6 地址。如果指定域名,服务器在启动时会发起一次 DNS 请求,并在服务器运行期间缓存结果。若 DNS 请求失败,服务器将无法启动。如果修改了该域名的 DNS 记录,需要重启服务器。 | - |
port | 用于消息通信的 TCP 端口(配置中的 tcp_port,通常设为 9000)。不要与 http_port 混淆。 | - |
Keeper 配置
<ZooKeeper> 部分用于指定 ClickHouse Keeper(或 ZooKeeper)的运行位置。
由于使用的是 ClickHouse Keeper 集群,需要指定集群中的每个 <node>,
并分别通过 <host> 和 <port> 标签指定其主机名和端口号。
ClickHouse Keeper 的设置将在教程的下一步骤中进行说明。
尽管可以在与 ClickHouse Server 相同的服务器上运行 ClickHouse Keeper,但在生产环境中,我们强烈建议将 ClickHouse Keeper 部署在专用主机上。
宏配置
此外,<macros> 配置段用于定义复制表的参数替换。这些宏参数列在 system.macros 表中,允许在查询中使用 {shard} 和 {replica} 等替换变量。
这些配置需要根据集群的实际布局进行相应定义。
用户配置
现在修改位于 fs/volumes/clickhouse-{}/etc/clickhouse-server/users.d 路径下的每个空配置文件 users.xml,添加以下内容:
| 目录 | 文件 |
|---|---|
fs/volumes/clickhouse-01/etc/clickhouse-server/users.d | users.xml |
fs/volumes/clickhouse-02/etc/clickhouse-server/users.d | users.xml |
在此示例中,为简化配置,默认用户未设置密码。 在生产环境中,不建议采用此配置。
在此示例中,集群中所有节点的 users.xml 文件都相同。
配置 ClickHouse Keeper
Keeper 配置
为了使复制功能正常工作,需要先设置并配置一个 ClickHouse Keeper 集群。ClickHouse Keeper 提供数据复制所需的协调系统,可作为 ZooKeeper 的替代方案(也可以使用 ZooKeeper)。不过更推荐使用 ClickHouse Keeper,因为相比 ZooKeeper 它提供了更好的保证和可靠性,并且占用更少资源。为了实现高可用性并维持仲裁,建议至少运行三个 ClickHouse Keeper 节点。
ClickHouse Keeper 可以与 ClickHouse 一同运行在集群中的任意节点上,不过推荐将其部署在独立节点上,以便可以在不影响数据库集群的情况下独立扩缩容和管理 ClickHouse Keeper 集群。
在示例文件夹的根目录执行以下命令,为每个 ClickHouse Keeper 节点创建 keeper_config.xml 文件:
修改在每个节点目录 fs/volumes/clickhouse-keeper-{}/etc/clickhouse-keeper 中创建的空配置文件。
下面高亮显示的行需要根据各自节点进行相应修改:
| 目录 | 文件 |
|---|---|
fs/volumes/clickhouse-keeper-01/etc/clickhouse-keeper | keeper_config.xml |
fs/volumes/clickhouse-keeper-02/etc/clickhouse-keeper | keeper_config.xml |
fs/volumes/clickhouse-keeper-03/etc/clickhouse-keeper | keeper_config.xml |
每个配置文件都将包含如下所示的专用配置。
所使用的 server_id 在集群中对于对应的 ClickHouse Keeper 节点必须是唯一的,
并且要与 <raft_configuration> 部分中定义的服务器 <id> 相匹配。
tcp_port 是供 ClickHouse Keeper 的 客户端 使用的端口。
以下部分用于配置参与 Raft 共识算法仲裁的服务器(参见 [raft 共识算法](https://en.wikipedia.org/wiki/Raft_(algorithm))):
ClickHouse Cloud 消除了管理分片和副本所带来的运维负担。 该平台会自动处理高可用性、数据复制以及扩缩容相关决策。 计算和存储彼此独立,可根据需求弹性扩缩,而无需手动配置或持续维护。
测试部署配置
确保 Docker 在您的机器上运行。
在 cluster_2S_1R 目录的根目录下使用 docker-compose up 命令启动集群:
您应该会看到 Docker 开始拉取 ClickHouse 和 Keeper 镜像, 然后启动容器:
要验证集群是否正在运行,请连接到 clickhouse-01 或 clickhouse-02 并运行以下查询。连接到第一个节点的命令如下所示:
如果成功,您将看到 ClickHouse 客户端提示符:
运行以下查询以检查各主机定义的集群拓扑:
运行以下查询以检查 ClickHouse Keeper 集群的状态:
mntr 命令也常用于确认 ClickHouse Keeper 是否正在运行,并获取三个 Keeper 节点之间关系的状态信息。
在本例所使用的配置中,有三个节点协同工作。
这些节点会选举出一个 leader 节点,其余节点将作为 follower 节点。
mntr 命令会提供与性能相关的信息,以及某个节点当前是 follower 还是 leader。
你可能需要安装 netcat 才能向 Keeper 发送 mntr 命令。
有关下载信息,请参阅 nmap.org 页面。
在 clickhouse-keeper-01、clickhouse-keeper-02 和 clickhouse-keeper-03 上的 shell 中运行下面的命令,以检查每个 Keeper 节点的状态。下面显示的是用于 clickhouse-keeper-01 的命令:
下面展示的是来自 follower 节点的一个示例响应:
下面是来自 leader 节点的一个示例响应:
至此,您已成功部署了一个单分片双副本的 ClickHouse 集群。 下一步,您将在该集群中创建表。
创建数据库
现在您已验证集群已正确设置并正在运行,接下来将重新创建与 UK property prices 示例数据集教程中使用的相同表。该表包含自 1995 年以来英格兰和威尔士房地产交易价格的约 3000 万行数据。
通过在不同的终端标签页或窗口中分别运行以下各命令,连接到每个主机的客户端:
您可以在每个主机的 clickhouse-client 中运行以下查询,确认除默认数据库外尚未创建其他数据库:
从 clickhouse-01 客户端执行以下分布式 DDL 查询,使用 ON CLUSTER 子句创建名为 uk 的新数据库:
您可以再次从每个主机的客户端运行相同的查询,
以确认数据库已在整个集群中创建,
即使查询仅在 clickhouse-01 上执行:
在集群上创建表
数据库创建完成后,接下来创建表。 在任意主机客户端上运行以下查询:
请注意,该查询与 英国房产价格 示例数据集教程中原始 CREATE 语句所使用的查询完全相同,唯一的区别是增加了 ON CLUSTER 子句。
ON CLUSTER 子句用于分布式执行 DDL(数据定义语言)查询,例如 CREATE、DROP、ALTER 和 RENAME,以确保这些架构变更应用于集群中的所有节点。
您可以在各主机的客户端上运行以下查询,以确认表已在集群中创建:
在插入英国房价数据之前,让我们先进行一个快速实验,看看从任一主机向普通表插入数据时会发生什么。
从任一主机执行以下查询以创建测试数据库和表:
现在从 clickhouse-01 运行以下 INSERT 查询:
切换到 clickhouse-02 并运行以下 INSERT 查询:
现在从 clickhouse-01 或 clickhouse-02 运行以下查询:
您会注意到,与 ReplicatedMergeTree 表不同,这里只返回插入到该特定主机上的那一行数据,而不是两行都返回。
要跨两个分片读取数据,我们需要一个能够处理跨所有分片查询的接口,该接口在运行 SELECT 查询时合并来自两个分片的数据,在运行 INSERT 查询时将数据插入到两个分片。
在 ClickHouse 中,此接口称为分布式表,通过 Distributed 表引擎创建。下面我们来看看它的工作原理。
创建分布式表
使用以下查询创建分布式表:
在此示例中,选择 rand() 函数作为分片键,使插入操作随机分布到各个分片上。
现在从任一主机查询分布式表,您将获得在两台主机上插入的所有行,这与之前的示例不同:
对英国房产价格数据执行相同操作。从任意主机客户端运行以下查询,使用之前通过 ON CLUSTER 创建的现有表来创建分布式表:
向分布式表插入数据
现在连接到任意一台主机并插入数据:
数据插入后,可以使用分布式表检查行数:
在任一主机上运行以下查询,您将看到数据已基本均匀地分布在各个分片上(请注意,由于插入分片的选择是通过 rand() 设置的,因此您的结果可能会有所不同):
如果其中一台主机发生故障会怎样?让我们通过关闭 clickhouse-01 来模拟这种情况:
运行以下命令检查主机是否已停止运行:
现在从 clickhouse-02 运行之前在分布式表上执行的相同 select 查询:
遗憾的是,我们的集群不具备容错能力。如果其中一台主机发生故障,集群将被视为不健康状态,查询将会失败。这与我们在前面示例中看到的复制表不同——在复制表的情况下,即使其中一台主机发生故障,我们仍然能够插入数据。
结论
这种集群拓扑结构的优势在于,数据被分布在不同的主机上,每个节点只使用一半的存储空间。更重要的是,查询会在两个分片上并行处理,这在内存利用率方面更高效,同时减少了每个主机的 I/O。
这种集群拓扑结构的主要劣势是,一旦丢失其中一台主机,我们将无法继续提供查询服务。
在下一个示例中,我们将介绍如何设置一个包含两个分片和两个副本的集群,以同时提供可扩展性和容错能力。

