> ## Documentation Index
> Fetch the complete documentation index at: https://clickhouse.com/docs/llms.txt
> Use this file to discover all available pages before exploring further.
# BYOC Onboarding for AWS
> Deploy ClickHouse on your own cloud infrastructure
## Onboarding process
Customers can initiate the onboarding process by reaching out to [us](https://clickhouse.com/cloud/bring-your-own-cloud). Customers need to have a dedicated AWS account and know the region they will use. At this time, we are allowing users to launch BYOC services only in the regions that we support for ClickHouse Cloud.
### Prepare an AWS account
Customers are recommended to prepare a dedicated AWS account for hosting the ClickHouse BYOC deployment to ensure better isolation. However, using a shared account and an existing VPC is also possible. See the details in *Setup BYOC Infrastructure* below.
With this account and the initial organization admin email, you can contact ClickHouse support.
### Initialize BYOC setup
The initial BYOC setup can be performed using either a CloudFormation template or a Terraform module. Both approaches create the same IAM role, enabling BYOC controllers from ClickHouse Cloud to manage your infrastructure. Note that S3, VPC, and compute resources required for running ClickHouse are not included in this initial setup.
#### CloudFormation Template
[BYOC CloudFormation template](https://s3.us-east-2.amazonaws.com/clickhouse-public-resources.clickhouse.cloud/cf-templates/byoc.yaml)
#### Terraform Module
[BYOC Terraform module](https://s3.us-east-2.amazonaws.com/clickhouse-public-resources.clickhouse.cloud/tf/byoc.tar.gz)
```hcl theme={null}
module "clickhouse_onboarding" {
source = "https://s3.us-east-2.amazonaws.com/clickhouse-public-resources.clickhouse.cloud/tf/byoc.tar.gz"
byoc_env = "production"
}
```
### Set up BYOC infrastructure
After creating the CloudFormation stack, you will be prompted to set up the infrastructure, including S3, VPC, and the EKS cluster, from the cloud console. Certain configurations must be determined at this stage, as they cannot be changed later. Specifically:
* **The region you want to use**, you can choose one of any [public regions](/docs/products/cloud/reference/supported-regions) we have for ClickHouse Cloud.
* **The VPC CIDR range for BYOC**: By default, we use `10.0.0.0/16` for the BYOC VPC CIDR range. If you plan to use VPC peering with another account, ensure the CIDR ranges do not overlap. Allocate a proper CIDR range for BYOC, with a minimum size of `/22` to accommodate necessary workloads.
* **Availability Zones for BYOC VPC**: If you plan to use VPC peering, aligning availability zones between the source and BYOC accounts can help reduce cross-AZ traffic costs. In AWS, availability zone suffixes (`a, b, c`) may represent different physical zone IDs across accounts. See the [AWS guide](https://docs.aws.amazon.com/prescriptive-guidance/latest/patterns/use-consistent-availability-zones-in-vpcs-across-different-aws-accounts.html) for details.
#### Customer-managed VPC
By default, ClickHouse Cloud will provision a dedicated VPC for better isolation in your BYOC deployment. However, you can also use an existing VPC in your account. This requires specific configuration and must be coordinated through ClickHouse Support.
**Configure Your Existing VPC**
1. Allocate at least 3 private subnets across 3 different availability zones for ClickHouse Cloud to use.
2. Ensure each subnet has a minimum CIDR range of `/23` (e.g., 10.0.0.0/23) to provide sufficient IP addresses for the ClickHouse deployment.
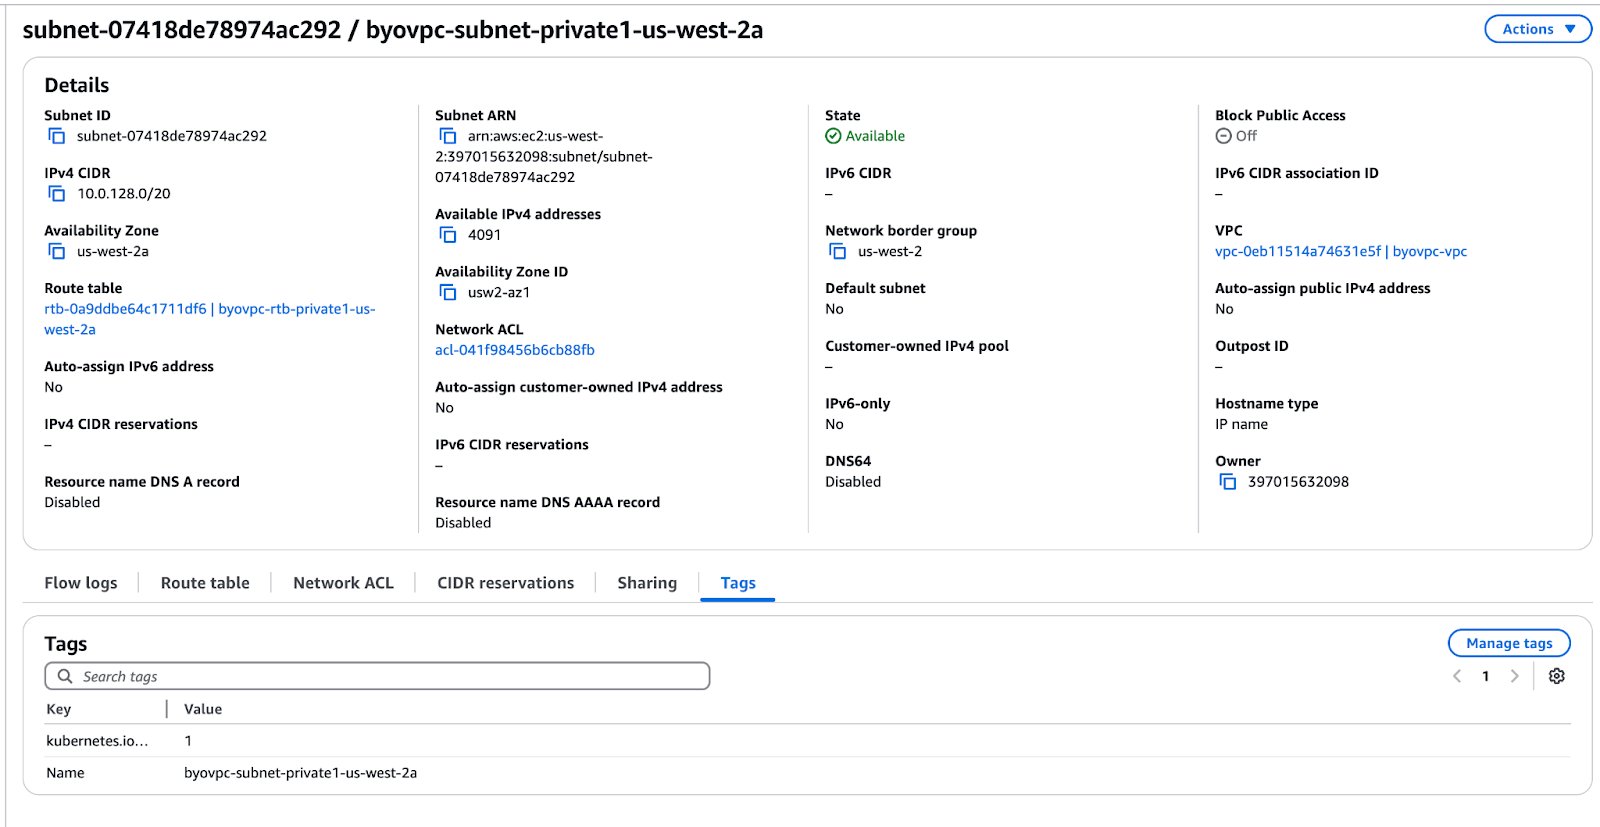
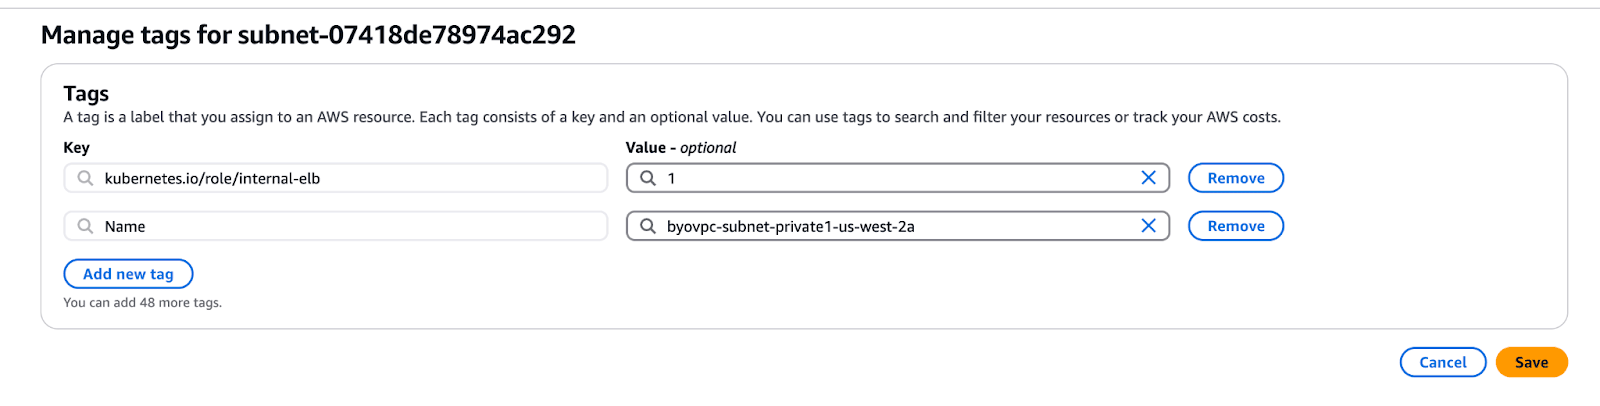
3. Add the tag `kubernetes.io/role/internal-elb=1` to each subnet to enable proper load balancer configuration.
4. Configure S3 Gateway Endpoint
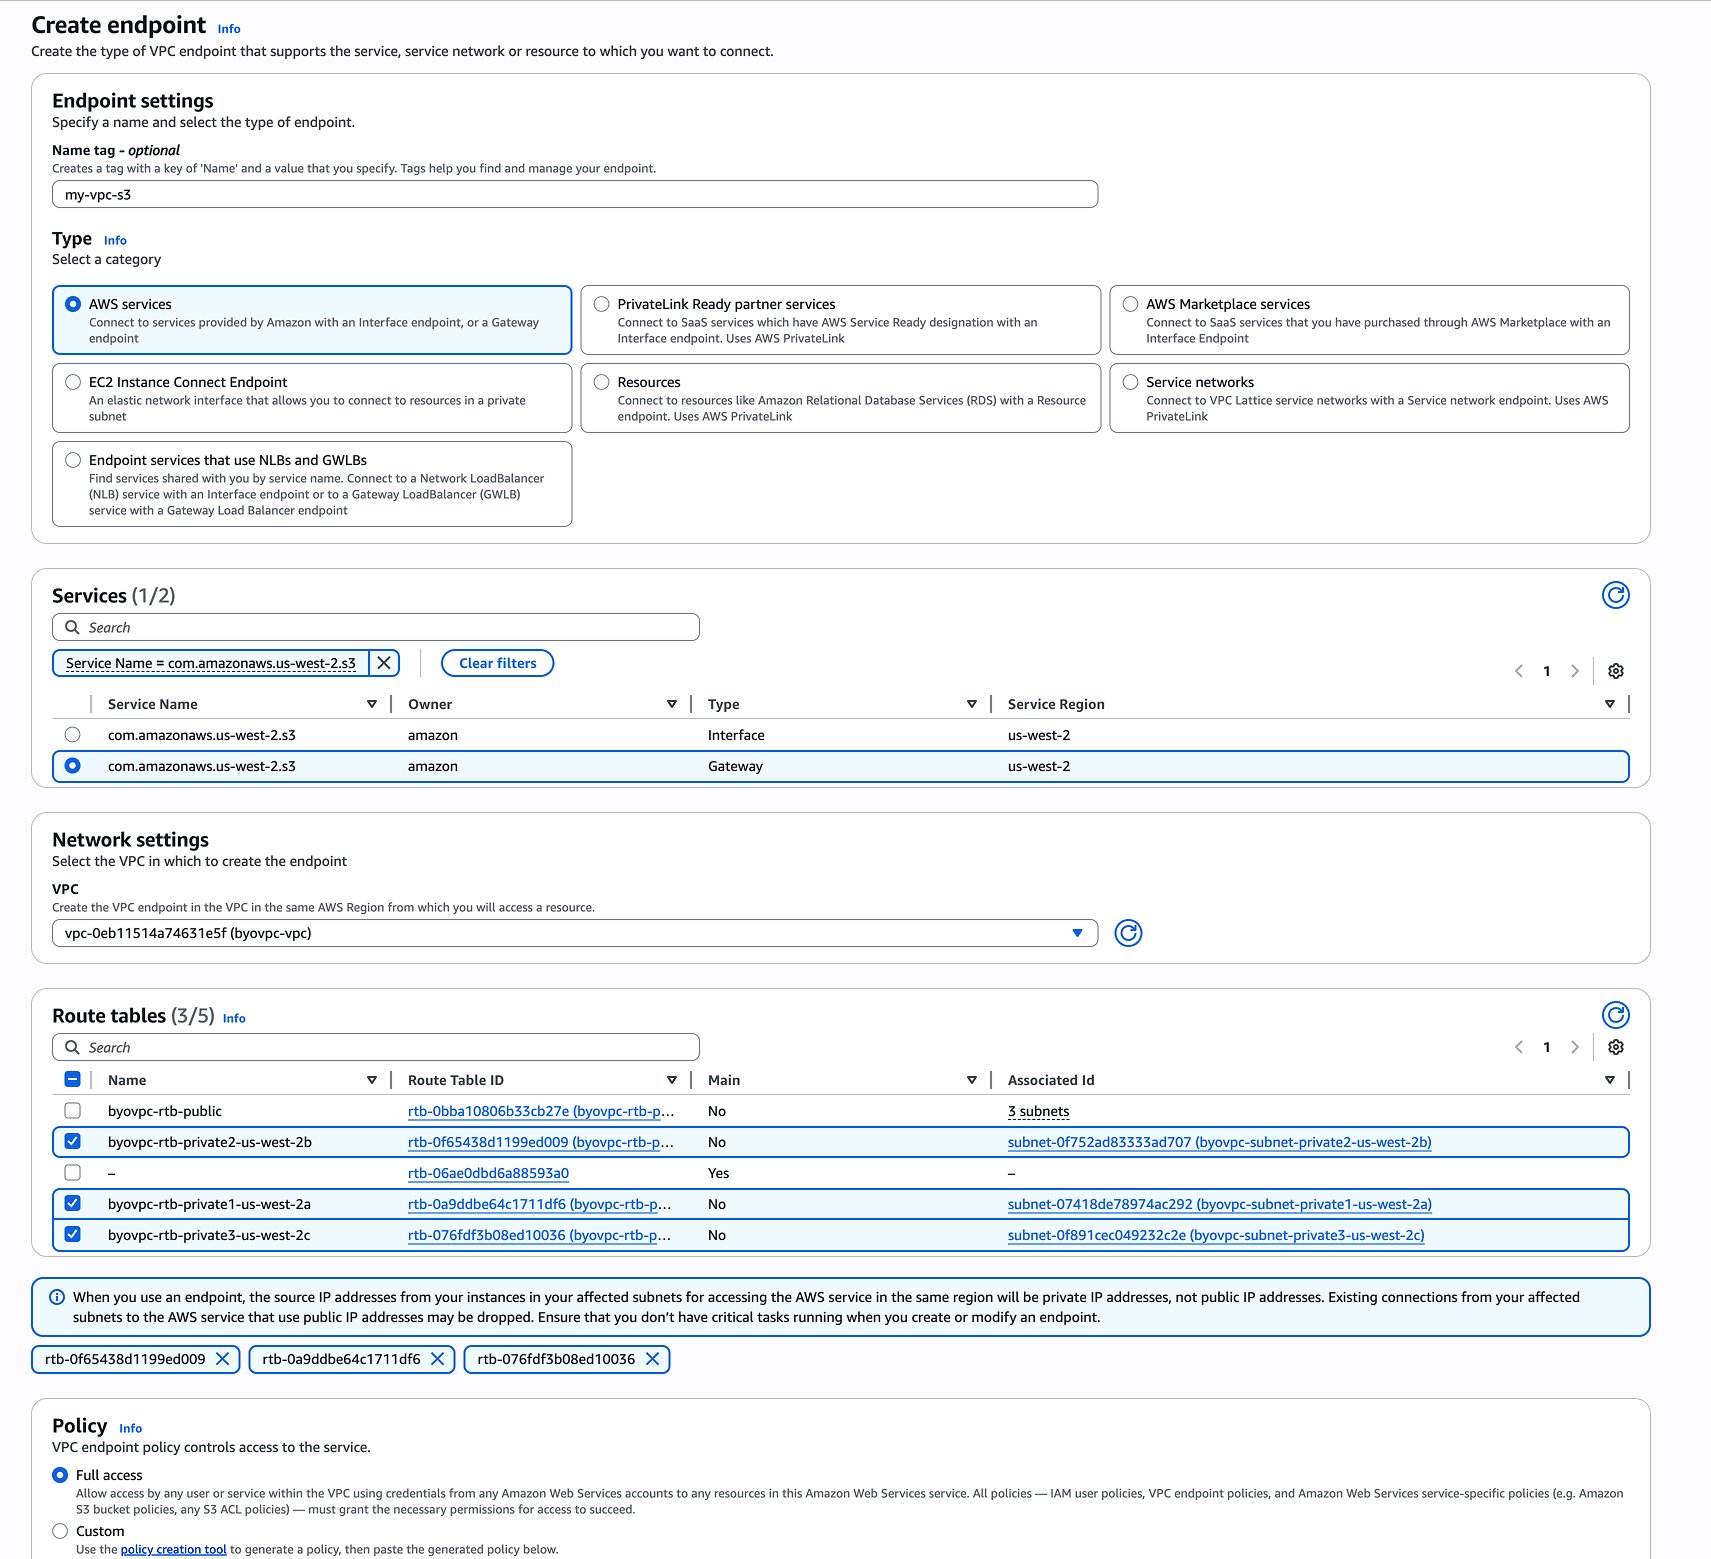
If your VPC doesn't already have an S3 Gateway Endpoint configured, you'll need to create one to enable secure, private communication between your VPC and Amazon S3. This endpoint allows your ClickHouse services to access S3 without going through the public internet. Please refer to the screenshot below for an example configuration.
**Contact ClickHouse Support**\
Create a support ticket with the following information:
* Your AWS account ID
* The AWS region where you want to deploy the service
* Your VPC ID
* The Private Subnet IDs you've allocated for ClickHouse
* The availability zones these subnets are in
### Optional: Setup VPC Peering
To create or delete VPC peering for ClickHouse BYOC, follow the steps:
Contact ClickHouse Support to enable Private Load Balancer.
1. Navigate to the VPC Dashboard in ClickHouse BYOC account.
2. Select Peering Connections.
3. Click Create Peering Connection
4. Set the VPC Requester to the ClickHouse VPC ID.
5. Set the VPC Accepter to the target VPC ID. (Select another account if applicable)
6. Click Create Peering Connection.
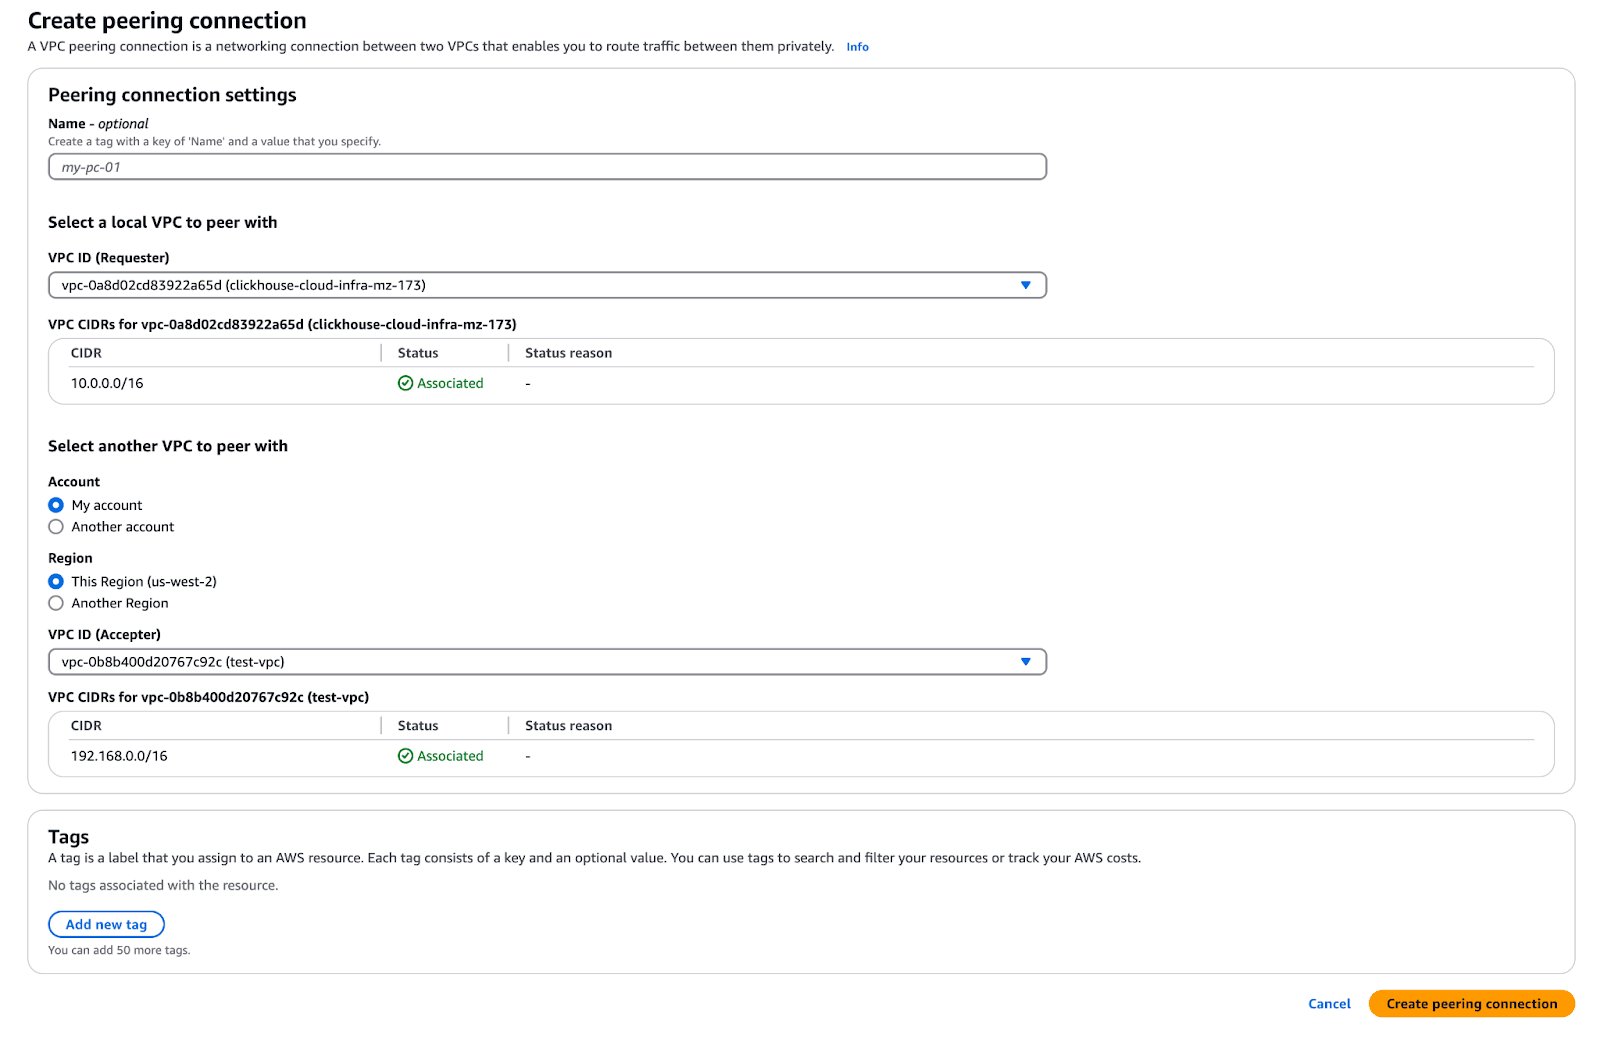
Go to the peering account, in the (VPC -> Peering connections -> Actions -> Accept request) page customer can approve this VPC peering request.

In ClickHouse BYOC account,
1. Select Route Tables in the VPC Dashboard.
2. Search for the ClickHouse VPC ID. Edit each route table attached to the private subnets.
3. Click the Edit button under the Routes tab.
4. Click Add another route.
5. Enter the CIDR range of the target VPC for the Destination.
6. Select “Peering Connection” and the ID of the peering connection for the Target.

In the peering AWS account,
1. Select Route Tables in the VPC Dashboard.
2. Search for the target VPC ID.
3. Click the Edit button under the Routes tab.
4. Click Add another route.
5. Enter the CIDR range of the ClickHouse VPC for the Destination.
6. Select “Peering Connection” and the ID of the peering connection for the Target.

In the ClickHouse BYOC account, you need to update the Security Group settings to allow traffic from your peered VPC. Please contact ClickHouse Support to request the addition of inbound rules that include the CIDR ranges of your peered VPC.
***
The ClickHouse service should now be accessible from the peered VPC.
To access ClickHouse privately, a private load balancer and endpoint are provisioned for secure connectivity from the user's peered VPC. The private endpoint follows the public endpoint format with a `-private` suffix. For example:
* **Public endpoint**: `h5ju65kv87.mhp0y4dmph.us-west-2.aws.byoc.clickhouse.cloud`
* **Private endpoint**: `h5ju65kv87-private.mhp0y4dmph.us-west-2.aws.byoc.clickhouse.cloud`
Optional, after verifying that peering is working, you can request the removal of the public load balancer for ClickHouse BYOC.
## Upgrade process
We regularly upgrade the software, including ClickHouse database version upgrades, ClickHouse Operator, EKS, and other components.
While we aim for seamless upgrades (e.g., rolling upgrades and restarts), some, such as ClickHouse version changes and EKS node upgrades, may impact service. Customers can specify a maintenance window (e.g., every Tuesday at 1:00 a.m. PDT), ensuring such upgrades occur only during the scheduled time.
Maintenance windows do not apply to security and vulnerability fixes. These are handled as off-cycle upgrades, with timely communication to coordinate a suitable time and minimize operational impact.
## CloudFormation IAM roles
### Bootstrap IAM role
The bootstrap IAM role has the following permissions:
* **EC2 and VPC operations**: Required for setting up VPC and EKS clusters.
* **S3 operations (e.g., `s3:CreateBucket`)**: Needed to create buckets for ClickHouse BYOC storage.
* **`route53:*` permissions**: Required for external DNS to configure records in Route 53.
* **IAM operations (e.g., `iam:CreatePolicy`)**: Needed for controllers to create additional roles (see the next section for details).
* **EKS operations**: Limited to resources with names starting with the `clickhouse-cloud` prefix.
### Additional IAM roles created by the controller
In addition to the `ClickHouseManagementRole` created via CloudFormation, the controller will create several additional roles.
These roles are assumed by applications running within the customer's EKS cluster:
* **State Exporter Role**
* ClickHouse component that reports service health information to ClickHouse Cloud.
* Requires permission to write to an SQS queue owned by ClickHouse Cloud.
* **Load-Balancer Controller**
* Standard AWS load balancer controller.
* EBS CSI Controller to manage volumes for ClickHouse services.
* **External-DNS**
* Propagates DNS configurations to Route 53.
* **Cert-Manager**
* Provisions TLS certificates for BYOC service domains.
* **Cluster Autoscaler**
* Adjusts the node group size as needed.
**K8s-control-plane** and **k8s-worker** roles are meant to be assumed by AWS EKS services.
Lastly, **`data-plane-mgmt`** allows a ClickHouse Cloud Control Plane component to reconcile necessary custom resources, such as `ClickHouseCluster` and the Istio Virtual Service/Gateway.
## Network boundaries
This section covers different network traffic to and from the customer BYOC VPC:
* **Inbound**: Traffic entering the customer BYOC VPC.
* **Outbound**: Traffic originating from the customer BYOC VPC and sent to an external destination.
* **Public**: A network endpoint accessible from the public internet.
* **Private**: A network endpoint accessible only through private connections, such as VPC peering, VPC Private Link, or Tailscale.
**Istio ingress is deployed behind an AWS NLB to accept ClickHouse client traffic.**
*Inbound, Public (can be Private)*
The Istio ingress gateway terminates TLS. The certificate, provisioned by CertManager with Let's Encrypt, is stored as a secret within the EKS cluster. Traffic between Istio and ClickHouse is [encrypted by AWS](https://docs.aws.amazon.com/whitepapers/latest/logical-separation/encrypting-data-at-rest-and--in-transit.html#:~:text=All%20network%20traffic%20between%20AWS,supported%20Amazon%20EC2%20instance%20types) since they reside in the same VPC.
By default, ingress is publicly accessible with IP allow list filtering. Customers can configure VPC peering to make it private and disable public connections. We highly recommend setting up an [IP filter](/docs/products/cloud/guides/security/connectivity/setting-ip-filters) to restrict access.
### Troubleshooting access
*Inbound, Public (can be Private)*
ClickHouse Cloud engineers require troubleshooting access via Tailscale. They are provisioned with just-in-time certificate-based authentication for BYOC deployments.
### Billing scraper
*Outbound, Private*
The Billing scraper collects billing data from ClickHouse and sends it to an S3 bucket owned by ClickHouse Cloud.
It runs as a sidecar alongside the ClickHouse server container, periodically scraping CPU and memory metrics. Requests within the same region are routed through VPC gateway service endpoints.
### Alerts
*Outbound, Public*
AlertManager is configured to send alerts to ClickHouse Cloud when the customer's ClickHouse cluster is unhealthy.
Metrics and logs are stored within the customer's BYOC VPC. Logs are currently stored locally in EBS. In a future update, they will be stored in LogHouse, a ClickHouse service within the BYOC VPC. Metrics use a Prometheus and Thanos stack, stored locally in the BYOC VPC.
### Service state
*Outbound*
State Exporter sends ClickHouse service state information to an SQS owned by ClickHouse Cloud.