> ## Documentation Index
> Fetch the complete documentation index at: https://clickhouse.com/docs/llms.txt
> Use this file to discover all available pages before exploring further.

> ClickHouse 연결을 위한 공식 JS 클라이언트입니다.

# ClickHouse JS

ClickHouse에 연결하기 위한 공식 JS 클라이언트입니다.
이 클라이언트는 TypeScript로 작성되었으며, 클라이언트의 공개 API에 대한 타입 정의를 제공합니다.

의존성이 전혀 없으며, 최고 성능을 위해 최적화되어 있고, 다양한 ClickHouse 버전과 구성(온프레미스 single node, 온프레미스 클러스터, ClickHouse Cloud)에서 테스트되었습니다.

서로 다른 환경에 맞는 두 가지 버전의 클라이언트를 사용할 수 있습니다:

* `@clickhouse/client` - Node.js 전용
* `@clickhouse/client-web` - 브라우저(Chrome/Firefox), Cloudflare workers

TypeScript를 사용하는 경우, [version 4.5](https://www.typescriptlang.org/docs/handbook/release-notes/typescript-4-5.html) 이상인지 확인하십시오. 이 버전부터 [inline import and export syntax](https://www.typescriptlang.org/docs/handbook/release-notes/typescript-4-5.html#type-modifiers-on-import-names)를 사용할 수 있습니다.

클라이언트 소스 코드는 [ClickHouse-JS GitHub 리포지토리](https://github.com/ClickHouse/clickhouse-js)에서 확인할 수 있습니다.

<Info>
  **AI agent skills**

  JS 클라이언트에는 코딩 에이전트가 클라이언트를 사용하는 데 도움이 되는 AI agent 스킬이 함께 제공됩니다. 다음과 같이 설치하십시오:

  ```sh theme={null}
  npm skills add ClickHouse/clickhouse-js
  ```
</Info>

<div id="environment-requirements-nodejs">
  ## 환경 요구 사항 (node.js)
</div>

클라이언트를 실행하려면 환경에서 Node.js를 사용할 수 있어야 합니다.
이 클라이언트는 [현재 유지보수되는](https://github.com/nodejs/release#readme) 모든 Node.js 릴리스를 지원합니다.

Node.js 버전이 지원 종료에 가까워지면 더 이상 최신 버전이 아니고 보안상 안전하지 않은 것으로 간주되므로, 클라이언트는 해당 버전에 대한 지원을 중단합니다.

현재 Node.js 버전 지원 범위는 다음과 같습니다.

| Node.js version | Supported?  |
| --------------- | ----------- |
| 24.x            | ✔           |
| 22.x            | ✔           |
| 20.x            | ✔           |
| 18.x            | 가능한 범위 내 지원 |

<div id="environment-requirements-web">
  ## 환경 요구 사항 (웹)
</div>

클라이언트의 웹 버전은 최신 Chrome/Firefox 브라우저에서 공식적으로 테스트되었으며, React/Vue/Angular 애플리케이션이나 Cloudflare workers에서 의존성으로 포함해 사용할 수 있습니다.

<div id="installation">
  ## 설치
</div>

최신 안정 버전의 Node.js 클라이언트를 설치하려면 다음을 실행하십시오:

```sh theme={null}
npm i @clickhouse/client
```

웹 버전 설치:

```sh theme={null}
npm i @clickhouse/client-web
```

<div id="compatibility-with-clickhouse">
  ## ClickHouse와의 호환성
</div>

| 클라이언트 버전 | ClickHouse |
| -------- | ---------- |
| 1.12.0   | 24.8+      |

클라이언트는 이전 버전에서도 작동할 가능성이 높지만, 이는 최선 노력 수준의 지원으로 보장되지는 않습니다. ClickHouse 버전이 23.3보다 낮다면 [ClickHouse security policy](https://github.com/ClickHouse/ClickHouse/blob/master/SECURITY.md)를 참조하고 업그레이드를 고려하십시오.

<div id="examples">
  ## 예시
</div>

클라이언트 리포지토리의 [예시](https://github.com/ClickHouse/clickhouse-js/blob/main/examples)에서는 클라이언트 사용과 관련된 다양한 시나리오를 다룹니다.

개요는 [예시 README](https://github.com/ClickHouse/clickhouse-js/blob/main/examples/README.md#overview)에서 확인할 수 있습니다.

예시 또는 아래 문서에서 명확하지 않거나 누락된 내용이 있으면 언제든지 [문의해 주세요](/docs/ko/integrations/language-clients/js/index#contact-us).

<div id="client-api">
  ### 클라이언트 API
</div>

별도로 명시하지 않는 한, 대부분의 예시는 클라이언트의 Node.js 버전과 web version 모두에서 호환됩니다.

<div id="creating-a-client-instance">
  #### 클라이언트 인스턴스 만들기
</div>

`createClient` 팩터리를 사용해 필요한 만큼 클라이언트 인스턴스를 만들 수 있습니다.

```ts theme={null}
import { createClient } from '@clickhouse/client' // or '@clickhouse/client-web'

const client = createClient({
  /* configuration */
})
```

사용 중인 환경에서 ESM 모듈을 지원하지 않으면, 대신 CJS 구문을 사용할 수 있습니다:

```ts theme={null}
const { createClient } = require('@clickhouse/client');

const client = createClient({
  /* configuration */
})
```

클라이언트 인스턴스는 생성 시 [사전 구성](/docs/ko/integrations/language-clients/js/index#configuration)할 수 있습니다.

<div id="configuration">
  #### 구성
</div>

클라이언트 인스턴스를 생성할 때 다음 연결 설정을 조정할 수 있습니다:

| 설정                                                                       | 설명                                              | 기본값                             | 관련 항목                                                                                                          |                                                                                                  |
| ------------------------------------------------------------------------ | ----------------------------------------------- | ------------------------------- | -------------------------------------------------------------------------------------------------------------- | ------------------------------------------------------------------------------------------------ |
| **url**?: string                                                         | ClickHouse 인스턴스 URL입니다.                         | `http://localhost:8123`         | [URL 구성 문서](/docs/ko/integrations/language-clients/js/index#url-configuration)                                      |                                                                                                  |
| **pathname**?: string                                                    | 클라이언트가 ClickHouse URL을 파싱한 후 여기에 추가할 선택적 경로입니다. | `''`                            | [경로가 포함된 프록시 문서](/docs/ko/integrations/language-clients/js/index#proxy-with-a-pathname)                             |                                                                                                  |
| **request\_timeout**?: number                                            | 요청 timeout입니다(밀리초 단위).                          | `30_000`                        | -                                                                                                              |                                                                                                  |
| **compression**?: `{ **response**?: boolean; **request**?: boolean }`    | Compression을 활성화합니다.                            | -                               | [Compression 문서](/docs/ko/integrations/language-clients/js/index#compression)                                       |                                                                                                  |
| **username**?: string                                                    | 요청을 수행할 사용자 이름입니다.                              | `default`                       | -                                                                                                              |                                                                                                  |
| **password**?: string                                                    | 사용자 password입니다.                                | `''`                            | -                                                                                                              |                                                                                                  |
| **application**?: string                                                 | Node.js 클라이언트를 사용하는 애플리케이션 이름입니다.               | `clickhouse-js`                 | -                                                                                                              |                                                                                                  |
| **database**?: string                                                    | 사용할 데이터베이스 이름입니다.                               | `default`                       | -                                                                                                              |                                                                                                  |
| **clickhouse\_settings**?: ClickHouseSettings                            | 모든 요청에 적용할 ClickHouse settings입니다.              | `{}`                            | -                                                                                                              |                                                                                                  |
| **log**?: `{ **LoggerClass**?: Logger, **level**?: ClickHouseLogLevel }` | 내부 클라이언트 logs 구성입니다.                            | -                               | [로깅 문서](/docs/ko/integrations/language-clients/js/index#logging-nodejs-only)                                        |                                                                                                  |
| **session\_id**?: string                                                 | 모든 요청과 함께 전송할 선택적 ClickHouse Session ID입니다.     | -                               | -                                                                                                              |                                                                                                  |
| **keep\_alive**?: `{ **enabled**?: boolean }`                            | Node.js 및 Web 버전 모두에서 기본적으로 활성화됩니다.             | -                               | -                                                                                                              |                                                                                                  |
| **http\_headers**?: `Record<string, string>`                             | 전송되는 ClickHouse 요청에 추가할 HTTP headers입니다.        | -                               | [authentication이 포함된 리버스 프록시 문서](/docs/ko/integrations/language-clients/js/index#reverse-proxy-with-authentication) |                                                                                                  |
| **roles**?: string                                                       | string\[]                                       | 전송 요청에 첨부할 ClickHouse 역할 이름입니다. | -                                                                                                              | [HTTP 인터페이스에서 역할 사용하기](/docs/ko/concepts/features/interfaces/http#setting-role-with-query-parameters) |

<div id="nodejs-specific-configuration-parameters">
  #### Node.js 전용 구성 매개변수
</div>

| 설정                                                                                         | 설명                                                              | 기본값                         | 관련 항목                                                                                                                  |                                                                                                            |
| ------------------------------------------------------------------------------------------ | --------------------------------------------------------------- | --------------------------- | ---------------------------------------------------------------------------------------------------------------------- | ---------------------------------------------------------------------------------------------------------- |
| **max\_open\_connections**?: number                                                        | 호스트별로 허용되는 연결 소켓의 최대 개수입니다.                                     | `10`                        | -                                                                                                                      |                                                                                                            |
| **tls**?: `{ **ca_cert**: Buffer, **cert**?: Buffer, **key**?: Buffer }`                   | TLS 인증서를 구성합니다.                                                 | -                           | [TLS 문서](/docs/ko/integrations/language-clients/js/index#tls-certificates-nodejs-only)                                      |                                                                                                            |
| **keep\_alive**?: `{ **enabled**?: boolean, **idle_socket_ttl**?: number }`                | -                                                               | -                           | [Keep Alive 문서](/docs/ko/integrations/language-clients/js/index#keep-alive-configuration-nodejs-only)                       |                                                                                                            |
| **http\_agent**?: http.Agent                                                               | https.Agent <br /><Badge color="green" icon="flask">실험적</Badge> | 클라이언트용 사용자 지정 HTTP 에이전트입니다. | -                                                                                                                      | [HTTP 에이전트 문서](/docs/ko/integrations/language-clients/js/index#custom-httphttps-agent-experimental-nodejs-only) |
| **set\_basic\_auth\_header**?: boolean <br /><Badge color="green" icon="flask">실험적</Badge> | 기본 인증 자격 증명으로 `Authorization` 헤더를 설정합니다.                        | `true`                      | [HTTP 에이전트 문서에서 이 설정의 사용법](/docs/ko/integrations/language-clients/js/index#custom-httphttps-agent-experimental-nodejs-only) |                                                                                                            |

<div id="url-configuration">
  ### URL 구성
</div>

<Warning>
  URL 구성은 *항상* 하드코딩된 값을 덮어쓰며, 이 경우 경고가 로그에 기록됩니다.
</Warning>

대부분의 클라이언트 인스턴스 매개변수는 URL로 구성할 수 있습니다. URL 형식은 `http[s]://[username:password@]hostname:port[/database][?param1=value1&param2=value2]`입니다. 일부 예외를 제외하면, 대부분의 매개변수 이름은 구성 옵션 인터페이스에서의 경로를 반영합니다. 다음 매개변수를 지원합니다:

| 매개변수                                        | 유형                                                       |
| ------------------------------------------- | -------------------------------------------------------- |
| `pathname`                                  | 임의의 문자열                                                  |
| `application_id`                            | 임의의 문자열                                                  |
| `session_id`                                | 임의의 문자열                                                  |
| `request_timeout`                           | 음수가 아닌 숫자                                                |
| `max_open_connections`                      | 0보다 큰 음수가 아닌 숫자                                          |
| `compression_request`                       | 불리언. 아래 (1)을 참조하십시오                                      |
| `compression_response`                      | 불리언                                                      |
| `log_level`                                 | 허용되는 값: `OFF`, `TRACE`, `DEBUG`, `INFO`, `WARN`, `ERROR` |
| `keep_alive_enabled`                        | 불리언                                                      |
| `clickhouse_setting_*` or `ch_*`            | 아래 (2)를 참조하십시오                                           |
| `http_header_*`                             | 아래 (3)을 참조하십시오                                           |
| (Node.js only) `keep_alive_idle_socket_ttl` | 음수가 아닌 숫자                                                |

* (1) 불리언의 유효한 값은 `true`/`1` 및 `false`/`0`입니다.
* (2) `clickhouse_setting_` 또는 `ch_` 접두사가 붙은 모든 매개변수는 이 접두사가 제거된 뒤, 나머지 부분이 클라이언트의 `clickhouse_settings`에 추가됩니다. 예를 들어 `?ch_async_insert=1&ch_wait_for_async_insert=1`는 다음과 같습니다:

```ts theme={null}
createClient({
  clickhouse_settings: {
    async_insert: 1,
    wait_for_async_insert: 1,
  },
})
```

참고: URL에서는 `clickhouse_settings`의 Boolean 값을 `1`/`0`으로 전달해야 합니다.

* (3) `http_header` 구성에도 (2)와 비슷하게 적용됩니다. 예를 들어 `?http_header_x-clickhouse-auth=foobar`는 다음과 같습니다:

```ts theme={null}
createClient({
  http_headers: {
    'x-clickhouse-auth': 'foobar',
  },
})
```

<div id="connecting">
  ### 연결
</div>

<div id="gather-your-connection-details">
  #### 연결 정보를 준비하십시오
</div>

HTTP(S)로 ClickHouse에 연결하려면 다음 정보가 필요합니다.

| 매개변수                      | 설명                                                         |
| ------------------------- | ---------------------------------------------------------- |
| `HOST` and `PORT`         | 일반적으로 TLS를 사용하는 경우 포트는 8443, TLS를 사용하지 않는 경우 8123입니다.      |
| `DATABASE NAME`           | 기본적으로 `default`라는 이름의 데이터베이스가 제공되며, 연결할 데이터베이스 이름을 사용하십시오. |
| `USERNAME` and `PASSWORD` | 기본 사용자 이름은 `default`입니다. 사용 사례에 맞는 사용자 이름을 사용하십시오.         |

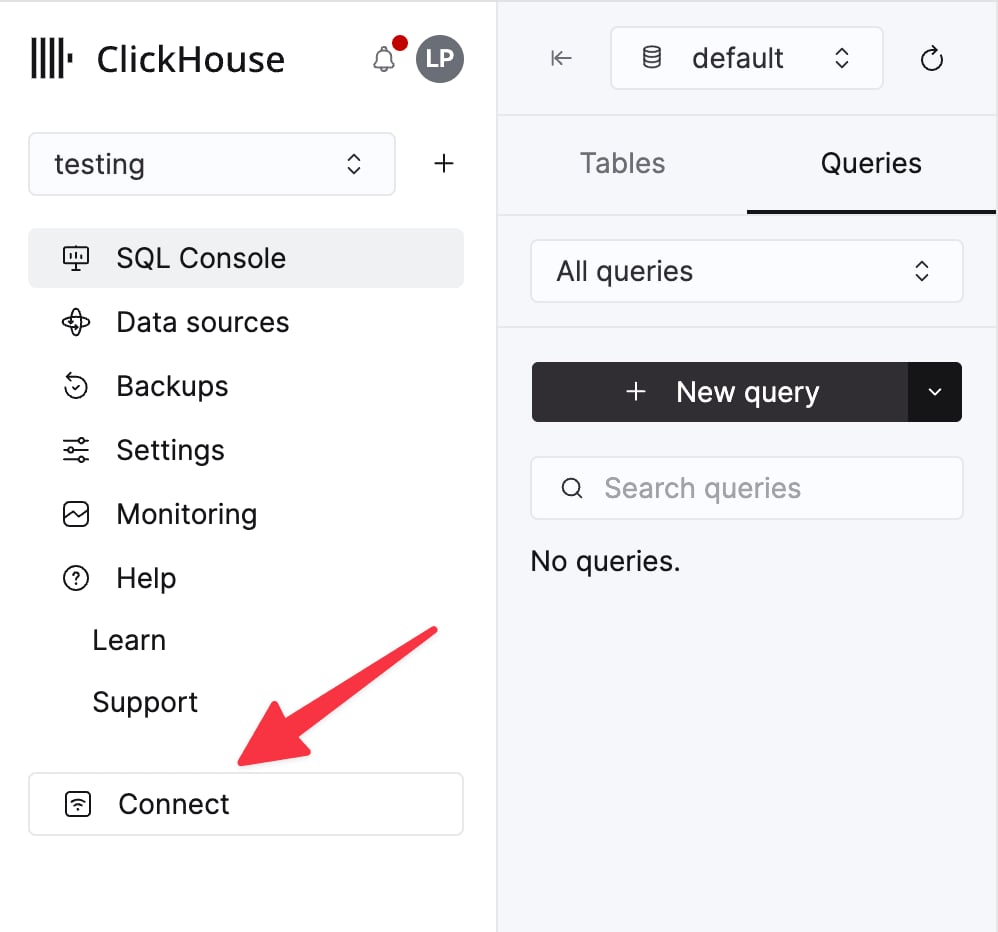
ClickHouse Cloud 서비스의 연결 정보는 ClickHouse Cloud 콘솔에서 확인할 수 있습니다.
서비스를 선택한 다음 **Connect**를 클릭하십시오.
<div className="ch-image-md">
  <Frame>
    <img src="https://mintcdn.com/private-7c7dfe99/CFFsa2agBPbviR4r/images/_snippets/cloud-connect-button.webp?fit=max&auto=format&n=CFFsa2agBPbviR4r&q=85&s=ec0a298a33ca841e947fa5e8bae47362" alt="ClickHouse Cloud 서비스 연결 버튼" width="998" height="932" data-path="images/_snippets/cloud-connect-button.webp" />
  </Frame>
</div>

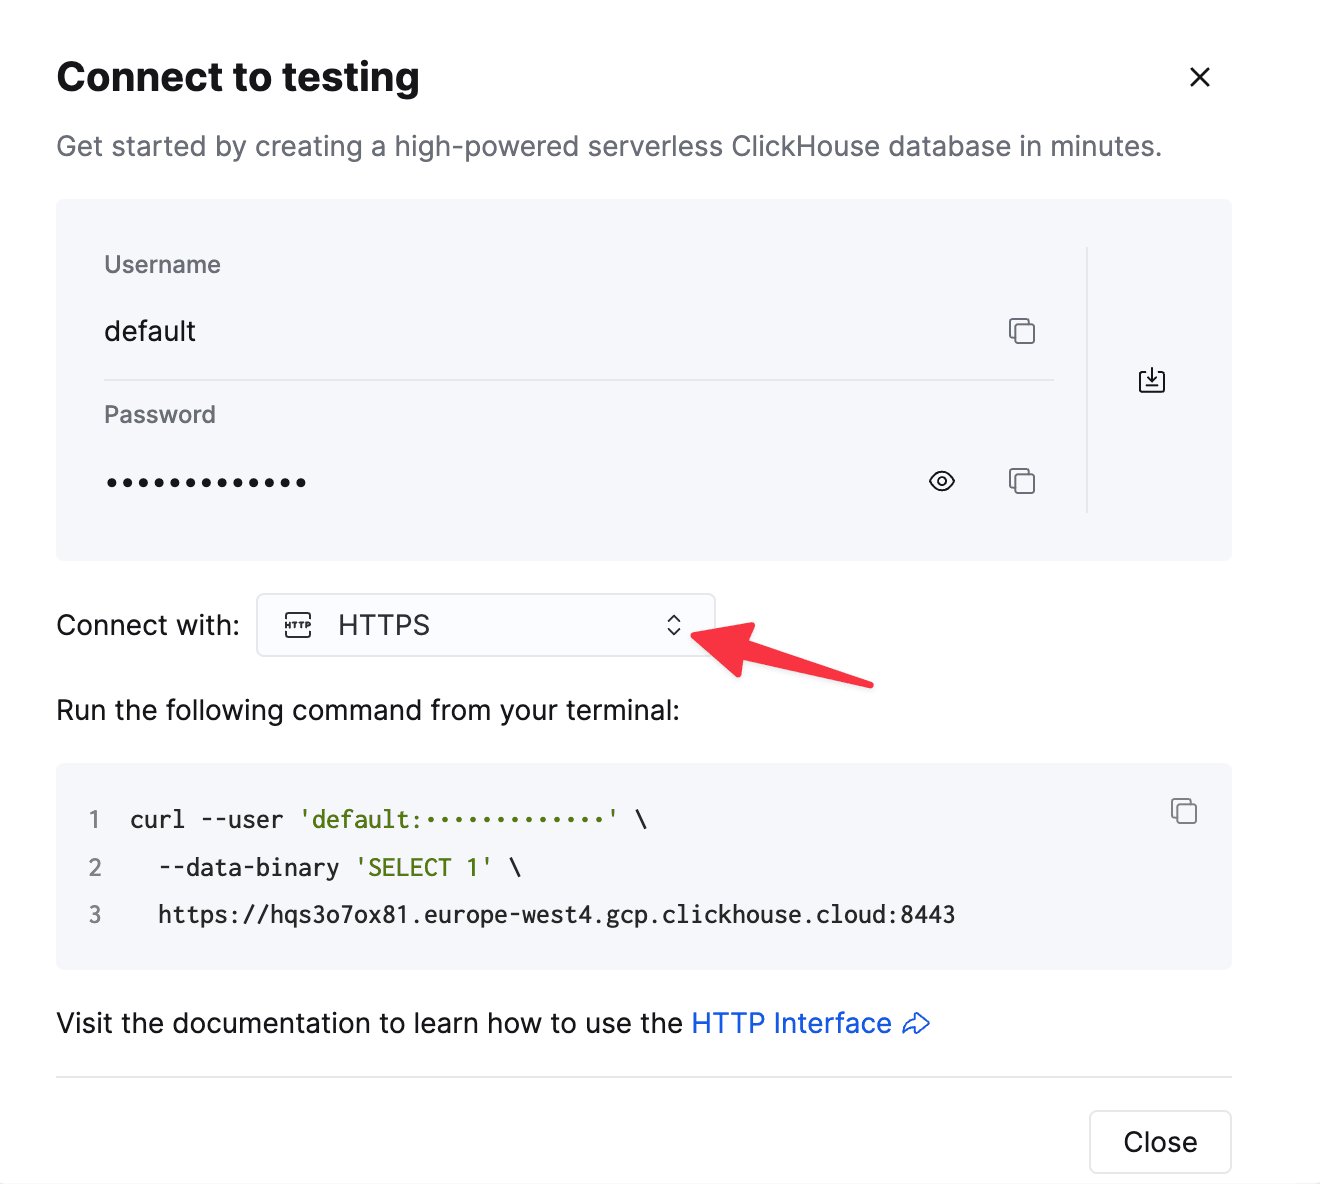
**HTTPS**를 선택하십시오. 연결 정보가 예시 `curl` 명령으로 표시됩니다.

<div className="ch-image-md">
  <Frame>
    <img src="https://mintcdn.com/private-7c7dfe99/CFFsa2agBPbviR4r/images/_snippets/connection-details-https.webp?fit=max&auto=format&n=CFFsa2agBPbviR4r&q=85&s=cb0fbd98aa2b5b7ca484c9f53395ee07" alt="ClickHouse Cloud HTTPS 연결 정보" width="1320" height="1184" data-path="images/_snippets/connection-details-https.webp" />
  </Frame>
</div>

자가 관리형 ClickHouse를 사용하는 경우 연결 정보는 ClickHouse 관리자가 설정합니다.

<div id="connection-overview">
  #### 연결 개요
</div>

이 클라이언트는 HTTP 또는 HTTPS 프로토콜을 통한 연결을 지원합니다. RowBinary 지원도 예정대로 진행 중입니다. 자세한 내용은 [관련 issue](https://github.com/ClickHouse/clickhouse-js/issues/216)를 참조하십시오.

다음 예시는 ClickHouse Cloud에 연결을 설정하는 방법을 보여줍니다. `url`(프로토콜 및 포트 포함)과 `password` 값은 환경 변수로 지정되어 있으며, `default` 사용자를 사용한다고 가정합니다.

**예시:** 구성에 환경 변수를 사용하여 Node.js Client 인스턴스를 생성합니다.

```ts theme={null}
import { createClient } from '@clickhouse/client'

const client = createClient({
  url: process.env.CLICKHOUSE_HOST ?? 'http://localhost:8123',
  username: process.env.CLICKHOUSE_USER ?? 'default',
  password: process.env.CLICKHOUSE_PASSWORD ?? '',
})
```

클라이언트 리포지토리에는 환경 변수를 사용하는 여러 예시가 포함되어 있으며, 예를 들어 [ClickHouse Cloud에서 테이블을 생성하는 예시](https://github.com/ClickHouse/clickhouse-js/blob/main/examples/node/schema-and-deployments/create_table_cloud.ts), [async 삽입을 사용하는 예시](https://github.com/ClickHouse/clickhouse-js/blob/main/examples/node/coding/async_insert.ts), 그 밖에도 많은 예시가 있습니다.

<div id="connection-pool-nodejs-only">
  #### 연결 풀 (Node.js 전용)
</div>

모든 요청마다 연결을 설정하는 오버헤드를 피하기 위해 클라이언트는 Keep-Alive 메커니즘을 활용하여 재사용 가능한 ClickHouse 연결 풀을 생성합니다. 기본적으로 Keep-Alive는 활성화되어 있으며 연결 풀 크기는 `10`으로 설정되어 있지만, `max_open_connections` [구성 옵션](/docs/ko/integrations/language-clients/js/index#configuration)으로 변경할 수 있습니다.

사용자가 `max_open_connections: 1`을 설정하지 않는 한, 풀에 있는 동일한 연결이 이후 쿼리에도 사용된다고 보장할 수는 없습니다. 이런 설정이 필요한 경우는 드물지만, 임시 테이블을 사용하는 경우에는 필요할 수 있습니다.

관련 항목: [Keep-Alive 구성](/docs/ko/integrations/language-clients/js/index#keep-alive-configuration-nodejs-only).

<div id="query-id">
  ### 쿼리 ID
</div>

쿼리 또는 SQL 문(`command`, `exec`, `insert`, `select`)을 전송하는 모든 메서드는 결과에 `query_id`를 제공합니다. 이 고유 식별자는 클라이언트가 각 쿼리마다 할당하며, [서버 구성](/docs/ko/reference/settings/server-settings/settings)에서 활성화되어 있다면 `system.query_log`에서 데이터를 조회하거나,
장시간 실행되는 쿼리를 취소하는 데 유용할 수 있습니다([예시](https://github.com/ClickHouse/clickhouse-js/blob/main/examples/node/troubleshooting/cancel_query.ts) 참조). 필요한 경우 사용자가 `command`/`query`/`exec`/`insert` 메서드의 파라미터에서 `query_id`를 재정의할 수 있습니다.

<Tip>
  `query_id` 매개변수를 재정의하는 경우, 호출마다 고유성이 보장되도록 해야 합니다. 임의의 UUID를 사용하는 것이 좋습니다.
</Tip>

<div id="base-parameters-for-all-client-methods">
  ### 모든 클라이언트 메서드의 기본 매개변수
</div>

모든 클라이언트 메서드([query](/docs/ko/integrations/language-clients/js/index#query-method)/[command](/docs/ko/integrations/language-clients/js/index#command-method)/[insert](/docs/ko/integrations/language-clients/js/index#insert-method)/[exec](/docs/ko/integrations/language-clients/js/index#exec-method))에 공통으로 적용할 수 있는 매개변수가 몇 가지 있습니다.

```ts theme={null}
interface BaseQueryParams {
  // ClickHouse settings that can be applied on query level.
  clickhouse_settings?: ClickHouseSettings
  // Parameters for query binding.
  query_params?: Record<string, unknown>
  // AbortSignal instance to cancel a query in progress.
  abort_signal?: AbortSignal
  // query_id override; if not specified, a random identifier will be generated automatically.
  query_id?: string
  // session_id override; if not specified, the session id will be taken from the client configuration.
  session_id?: string
  // credentials override; if not specified, the client's credentials will be used.
  auth?: { username: string, password: string }
  // A specific list of roles to use for this query. Overrides the roles set in the client configuration.
  role?: string | Array<string>
}
```

<div id="query-method">
  ### 쿌리 메서드
</div>

응답이 있는 대부분의 SQL 문(예: `SELECT`)에 사용하며, `CREATE TABLE`과 같은 DDL을 전송할 때도 사용합니다. 이 메서드는 await해야 하며, 반환된 결과 집합는 애플리케이션에서 소비하는 것을 전제로 합니다.

<Note>
  데이터 삽입에는 전용 메서드인 [insert](/docs/ko/integrations/language-clients/js/index#insert-method)를 사용하고, DDL에는 [command](/docs/ko/integrations/language-clients/js/index#command-method)를 사용합니다.
</Note>

```ts theme={null}
interface QueryParams extends BaseQueryParams {
  // Query to execute that might return some data.
  query: string
  // Format of the resulting dataset. Default: JSON.
  format?: DataFormat
}

interface ClickHouseClient {
  query(params: QueryParams): Promise<ResultSet>
}
```

관련 항목: [모든 클라이언트 메서드의 기본 매개변수](/docs/ko/integrations/language-clients/js/index#base-parameters-for-all-client-methods).

<Tip>
  `query`에 FORMAT 절을 지정하지 말고, 대신 `format` 매개변수를 사용하세요.
</Tip>

<div id="result-set-and-row-abstractions">
  #### 결과 집합 및 행 추상화
</div>

`ResultSet`은 애플리케이션에서 데이터를 처리할 때 사용할 수 있는 여러 편의 메서드를 제공합니다.

Node.js `ResultSet` 구현은 내부적으로 `Stream.Readable`을 사용하며, 웹 버전은 Web API `ReadableStream`을 사용합니다.

`ResultSet`에서 `text` 또는 `json` 메서드를 호출해 `ResultSet`을 소비하고, 쿼리가 반환한 전체 행 집합을 메모리에 로드할 수 있습니다.

`ResultSet`은 응답 스트림을 열린 상태로 유지하므로 그동안 기본 연결이 계속 사용 중 상태로 남습니다. 따라서 가능한 한 빨리 `ResultSet` 소비를 시작해야 합니다. 클라이언트는 애플리케이션의 과도한 메모리 사용량을 방지하기 위해 들어오는 데이터를 버퍼링하지 않습니다.

또는 한 번에 메모리에 담기 어려울 정도로 크다면 `stream` 메서드를 호출해 스트리밍 모드로 데이터를 처리할 수 있습니다. 이 경우 각 응답 청크는 상대적으로 작은 행 배열로 변환되며(이 배열의 크기는 클라이언트가 server로부터 받는 특정 청크의 크기와 개별 행의 크기에 따라 달라질 수 있습니다), 청크별로 하나씩 처리됩니다.

환경에 따라 스트리밍에 가장 적합한 포맷을 결정하려면 [지원되는 데이터 포맷](/docs/ko/integrations/language-clients/js/index#supported-data-formats) 목록을 참조하십시오. 예를 들어 JSON 객체를 스트리밍하려는 경우 [JSONEachRow](/docs/ko/reference/formats/JSON/JSONEachRow)를 선택하면 각 행이 JS 객체로 파싱됩니다. 또는 더 압축된 [JSONCompactColumns](/docs/ko/reference/formats/JSON/JSONCompactColumns) 포맷을 선택하면 각 행이 값의 간결한 배열이 됩니다. 관련 항목: [스트리밍 파일](/docs/ko/integrations/language-clients/js/index#streaming-files-nodejs-only).

<Warning>
  `ResultSet` 또는 해당 스트림이 끝까지 완전히 소비되지 않으면, 비활성 상태가 `request_timeout` 기간 동안 지속된 후 폐기됩니다.
</Warning>

```ts theme={null}
interface BaseResultSet<Stream> {
  // See "Query ID" section above
  query_id: string

  // Consume the entire stream and get the contents as a string
  // Can be used with any DataFormat
  // Should be called only once
  text(): Promise<string>

  // Consume the entire stream and parse the contents as a JS object
  // Can be used only with JSON formats
  // Should be called only once
  json<T>(): Promise<T>

  // Returns a readable stream for responses that can be streamed
  // Every iteration over the stream provides an array of Row[] in the selected DataFormat
  // Should be called only once
  stream(): Stream
}

interface Row {
  // Get the content of the row as a plain string
  text: string

  // Parse the content of the row as a JS object
  json<T>(): T
}
```

**예시:** (Node.js/Web) 결과 데이터셋을 `JSONEachRow` 포맷으로 반환하는 쿼리로, 전체 스트림을 읽어 JS 객체로 파싱합니다.
[소스 코드](https://github.com/ClickHouse/clickhouse-js/blob/main/examples/node/coding/array_json_each_row.ts).

```ts theme={null}
const resultSet = await client.query({
  query: 'SELECT * FROM my_table',
  format: 'JSONEachRow',
})
const dataset = await resultSet.json() // or `row.text` to avoid parsing JSON
```

**예시:** (Node.js 전용) 기존 `on('data')` 방식을 사용해 `JSONEachRow` 포맷의 스트리밍 쿼리 결과를 처리합니다. 이는 `for await const` 구문으로도 대체해 사용할 수 있습니다. [소스 코드](https://github.com/ClickHouse/clickhouse-js/blob/main/examples/node/performance/select_streaming_json_each_row.ts).

```ts theme={null}
const rows = await client.query({
  query: 'SELECT number FROM system.numbers_mt LIMIT 5',
  format: 'JSONEachRow', // or JSONCompactEachRow, JSONStringsEachRow, etc.
})
const stream = rows.stream()
stream.on('data', (rows: Row[]) => {
  rows.forEach((row: Row) => {
    console.log(row.json()) // or `row.text` to avoid parsing JSON
  })
})
await new Promise((resolve, reject) => {
  stream.on('end', () => {
    console.log('Completed!')
    resolve(0)
  })
  stream.on('error', reject)
})
```

**예시:** (Node.js only) 기존 `on('data')` 방식을 사용해 `CSV` 포맷의 스트리밍 쿼리 결과를 처리합니다. 이는 `for await const` 구문과 서로 대체하여 사용할 수 있습니다.
[소스 코드](https://github.com/ClickHouse/clickhouse-js/blob/main/examples/node/performance/select_streaming_text_line_by_line.ts)

```ts theme={null}
const resultSet = await client.query({
  query: 'SELECT number FROM system.numbers_mt LIMIT 5',
  format: 'CSV', // or TabSeparated, CustomSeparated, etc.
})
const stream = resultSet.stream()
stream.on('data', (rows: Row[]) => {
  rows.forEach((row: Row) => {
    console.log(row.text)
  })
})
await new Promise((resolve, reject) => {
  stream.on('end', () => {
    console.log('Completed!')
    resolve(0)
  })
  stream.on('error', reject)
})
```

**예시:** (Node.js 전용) `for await const` 구문을 사용하여 `JSONEachRow` 포맷의 JS 객체 형태로 스트리밍 쿼리 결과를 소비하는 방식입니다. 이는 기존의 `on('data')` 방식과도 서로 바꾸어 사용할 수 있습니다.
[소스 코드](https://github.com/ClickHouse/clickhouse-js/blob/main/examples/node/performance/select_streaming_json_each_row_for_await.ts).

```ts theme={null}
const resultSet = await client.query({
  query: 'SELECT number FROM system.numbers LIMIT 10',
  format: 'JSONEachRow', // or JSONCompactEachRow, JSONStringsEachRow, etc.
})
for await (const rows of resultSet.stream()) {
  rows.forEach(row => {
    console.log(row.json())
  })
}
```

<Note>
  `for await const` 구문은 `on('data')` 방식보다 코드량이 조금 적지만, 성능에 부정적인 영향을 줄 수 있습니다.
  자세한 내용은 [Node.js 리포지토리의 해당 이슈](https://github.com/nodejs/node/issues/31979)를 참조하십시오.
</Note>

**예시:** (웹 전용) 객체 `ReadableStream`을 순회합니다.

```ts theme={null}
const resultSet = await client.query({
  query: 'SELECT * FROM system.numbers LIMIT 10',
  format: 'JSONEachRow'
})

const reader = resultSet.stream().getReader()
while (true) {
  const { done, value: rows } = await reader.read()
  if (done) { break }
  rows.forEach(row => {
    console.log(row.json())
  })
}
```

<div id="insert-method">
  ### 삽입 메서드
</div>

데이터를 삽입할 때 사용하는 주요 메서드입니다.

```ts theme={null}
export interface InsertResult {
  query_id: string
  executed: boolean
}

interface ClickHouseClient {
  insert(params: InsertParams): Promise<InsertResult>
}
```

반환 유형은 최소한으로 구성되어 있습니다. 서버에서 반환되는 데이터는 없을 것으로 예상하며 응답 스트림을 즉시 비우기 때문입니다.

빈 배열이 삽입 메서드에 제공되면 삽입 statement는 서버로 전송되지 않습니다. 대신 메서드는 즉시 `{ query_id: '...', executed: false }`로 확인됩니다. 이 경우 메서드 파라미터에 `query_id`가 제공되지 않았다면 결과에서는 빈 문자열이 됩니다. 클라이언트가 생성한 임의의 UUID를 반환하면 혼동을 줄 수 있기 때문입니다. 해당 `query_id`를 가진 쿼리는 `system.query_log` 테이블에 존재하지 않기 때문입니다.

삽입 statement가 서버로 전송되었다면 `executed` flag는 `true`가 됩니다.

<div id="insert-method-and-streaming-in-nodejs">
  #### Node.js에서의 삽입 메서드와 스트리밍
</div>

`insert` 메서드에 지정한 [data format](/docs/ko/integrations/language-clients/js/index#supported-data-formats)에 따라 `Stream.Readable` 또는 일반 `Array<T>`와 함께 사용할 수 있습니다. [file streaming](/docs/ko/integrations/language-clients/js/index#streaming-files-nodejs-only)에 대한 이 섹션도 참고하십시오.

삽입 메서드는 일반적으로 await하여 사용합니다. 하지만 입력 스트림을 지정해 두고, 스트림이 완료된 뒤에 나중에 `insert` 작업을 await할 수도 있습니다(이 경우 `insert` promise도 함께 resolve됩니다). 이는 이벤트 리스너와 비슷한 시나리오에서 유용할 수 있지만, 클라이언트 측 오류 처리는 다양한 예외 상황 때문에 간단하지 않을 수 있습니다. 대신 [async inserts](/docs/ko/concepts/features/operations/insert/asyncinserts) 사용을 고려하십시오. 사용 방법은 [this example](https://github.com/ClickHouse/clickhouse-js/blob/main/examples/node/performance/async_insert_without_waiting.ts)에서 확인할 수 있습니다.

<Tip>
  이 메서드로 표현하기 어려운 사용자 지정 INSERT 문이 있다면, [command method](/docs/ko/integrations/language-clients/js/index#command-method) 사용을 고려하십시오.

  사용 방법은 [INSERT INTO ... VALUES](https://github.com/ClickHouse/clickhouse-js/blob/main/examples/node/coding/insert_values_and_functions.ts) 또는 [INSERT INTO ... SELECT](https://github.com/ClickHouse/clickhouse-js/blob/main/examples/node/coding/insert_from_select.ts) 예시에서 확인할 수 있습니다.
</Tip>

```ts theme={null}
interface InsertParams<T> extends BaseQueryParams {
  // Table name to insert the data into
  table: string
  // A dataset to insert.
  values: ReadonlyArray<T> | Stream.Readable
  // Format of the dataset to insert.
  format?: DataFormat
  // Allows to specify which columns the data will be inserted into.
  // - An array such as `['a', 'b']` will generate: `INSERT INTO table (a, b) FORMAT DataFormat`
  // - An object such as `{ except: ['a', 'b'] }` will generate: `INSERT INTO table (* EXCEPT (a, b)) FORMAT DataFormat`
  // By default, the data is inserted into all columns of the table,
  // and the generated statement will be: `INSERT INTO table FORMAT DataFormat`.
  columns?: NonEmptyArray<string> | { except: NonEmptyArray<string> }
}
```

관련 항목: [모든 클라이언트 메서드의 기본 매개변수](/docs/ko/integrations/language-clients/js/index#base-parameters-for-all-client-methods).

<Warning>
  `abort_signal`로 취소된 요청이라고 해서 데이터 삽입이 이루어지지 않았다고 보장할 수는 없습니다. 취소되기 전에 서버가 스트리밍된 데이터의 일부를 이미 수신했을 수 있기 때문입니다.
</Warning>

**예시:** (Node.js/Web) 배열 형태의 값을 삽입합니다.
[소스 코드](https://github.com/ClickHouse/clickhouse-js/blob/main/examples/node/coding/array_json_each_row.ts).

```ts theme={null}
await client.insert({
  table: 'my_table',
  // structure should match the desired format, JSONEachRow in this example
  values: [
    { id: 42, name: 'foo' },
    { id: 42, name: 'bar' },
  ],
  format: 'JSONEachRow',
})
```

**예시:** (Node.js 전용) CSV 파일 스트림을 삽입합니다.
[소스 코드](https://github.com/ClickHouse/clickhouse-js/blob/main/examples/node/performance/insert_file_stream_csv.ts). 관련 항목: [파일 스트리밍](/docs/ko/integrations/language-clients/js/index#streaming-files-nodejs-only).

```ts theme={null}
await client.insert({
  table: 'my_table',
  values: fs.createReadStream('./path/to/a/file.csv'),
  format: 'CSV',
})
```

**예시**: 삽입 구문에서 특정 컬럼을 제외합니다.

다음과 같은 테이블 정의가 있다고 가정합니다:

```sql theme={null}
CREATE OR REPLACE TABLE mytable
(id UInt32, message String)
ENGINE MergeTree()
ORDER BY (id)
```

특정 컬럼에만 삽입합니다:

```ts theme={null}
// Generated statement: INSERT INTO mytable (message) FORMAT JSONEachRow
await client.insert({
  table: 'mytable',
  values: [{ message: 'foo' }],
  format: 'JSONEachRow',
  // `id` column value for this row will be zero (default for UInt32)
  columns: ['message'],
})
```

특정 컬럼 제외하기:

```ts theme={null}
// Generated statement: INSERT INTO mytable (* EXCEPT (message)) FORMAT JSONEachRow
await client.insert({
  table: tableName,
  values: [{ id: 144 }],
  format: 'JSONEachRow',
  // `message` column value for this row will be an empty string
  columns: {
    except: ['message'],
  },
})
```

자세한 내용은 [소스 코드](https://github.com/ClickHouse/clickhouse-js/blob/main/examples/node/coding/insert_exclude_columns.ts)를 참고하십시오.

**예시**: 클라이언트 인스턴스에 지정한 데이터베이스와 다른 데이터베이스에 삽입하는 예시입니다. [소스 코드](https://github.com/ClickHouse/clickhouse-js/blob/main/examples/node/coding/insert_into_different_db.ts).

```ts theme={null}
await client.insert({
  table: 'mydb.mytable', // Fully qualified name including the database
  values: [{ id: 42, message: 'foo' }],
  format: 'JSONEachRow',
})
```

<div id="web-version-limitations">
  #### 웹 버전 제한 사항
</div>

현재 `@clickhouse/client-web`에서 삽입은 `Array<T>` 및 `JSON*` 포맷에서만 지원됩니다.
브라우저 호환성이 충분하지 않기 때문에 웹 버전에서는 아직 스트림 삽입이 지원되지 않습니다.

따라서 웹 버전용 `InsertParams` 인터페이스는 Node.js 버전과 약간 다르며,
`values`는 `ReadonlyArray<T>` 유형으로만 제한됩니다:

```ts theme={null}
interface InsertParams<T> extends BaseQueryParams {
  // Table name to insert the data into
  table: string
  // A dataset to insert.
  values: ReadonlyArray<T>
  // Format of the dataset to insert.
  format?: DataFormat
  // Allows to specify which columns the data will be inserted into.
  // - An array such as `['a', 'b']` will generate: `INSERT INTO table (a, b) FORMAT DataFormat`
  // - An object such as `{ except: ['a', 'b'] }` will generate: `INSERT INTO table (* EXCEPT (a, b)) FORMAT DataFormat`
  // By default, the data is inserted into all columns of the table,
  // and the generated statement will be: `INSERT INTO table FORMAT DataFormat`.
  columns?: NonEmptyArray<string> | { except: NonEmptyArray<string> }
}
```

이는 향후 변경될 수 있는 사항입니다. 관련 항목: [모든 클라이언트 메서드의 기본 매개변수](/docs/ko/integrations/language-clients/js/index#base-parameters-for-all-client-methods).

<div id="command-method">
  ### command 메서드
</div>

출력이 없는 SQL 문, 포맷 절을 적용할 수 없는 경우, 또는 응답 자체가 필요하지 않은 경우에 사용할 수 있습니다. 이러한 SQL 문의 예시로는 `CREATE TABLE` 또는 `ALTER TABLE`이 있습니다.

반드시 await해야 합니다.

응답 스트림은 즉시 폐기되며, 이에 따라 내부 소켓이 해제됩니다.

```ts theme={null}
interface CommandParams extends BaseQueryParams {
  // Statement to execute.
  query: string
}

interface CommandResult {
  query_id: string
}

interface ClickHouseClient {
  command(params: CommandParams): Promise<CommandResult>
}
```

관련 항목: [모든 클라이언트 메서드의 기본 매개변수](/docs/ko/integrations/language-clients/js/index#base-parameters-for-all-client-methods).

**예시:** (Node.js/Web) ClickHouse Cloud에서 테이블을 생성합니다.
[소스 코드](https://github.com/ClickHouse/clickhouse-js/blob/main/examples/node/schema-and-deployments/create_table_cloud.ts).

```ts theme={null}
await client.command({
  query: `
    CREATE TABLE IF NOT EXISTS my_cloud_table
    (id UInt64, name String)
    ORDER BY (id)
  `,
  // Recommended for cluster usage to avoid situations where a query processing error occurred after the response code,
  // and HTTP headers were already sent to the client.
  // See https://clickhouse.com/docs/interfaces/http/#response-buffering
  clickhouse_settings: {
    wait_end_of_query: 1,
  },
})
```

**예시:** (Node.js/Web) 자체 호스팅된 ClickHouse 인스턴스에서 테이블을 생성합니다.
[소스 코드](https://github.com/ClickHouse/clickhouse-js/blob/main/examples/node/schema-and-deployments/create_table_single_node.ts).

```ts theme={null}
await client.command({
  query: `
    CREATE TABLE IF NOT EXISTS my_table
    (id UInt64, name String)
    ENGINE MergeTree()
    ORDER BY (id)
  `,
})
```

**예시:** (Node.js/Web) INSERT FROM SELECT

```ts theme={null}
await client.command({
  query: `INSERT INTO my_table SELECT '42'`,
})
```

<Warning>
  `abort_signal`로 취소된 요청이라도 해당 statement가 server에서 실행되지 않았다고 단정할 수는 없습니다.
</Warning>

<div id="exec-method">
  ### Exec 메서드
</div>

`query`/`insert`에 맞지 않는 사용자 정의 쿼리가 있고
결과를 받아야 한다면 `command` 대신 `exec`를 사용할 수 있습니다.

`exec`는 애플리케이션 측에서 반드시 소비하거나 폐기해야 하는 readable stream을 반환합니다.

```ts theme={null}
interface ExecParams extends BaseQueryParams {
  // Statement to execute.
  query: string
}

interface ClickHouseClient {
  exec(params: ExecParams): Promise<QueryResult>
}
```

관련 항목: [모든 클라이언트 메서드의 기본 매개변수](/docs/ko/integrations/language-clients/js/index#base-parameters-for-all-client-methods).

Stream의 반환 유형은 Node.js 버전과 Web 버전에서 다릅니다.

Node.js:

```ts theme={null}
export interface QueryResult {
  stream: Stream.Readable
  query_id: string
}
```

웹:

```ts theme={null}
export interface QueryResult {
  stream: ReadableStream
  query_id: string
}
```

<div id="ping">
  ### Ping
</div>

연결 상태를 확인하는 데 사용되는 `ping` 메서드는 서버에 연결할 수 있으면 `true`를 반환합니다.

서버에 연결할 수 없는 경우 결과에는 원인이 된 오류도 함께 포함됩니다.

```ts theme={null}
type PingResult =
  | { success: true }
  | { success: false; error: Error }

/** Parameters for the health-check request - using the built-in `/ping` endpoint.
 *  This is the default behavior for the Node.js version. */
export type PingParamsWithEndpoint = {
  select: false
  /** AbortSignal instance to cancel a request in progress. */
  abort_signal?: AbortSignal
  /** Additional HTTP headers to attach to this particular request. */
  http_headers?: Record<string, string>
}
/** Parameters for the health-check request - using a SELECT query.
 *  This is the default behavior for the Web version, as the `/ping` endpoint does not support CORS.
 *  Most of the standard `query` method params, e.g., `query_id`, `abort_signal`, `http_headers`, etc. will work,
 *  except for `query_params`, which does not make sense to allow in this method. */
export type PingParamsWithSelectQuery = { select: true } & Omit<
  BaseQueryParams,
  'query_params'
>
export type PingParams = PingParamsWithEndpoint | PingParamsWithSelectQuery

interface ClickHouseClient {
  ping(params?: PingParams): Promise<PingResult>
}
```

애플리케이션이 시작될 때 서버를 사용할 수 있는지 확인하는 데 Ping이 유용할 수 있습니다. 특히 ClickHouse Cloud에서는 인스턴스가 유휴 상태였다가 ping 후에 다시 활성화될 수 있으므로, 이런 경우에는 중간에 지연 시간을 두고 몇 차례 재시도하는 것이 좋습니다.

기본적으로 Node.js 버전은 `/ping` 엔드포인트를 사용하고, 웹 버전은 `/ping` 엔드포인트가 CORS를 지원하지 않기 때문에 비슷한 결과를 얻기 위해 간단한 `SELECT 1` 쿼리를 사용합니다.

**예시:** (Node.js/Web) ClickHouse 서버 인스턴스에 보내는 간단한 ping입니다. 참고: 웹 버전에서는 포착되는 오류가 다릅니다.
[소스 코드](https://github.com/ClickHouse/clickhouse-js/blob/main/examples/ping.ts).

```ts theme={null}
const result = await client.ping();
if (!result.success) {
  // process result.error
}
```

**예시:** `ping` 메서드를 호출할 때 자격 증명도 함께 확인하거나 `query_id`와 같은 추가 파라미터를 지정하려면, 다음과 같이 사용할 수 있습니다:

```ts theme={null}
const result = await client.ping({ select: true, /* query_id, abort_signal, http_headers, or any other query params */ });
```

Ping 메서드에서는 표준 `query` 메서드의 매개변수 대부분을 사용할 수 있습니다. 자세한 내용은 `PingParamsWithSelectQuery` 타입 정의를 참조하십시오.

<div id="close-nodejs-only">
  ### 닫기 (Node.js 전용)
</div>

열려 있는 모든 연결을 닫고 리소스를 해제합니다. 웹 버전에서는 no-op입니다.

```ts theme={null}
await client.close()
```

<div id="streaming-files-nodejs-only">
  ## 파일 스트리밍 (Node.js 전용)
</div>

클라이언트 리포지토리에는 널리 사용되는 데이터 포맷(NDJSON, CSV, Parquet)에 대한 여러 파일 스트리밍 예시가 있습니다.

* [NDJSON 파일에서 스트리밍](https://github.com/ClickHouse/clickhouse-js/blob/main/examples/node/performance/insert_file_stream_ndjson.ts)
* [CSV 파일에서 스트리밍](https://github.com/ClickHouse/clickhouse-js/blob/main/examples/node/performance/insert_file_stream_csv.ts)
* [Parquet 파일에서 스트리밍](https://github.com/ClickHouse/clickhouse-js/blob/main/examples/node/performance/insert_file_stream_parquet.ts)
* [Parquet 파일로 스트리밍](https://github.com/ClickHouse/clickhouse-js/blob/main/examples/node/performance/select_parquet_as_file.ts)

다른 포맷의 파일로 스트리밍하는 방법도 Parquet와 비슷합니다.
차이점은 `query` 호출에 사용하는 포맷(`JSONEachRow`, `CSV` 등)과 출력 파일 이름뿐입니다.

<div id="supported-data-formats">
  ## 지원되는 데이터 포맷
</div>

클라이언트는 JSON 또는 텍스트 데이터 포맷을 처리합니다.

`format`을 JSON 계열 포맷(`JSONEachRow`, `JSONCompactEachRow` 등) 중 하나로 지정하면, 클라이언트는 wire를 통한 통신 중 데이터를 serialize 및 deserialize합니다.

"raw" 텍스트 포맷(`CSV`, `TabSeparated`, `CustomSeparated` 계열)으로 제공된 데이터는 추가 변환 없이 wire를 통해 전송됩니다.

<Tip>
  일반적인 포맷으로서의 JSON과 [ClickHouse JSON format](/docs/ko/reference/formats/JSON/JSON)은 혼동될 수 있습니다.

  클라이언트는 [JSONEachRow](/docs/ko/reference/formats/JSON/JSONEachRow)와 같은 포맷에서 JSON 객체 스트리밍을 지원합니다(다른 스트리밍 친화적인 포맷은 표 개요를 참조하고, `select_streaming_` [client 리포지토리의 예시](https://github.com/ClickHouse/clickhouse-js/tree/main/examples/node)도 함께 참조하십시오).

  다만 [ClickHouse JSON](/docs/ko/reference/formats/JSON/JSON)과 일부 다른 포맷은 응답에서 단일 객체로 표현되므로 클라이언트에서 스트리밍할 수 없습니다.
</Tip>

| 포맷                                         | 입력 (배열) | 입력 (객체) | 입력/출력 (스트림) | 출력 (JSON) | 출력 (텍스트)   |
| ------------------------------------------ | ------- | ------- | ----------- | --------- | ---------- |
| JSON                                       | ❌       | ✔️      | ❌           | ✔️        | ✔️         |
| JSONCompact                                | ❌       | ✔️      | ❌           | ✔️        | ✔️         |
| JSONObjectEachRow                          | ❌       | ✔️      | ❌           | ✔️        | ✔️         |
| JSONColumnsWithMetadata                    | ❌       | ✔️      | ❌           | ✔️        | ✔️         |
| JSONStrings                                | ❌       | ❌️      | ❌           | ✔️        | ✔️         |
| JSONCompactStrings                         | ❌       | ❌       | ❌           | ✔️        | ✔️         |
| JSONEachRow                                | ✔️      | ❌       | ✔️          | ✔️        | ✔️         |
| JSONEachRowWithProgress                    | ❌️      | ❌       | ✔️ ❗- 아래 참조 | ✔️        | ✔️         |
| JSONStringsEachRow                         | ✔️      | ❌       | ✔️          | ✔️        | ✔️         |
| JSONCompactEachRow                         | ✔️      | ❌       | ✔️          | ✔️        | ✔️         |
| JSONCompactStringsEachRow                  | ✔️      | ❌       | ✔️          | ✔️        | ✔️         |
| JSONCompactEachRowWithNames                | ✔️      | ❌       | ✔️          | ✔️        | ✔️         |
| JSONCompactEachRowWithNamesAndTypes        | ✔️      | ❌       | ✔️          | ✔️        | ✔️         |
| JSONCompactStringsEachRowWithNames         | ✔️      | ❌       | ✔️          | ✔️        | ✔️         |
| JSONCompactStringsEachRowWithNamesAndTypes | ✔️      | ❌       | ✔️          | ✔️        | ✔️         |
| CSV                                        | ❌       | ❌       | ✔️          | ❌         | ✔️         |
| CSVWithNames                               | ❌       | ❌       | ✔️          | ❌         | ✔️         |
| CSVWithNamesAndTypes                       | ❌       | ❌       | ✔️          | ❌         | ✔️         |
| TabSeparated                               | ❌       | ❌       | ✔️          | ❌         | ✔️         |
| TabSeparatedRaw                            | ❌       | ❌       | ✔️          | ❌         | ✔️         |
| TabSeparatedWithNames                      | ❌       | ❌       | ✔️          | ❌         | ✔️         |
| TabSeparatedWithNamesAndTypes              | ❌       | ❌       | ✔️          | ❌         | ✔️         |
| CustomSeparated                            | ❌       | ❌       | ✔️          | ❌         | ✔️         |
| CustomSeparatedWithNames                   | ❌       | ❌       | ✔️          | ❌         | ✔️         |
| CustomSeparatedWithNamesAndTypes           | ❌       | ❌       | ✔️          | ❌         | ✔️         |
| Parquet                                    | ❌       | ❌       | ✔️          | ❌         | ✔️❗- 아래 참조 |

Parquet의 경우, select의 주요 사용 사례는 결과 스트림을 파일로 저장하는 것일 가능성이 높습니다. 클라이언트 리포지토리의 [예시](https://github.com/ClickHouse/clickhouse-js/blob/main/examples/node/performance/select_parquet_as_file.ts)를 참조하십시오.

`JSONEachRowWithProgress`는 스트림에서 진행 상황 보고를 지원하는 출력 전용 포맷입니다. 자세한 내용은 [이 예시](https://github.com/ClickHouse/clickhouse-js/blob/main/examples/node/performance/select_json_each_row_with_progress.ts)를 참조하십시오.

ClickHouse의 전체 입력 및 출력 형식 목록은
[여기](/docs/ko/reference/formats/index)에서 확인할 수 있습니다.

<div id="supported-clickhouse-data-types">
  ## 지원되는 ClickHouse 데이터 타입
</div>

<Note>
  대응되는 JS 타입은 모든 값을 문자열로 나타내는 포맷(예: `JSONStringEachRow`)을 제외한 모든 `JSON*` 포맷에 적용됩니다.
</Note>

| 유형                     | 상태          | JS 타입                   |
| ---------------------- | ----------- | ----------------------- |
| UInt8/16/32            | ✔️          | number                  |
| UInt64/128/256         | ✔️ ❗- 아래 참조 | string                  |
| Int8/16/32             | ✔️          | number                  |
| Int64/128/256          | ✔️ ❗- 아래 참조 | string                  |
| Float32/64             | ✔️          | number                  |
| Decimal                | ✔️ ❗- 아래 참조 | number                  |
| Boolean                | ✔️          | boolean                 |
| String                 | ✔️          | string                  |
| FixedString            | ✔️          | string                  |
| UUID                   | ✔️          | string                  |
| Date32/64              | ✔️          | string                  |
| DateTime32/64          | ✔️ ❗- 아래 참조 | string                  |
| Enum                   | ✔️          | string                  |
| LowCardinality         | ✔️          | string                  |
| Array(T)               | ✔️          | T\[]                    |
| (new) JSON             | ✔️          | object                  |
| Variant(T1, T2...)     | ✔️          | T (variant에 따라 다름)      |
| Dynamic                | ✔️          | T (variant에 따라 다름)      |
| Nested                 | ✔️          | T\[]                    |
| Tuple(T1, T2, ...)     | ✔️          | \[T1, T2, ...]          |
| Tuple(n1 T1, n2 T2...) | ✔️          | \{ n1: T1; n2: T2; ...} |
| Nullable(T)            | ✔️          | T의 JS 타입 또는 null        |
| IPv4                   | ✔️          | string                  |
| IPv6                   | ✔️          | string                  |
| Point                  | ✔️          | \[ number, number ]     |
| Ring                   | ✔️          | Array\<Point>           |
| Polygon                | ✔️          | Array\<Ring>            |
| MultiPolygon           | ✔️          | Array\<Polygon>         |
| Map(K, V)              | ✔️          | Record\<K, V>           |
| Time/Time64            | ✔️          | string                  |

지원되는 ClickHouse 포맷의 전체 목록은
[여기](/docs/ko/reference/data-types/index)에서 확인할 수 있습니다.

관련 항목:

* [Dynamic/Variant/JSON 사용 예시](https://github.com/ClickHouse/clickhouse-js/blob/main/examples/node/coding/dynamic_variant_json.ts)
* [Time/Time64 사용 예시](https://github.com/ClickHouse/clickhouse-js/blob/main/examples/node/coding/time_time64.ts)

<div id="datedate32-types-caveats">
  ### Date/Date32 타입 관련 주의사항
</div>

클라이언트가 값을 삽입할 때 추가적인 타입 변환을 수행하지 않으므로, `Date`/`Date32` 타입 컬럼에는 문자열만 삽입할 수 있습니다.

**예시:** `Date` 타입 값을 삽입하는 예시입니다.
[소스 코드](https://github.com/ClickHouse/clickhouse-js/blob/ba387d7f4ce375a60982ac2d99cb47391cf76cec/__tests__/integration/date_time.test.ts)

```ts theme={null}
await client.insert({
  table: 'my_table',
  values: [ { date: '2022-09-05' } ],
  format: 'JSONEachRow',
})
```

하지만 `DateTime` 또는 `DateTime64` 컬럼을 사용하는 경우에는 문자열과 JS Date 객체를 모두 사용할 수 있습니다. JS Date 객체는 `date_time_input_format`을 `best_effort`로 설정하면 `insert`에 그대로 전달할 수 있습니다. 자세한 내용은 이 [예시](https://github.com/ClickHouse/clickhouse-js/blob/main/examples/node/coding/insert_js_dates.ts)를 참조하십시오.

<div id="decimal-types-caveats">
  ### Decimal\* 타입 유의사항
</div>

`JSON*` 계열 포맷을 사용해 Decimal을 삽입할 수 있습니다. 다음과 같이 정의된 테이블이 있다고 가정합니다.

```sql theme={null}
CREATE TABLE my_table
(
  id     UInt32,
  dec32  Decimal(9, 2),
  dec64  Decimal(18, 3),
  dec128 Decimal(38, 10),
  dec256 Decimal(76, 20)
)
ENGINE MergeTree()
ORDER BY (id)
```

문자열 형식으로 정밀도 손실 없이 값을 삽입할 수 있습니다:

```ts theme={null}
await client.insert({
  table: 'my_table',
  values: [{
    id: 1,
    dec32:  '1234567.89',
    dec64:  '123456789123456.789',
    dec128: '1234567891234567891234567891.1234567891',
    dec256: '12345678912345678912345678911234567891234567891234567891.12345678911234567891',
  }],
  format: 'JSONEachRow',
})
```

하지만 `JSON*` 포맷으로 데이터를 쿼리할 때 ClickHouse는 기본적으로 Decimal을 *숫자*로 반환하므로 정밀도가 손실될 수 있습니다. 이를 방지하려면 쿼리에서 Decimal을 문자열로 CAST할 수 있습니다:

```ts theme={null}
await client.query({
  query: `
    SELECT toString(dec32)  AS decimal32,
           toString(dec64)  AS decimal64,
           toString(dec128) AS decimal128,
           toString(dec256) AS decimal256
    FROM my_table
  `,
  format: 'JSONEachRow',
})
```

자세한 내용은 [이 예시](https://github.com/ClickHouse/clickhouse-js/blob/main/examples/node/coding/insert_decimals.ts)를 확인하십시오.

<div id="integral-types-int64-int128-int256-uint64-uint128-uint256">
  ### 정수 타입: Int64, Int128, Int256, UInt64, UInt128, UInt256
</div>

server는 이를 숫자로 받을 수 있지만, 이러한 타입의 최댓값이 `Number.MAX_SAFE_INTEGER`보다 크기 때문에 정수 오버플로우를 방지하기 위해 `JSON*` 계열 출력 형식에서는 문자열로 반환됩니다.

하지만 이 동작은
[`output_format_json_quote_64bit_integers` 설정](/docs/ko/reference/settings/formats#output_format_json_quote_64bit_integers)
으로 변경할 수 있습니다.

**예시:** 64비트 숫자에 대한 JSON 출력 형식을 조정합니다.

```ts theme={null}
const resultSet = await client.query({
  query: 'SELECT * from system.numbers LIMIT 1',
  format: 'JSONEachRow',
})

expect(await resultSet.json()).toEqual([ { number: '0' } ])
```

```ts theme={null}
const resultSet = await client.query({
  query: 'SELECT * from system.numbers LIMIT 1',
  format: 'JSONEachRow',
  clickhouse_settings: { output_format_json_quote_64bit_integers: 0 },
})

expect(await resultSet.json()).toEqual([ { number: 0 } ])
```

<div id="clickhouse-settings">
  ## ClickHouse 설정
</div>

클라이언트는 [settings](/docs/ko/reference/settings/session-settings)
메커니즘을 통해 ClickHouse의 동작을 조정할 수
있습니다.
설정은 클라이언트 인스턴스 수준에서 지정할 수 있으며, 이렇게 하면
ClickHouse로 전송되는 모든 요청에 적용됩니다:

```ts theme={null}
const client = createClient({
  clickhouse_settings: {}
})
```

또는 설정을 요청 수준에서 구성할 수 있습니다:

```ts theme={null}
client.query({
  clickhouse_settings: {}
})
```

지원되는 모든 ClickHouse 설정이 포함된 타입 선언 파일은
[여기](https://github.com/ClickHouse/clickhouse-js/blob/main/packages/client-common/src/settings.ts)에서 확인할 수 있습니다.

<Warning>
  쿼리를 실행하는 사용자에게 해당 설정을 변경할 수 있는 충분한 권한이 있는지 확인하십시오.
</Warning>

<div id="advanced-topics">
  ## 심화 주제
</div>

<div id="queries-with-parameters">
  ### 매개변수가 있는 쿼리
</div>

매개변수가 있는 쿼리를 만들고 클라이언트 애플리케이션에서 해당 매개변수에 값을 전달할 수 있습니다. 이렇게 하면 클라이언트 측에서
특정 동적 값으로 쿼리를 포맷할 필요가 없습니다.

평소처럼 쿼리를 작성한 다음, 앱 매개변수에서 쿼리로 전달할 값을 중괄호로 묶어
다음 형식으로 넣습니다:

```text theme={null}
{<name>: <data_type>}
```

여기서:

* `name` — 플레이스홀더 식별자입니다.
* `data_type` - 앱 매개변수 값의 [데이터 타입](/docs/ko/reference/data-types/index)입니다.

**예시:**: 매개변수를 사용하는 쿼리입니다.
[소스 코드](https://github.com/ClickHouse/clickhouse-js/blob/main/examples/node/coding/query_with_parameter_binding.ts)
.

```ts theme={null}
await client.query({
  query: 'SELECT plus({val1: Int32}, {val2: Int32})',
  format: 'CSV',
  query_params: {
    val1: 10,
    val2: 20,
  },
})
```

자세한 내용은 [https://clickhouse.com/docs/interfaces/cli#cli-queries-with-parameters-syntax를](https://clickhouse.com/docs/interfaces/cli#cli-queries-with-parameters-syntax를) 참조하십시오.

<div id="compression">
  ### 압축
</div>

참고: 요청 압축은 현재 Web 버전에서 사용할 수 없습니다. 응답 압축은 정상적으로 작동합니다. Node.js 버전에서는 둘 다 지원합니다.

wire를 통해 대규모 데이터셋을 처리하는 데이터 애플리케이션은 압축을 활성화하면 이점을 얻을 수 있습니다. 현재는 [zlib](https://nodejs.org/docs/latest-v14.x/api/zlib.html)을 사용하는 `GZIP`만 지원됩니다.

```typescript theme={null}
createClient({
  compression: {
    response: true,
    request: true
  }
})
```

구성 매개변수는 다음과 같습니다.

* `response: true`는 ClickHouse 서버가 압축된 응답 본문을 반환하도록 합니다. 기본값: `response: false`
* `request: true`는 클라이언트 요청 본문의 압축을 활성화합니다. 기본값: `request: false`

<div id="logging-nodejs-only">
  ### 로깅 (Node.js 전용)
</div>

<Warning>
  로깅은 실험적 기능이며, 향후 변경될 수 있습니다.
</Warning>

기본 로거 구현은 `console.debug/info` 메서드를 통해 로그 레코드를 `stdout`에 출력하고, `console.warn/error` 메서드를 통해 `stderr`에 출력합니다.
`LoggerClass`를 제공해 로깅 로직을 사용자 지정할 수 있으며, `level` 매개변수로 원하는 로그 레벨을 선택할 수 있습니다(기본값은 `WARN`입니다):

```typescript theme={null}
import type { Logger } from '@clickhouse/client'

// All three LogParams types are exported by the client
interface LogParams {
  module: string
  message: string
  args?: Record<string, unknown>
}
type ErrorLogParams = LogParams & { err: Error }
type WarnLogParams = LogParams & { err?: Error }

class MyLogger implements Logger {
  trace({ module, message, args }: LogParams) {
    // ...
  }
  debug({ module, message, args }: LogParams) {
    // ...
  }
  info({ module, message, args }: LogParams) {
    // ...
  }
  warn({ module, message, args }: WarnLogParams) {
    // ...
  }
  error({ module, message, args, err }: ErrorLogParams) {
    // ...
  }
}

const client = createClient({
  log: {
    LoggerClass: MyLogger,
    level: ClickHouseLogLevel.DEBUG,
  }
})
```

현재 클라이언트는 다음 이벤트를 로그로 남깁니다:

* `TRACE` - Keep-Alive 소켓의 수명 주기에 대한 저수준 정보
* `DEBUG` - 응답 정보(authorization headers 및 host 정보 제외)
* `INFO` - 대부분 사용되지 않으며, 클라이언트가 초기화될 때 현재 로그 레벨을 출력합니다
* `WARN` - 치명적이지 않은 오류입니다. 실패한 `ping` 요청은 경고로 기록되는데, 반환된 결과에 기본 오류가 포함되기 때문입니다
* `ERROR` - 실패한 요청과 같은 `query`/`insert`/`exec`/`command` 메서드의 치명적 오류

기본 로거 구현은 [여기](https://github.com/ClickHouse/clickhouse-js/blob/main/packages/client-common/src/logger.ts)에서 확인할 수 있습니다.

<div id="tls-certificates-nodejs-only">
  ### TLS 인증서 (Node.js 전용)
</div>

Node.js 클라이언트는 선택적으로 basic(인증 기관(Certificate Authority)만 사용하는)
및 mutual(인증 기관(Certificate Authority)과 클라이언트 인증서를 사용하는) TLS를 모두 지원합니다.

인증서가 `certs` 폴더에 있고
CA 파일 이름이 `CA.pem`이라고 가정할 때의 basic TLS 구성 예시는 다음과 같습니다:

```ts theme={null}
const client = createClient({
  url: 'https://<hostname>:<port>',
  username: '<username>',
  password: '<password>', // if required
  tls: {
    ca_cert: fs.readFileSync('certs/CA.pem'),
  },
})
```

클라이언트 인증서를 사용하는 상호 인증 TLS 구성 예시:

```ts theme={null}
const client = createClient({
  url: 'https://<hostname>:<port>',
  username: '<username>',
  tls: {
    ca_cert: fs.readFileSync('certs/CA.pem'),
    cert: fs.readFileSync(`certs/client.crt`),
    key: fs.readFileSync(`certs/client.key`),
  },
})
```

리포지토리에서 [기본](https://github.com/ClickHouse/clickhouse-js/blob/main/examples/node/security/basic_tls.ts) 및 [상호](https://github.com/ClickHouse/clickhouse-js/blob/main/examples/node/security/mutual_tls.ts) TLS에 대한 전체 예시를 확인하세요.

<div id="keep-alive-configuration-nodejs-only">
  ### Keep-alive 설정 (Node.js 전용)
</div>

클라이언트는 기본적으로 하위 `HTTP agent`에서 Keep-Alive를 활성화합니다. 즉, 연결된 소켓은 이후 request에 재사용되며 `Connection: keep-alive` header가 전송됩니다. 유휴 상태인 소켓은 기본적으로 2500밀리초 동안 연결 풀에 유지됩니다([이 옵션 조정에 관한 참고 사항](/docs/ko/integrations/language-clients/js/index#adjusting-idle_socket_ttl) 참조).

`keep_alive.idle_socket_ttl` 값은 server/LB 구성보다 상당히 낮게 설정해야 합니다. 주된 이유는 HTTP/1.1에서는 server가 클라이언트에 알리지 않고 소켓을 닫을 수 있으므로, server 또는 load balancer가 클라이언트보다 *먼저* 연결을 닫으면 클라이언트가 닫힌 소켓을 재사용하려고 시도할 수 있고, 그 결과 `socket hang up` 오류가 발생할 수 있기 때문입니다.

`keep_alive.idle_socket_ttl`을 수정하는 경우, 이 값은 server/LB의 Keep-Alive 구성과 항상 맞춰 두어야 하며, server가 열린 연결을 먼저 닫지 않도록 반드시 그보다 **항상 낮아야 합니다**.

<div id="adjusting-idle_socket_ttl">
  #### `idle_socket_ttl` 조정
</div>

클라이언트는 `keep_alive.idle_socket_ttl`을 2500밀리초로 설정합니다. 이는 가장 안전한 기본값으로 볼 수 있기 때문입니다. 서버 측 `keep_alive_timeout`은 `config.xml`을 수정하지 않아도 [ClickHouse 23.11 이전 버전에서는 3초까지 낮게 설정될 수 있습니다](https://github.com/ClickHouse/ClickHouse/commit/1685cdcb89fe110b45497c7ff27ce73cc03e82d1).

<Warning>
  성능에 만족하고 있고 문제가 발생하지 않는다면 `keep_alive.idle_socket_ttl` 설정값을 늘리지 **않는** 것이 좋습니다. 값을 늘리면 "Socket hang-up" 오류가 발생할 수 있기 때문입니다. 또한 애플리케이션이 많은 쿼리를 보내고 쿼리 사이의 다운타임이 길지 않다면, 소켓이 충분히 오래 유휴 상태로 머물지 않으므로 기본값으로도 충분하며 클라이언트는 해당 소켓을 풀에 유지합니다.
</Warning>

다음 명령을 실행하면 서버 응답 헤더에서 올바른 Keep-Alive timeout 값을 확인할 수 있습니다.

```sh theme={null}
curl -is --data-binary "SELECT 1" <clickhouse_url>
```

응답의 `Connection` 및 `Keep-Alive` 헤더 값을 확인하십시오. 예시:

```text theme={null}
Connection: Keep-Alive
Keep-Alive: timeout=10
```

이 경우 `keep_alive_timeout`은 10초이므로, 기본값보다 조금 더 오래 유휴 소켓을 열린 상태로 유지하려면 `keep_alive.idle_socket_ttl`을 9000 또는 9500밀리초로 높여볼 수 있습니다. 서버가 클라이언트보다 먼저 연결을 닫고 있음을 의미하는 "Socket hang-up" 오류가 발생하는지 주의 깊게 확인하고, 오류가 사라질 때까지 값을 낮추십시오.

<div id="troubleshooting">
  #### 문제 해결
</div>

최신 버전의 클라이언트를 사용 중인데도 `socket hang up` 오류가 발생한다면, 다음 방법으로 문제를 해결할 수 있습니다.

* 최소 `WARN` 로그 레벨(기본값)로 로그를 활성화하십시오. 그러면 application code에 소비되지 않았거나 처리되지 않은 채 남아 있는 스트림이 있는지 확인할 수 있습니다. 이러한 경우 전송 계층에서 WARN 수준으로 로그를 남기며, 이 상태가 서버에서 소켓을 닫는 원인이 될 수 있습니다. 로깅은 다음과 같이 클라이언트 구성에서 활성화할 수 있습니다.

  ```ts theme={null}
  const client = createClient({
    log: { level: ClickHouseLogLevel.WARN },
  })
  ```

* 원하는 구성이 올바른 클라이언트 인스턴스에 적용되었는지 확인하십시오. 애플리케이션에 클라이언트 인스턴스가 여러 개 있다면, 쿼리에 사용하는 인스턴스에 올바른 `keep_alive.idle_socket_ttl` 값이 설정되어 있는지 다시 확인하십시오.

* 클라이언트 구성에서 `keep_alive.idle_socket_ttl` 설정값을 500밀리초 줄이십시오. 특정 상황에서는, 예를 들어 클라이언트와 서버 사이의 네트워크 지연 시간이 높은 경우, 서버가 곧 닫으려는 소켓을 송신 요청이 할당받는 상황을 피하는 데 도움이 될 수 있습니다.

* 이 오류가 데이터 입출력이 없는 장시간 실행 쿼리 중 발생한다면(예: 장시간 실행되는 `INSERT FROM SELECT`), 로드 밸런서(load balancer) 또는 다른 네트워크 구성 요소가 장시간 유지되는 연결이나 오래 실행되는 요청을 닫고 있기 때문일 수 있습니다. 다음 ClickHouse 설정을 조합해 사용하면, 장시간 실행 쿼리 중에도 일부 데이터가 들어오도록 강제해 볼 수 있습니다.

  ```ts theme={null}
  const client = createClient({
    // 여기서는 실행 시간이 5분을 넘는 쿼리가 일부 있다고 가정합니다
    request_timeout: 400_000,
    /** 이 설정들을 함께 사용하면, 데이터 입출력이 없는 장시간 실행 쿼리의 경우
     *  `INSERT FROM SELECT` 및 이와 유사한 쿼리에서 LB 타임아웃 문제를 피할 수 있습니다.
     *  연결이 LB에 의해 유휴 상태로 표시되어 갑자기 닫힐 수 있기 때문입니다.
     *  여기서는 LB의 유휴 연결 타임아웃이 120초라고 가정하므로, "안전한" 값으로 110초를 설정합니다. */
    clickhouse_settings: {
      send_progress_in_http_headers: 1,
      http_headers_progress_interval_ms: '110000', // UInt64이므로 문자열로 전달해야 합니다
    },
  })
  ```

  다만 최근 Node.js 버전에서는 수신한 헤더의 총 크기가 16KB로 제한된다는 점을 유의하십시오. 일정 수 이상의 progress 헤더를 받으면(테스트에서는 약 70\~80개), 예외가 발생합니다.

  전송 중 대기 시간을 완전히 피하는 전혀 다른 접근 방식도 사용할 수 있습니다. 연결이 끊겨도 mutation이 취소되지 않는 HTTP 인터페이스 "기능"을 활용하는 방식입니다. 자세한 내용은 [이 예시(2부)](https://github.com/ClickHouse/clickhouse-js/blob/main/examples/long_running_queries_timeouts.ts)를 참조하십시오.

* Keep-Alive 기능은 완전히 비활성화할 수도 있습니다. 이 경우 클라이언트는 모든 요청에 `Connection: close` 헤더도 추가하며, 기반 HTTP 에이전트는 연결을 재사용하지 않습니다. 유휴 소켓이 없으므로 `keep_alive.idle_socket_ttl` 설정은 무시됩니다. 이 방식은 모든 요청마다 새 연결을 설정하므로 추가 오버헤드가 발생합니다.

  ```ts theme={null}
  const client = createClient({
    keep_alive: {
      enabled: false,
    },
  })
  ```

* `curl`을 사용한 간단한 명령줄 테스트를 동일한 ClickHouse 인스턴스와 동일한 네트워크 경로(즉, 같은 머신 또는 네트워크 세그먼트, 예: Kubernetes pod)에서 실행하여, Node.js 자체를 포함한 나머지 네트워크 스택의 잠재적 문제를 배제해 보십시오.

  ```sh theme={null}
  curl -is --user '<user>:<password>' --data-binary "SELECT 1" <clickhouse_url>
  ```

  몇 분 동안 반복 실행해 보는 것이 좋습니다. `curl`에서도 비슷한 오류가 보인다면, 문제는 클라이언트 구성이 아니라 네트워크 스택이나 서버 구성과 관련되어 있을 가능성이 높습니다.

* 순수 Node.js 기능으로 연결을 테스트하려면, 내장 `fetch` API를 사용해 ClickHouse 서버에 간단한 HTTP 요청을 보내 볼 수 있습니다.

```ts theme={null}
  const response = await fetch('<clickhouse_url>?query=SELECT+1', {
    method: 'POST',
    headers: {
      'Authorization': 'Basic ' + Buffer.from('<user>:<password>').toString('base64'),
    }
  })
```

* 경우에 따라 애플리케이션 코드나 프레임워크 어댑터가 실제 쿼리 실행 전에 선행 `ping()`을 추가할 수 있습니다. 이 경우 유휴 연결과 관련된 동일한 근본 원인으로 인해 `ping()` 요청은 성공하지만, 바로 뒤따르는 쿼리 요청은 "socket hang up" 오류와 함께 실패할 수 있습니다. 로그에서 이러한 패턴이 보이면 프레임워크 또는 애플리케이션 코드에서 선행 ping을 비활성화하는 옵션이 있는지 확인하십시오. 이렇게 하면 중간 네트워크 구성 요소에서 속도 제한이 적용될 가능성을 줄이는 데에도 도움이 됩니다.

* 애플리케이션 자체에 충분한 CPU 시간이 할당되고 있는지, 그리고 호스팅 제공업체가 네트워크를 제한하고 있지 않은지 확인하십시오. GC 일시 중지 메트릭, 이벤트 루프 지연 메트릭 등 다양한 모니터링 수단도 잠재적인 리소스 고갈 문제를 배제하는 데 도움이 될 수 있습니다.

* [no-floating-promises](https://typescript-eslint.io/rules/no-floating-promises/) ESLint 규칙을 활성화한 상태에서 애플리케이션 코드를 점검해 보십시오. 이렇게 하면 처리되지 않은 Promise를 식별하는 데 도움이 되며, 이러한 Promise는 정리되지 않은 스트림과 소켓으로 이어질 수 있습니다.

<div id="read-only-users">
  ### 읽기 전용 사용자
</div>

[readonly=1 사용자](/docs/ko/concepts/features/configuration/settings/permissions-for-queries#readonly)와 함께 클라이언트를 사용하는 경우, `enable_http_compression` 설정이 필요하므로 응답 압축을 활성화할 수 없습니다. 다음 구성은 오류를 발생시킵니다:

```ts theme={null}
const client = createClient({
  compression: {
    response: true, // won't work with a readonly=1 user
  },
})
```

readonly=1 사용자의 제한 사항을 더 자세히 보여 주는 [예시](https://github.com/ClickHouse/clickhouse-js/blob/main/examples/node/security/read_only_user.ts)를 참조하십시오.

<div id="proxy-with-a-pathname">
  ### 경로명이 포함된 프록시
</div>

ClickHouse instance가 프록시 뒤에 있고 URL에 경로명이 포함되어 있는 경우(예: [http://proxy:8123/clickhouse\&#95;server)에는](http://proxy:8123/clickhouse\&#95;server\)에는) `pathname` 구성 옵션에 `clickhouse_server`를 지정하십시오(앞에 슬래시가 있어도 되고 없어도 됩니다). 그렇지 않고 이를 `url`에 직접 지정하면 `database` 옵션으로 간주됩니다. 여러 세그먼트도 지원합니다. 예: `/my_proxy/db`.

```ts theme={null}
const client = createClient({
  url: 'http://proxy:8123',
  pathname: '/clickhouse_server',
})
```

<div id="reverse-proxy-with-authentication">
  ### 인증이 적용된 리버스 프록시
</div>

ClickHouse 배포 앞단에 인증이 적용된 리버스 프록시가 있는 경우, 해당 리버스 프록시에 필요한 헤더를 전달하도록 `http_headers` 설정을 사용할 수 있습니다:

```ts theme={null}
const client = createClient({
  http_headers: {
    'My-Auth-Header': '...',
  },
})
```

<div id="custom-httphttps-agent-experimental-nodejs-only">
  ### 사용자 지정 HTTP/HTTPS 에이전트(실험적, Node.js 전용)
</div>

<Warning>
  이는 실험적 기능이며 향후 릴리스에서 하위 호환되지 않는 방식으로 변경될 수 있습니다. 클라이언트가 제공하는 기본 구현 및 설정으로도 대부분의 사용 사례에는 충분합니다. 이 기능은 꼭 필요하다고 확신하는 경우에만 사용하세요.
</Warning>

기본적으로 클라이언트는 클라이언트 구성에 지정된 설정(`max_open_connections`, `keep_alive.enabled`, `tls` 등)을 사용해 내부 HTTP 또는 HTTPS 에이전트를 구성하며, 이 에이전트가 ClickHouse 서버와의 연결을 처리합니다. 또한 TLS 인증서를 사용하는 경우 내부 에이전트는 필요한 인증서로 구성되며, 올바른 TLS 인증 header가 적용됩니다.

1.2.0 이후에는 기본 내부 에이전트를 대체하는 사용자 지정 HTTP 또는 HTTPS 에이전트를 클라이언트에 제공할 수 있습니다. 이는 복잡한 네트워크 구성에서 유용할 수 있습니다. 사용자 지정 에이전트를 제공하면 다음 조건이 적용됩니다.

* `max_open_connections` 및 `tls` 옵션은 내부 에이전트 구성의 일부이므로 *아무런 효과가 없으며* 클라이언트에서 무시됩니다.
* `keep_alive.enabled`는 `Connection` header의 기본값만 제어합니다(`true` -> `Connection: keep-alive`, `false` -> `Connection: close`).
* 유휴 keep-alive socket 관리는 계속 동작하지만(에이전트가 아니라 특정 socket 자체에 종속되기 때문입니다), 이제 `keep_alive.idle_socket_ttl` 값을 `0`으로 설정해 이를 완전히 비활성화할 수 있습니다.

<div id="custom-agent-usage-examples">
  #### 사용자 지정 Agent 사용 예시
</div>

인증서 없이 사용자 지정 HTTP 또는 HTTPS Agent를 사용하는 예시:

```ts theme={null}
const agent = new http.Agent({ // or https.Agent
  keepAlive: true,
  keepAliveMsecs: 2500,
  maxSockets: 10,
  maxFreeSockets: 10,
})
const client = createClient({
  http_agent: agent,
})
```

basic TLS와 CA certificate를 사용하는 custom HTTPS Agent:

```ts theme={null}
const agent = new https.Agent({
  keepAlive: true,
  keepAliveMsecs: 2500,
  maxSockets: 10,
  maxFreeSockets: 10,
  ca: fs.readFileSync('./ca.crt'),
})
const client = createClient({
  url: 'https://myserver:8443',
  http_agent: agent,
  // With a custom HTTPS agent, the client won't use the default HTTPS connection implementation; the headers should be provided manually
  http_headers: {
    'X-ClickHouse-User': 'username',
    'X-ClickHouse-Key': 'password',
  },
  // Important: authorization header conflicts with the TLS headers; disable it.
  set_basic_auth_header: false,
})
```

mutual TLS와 함께 사용자 지정 HTTPS Agent 사용:

```ts theme={null}
const agent = new https.Agent({
  keepAlive: true,
  keepAliveMsecs: 2500,
  maxSockets: 10,
  maxFreeSockets: 10,
  ca: fs.readFileSync('./ca.crt'),
  cert: fs.readFileSync('./client.crt'),
  key: fs.readFileSync('./client.key'),
})
const client = createClient({
  url: 'https://myserver:8443',
  http_agent: agent,
  // With a custom HTTPS agent, the client won't use the default HTTPS connection implementation; the headers should be provided manually
  http_headers: {
    'X-ClickHouse-User': 'username',
    'X-ClickHouse-Key': 'password',
    'X-ClickHouse-SSL-Certificate-Auth': 'on',
  },
  // Important: authorization header conflicts with the TLS headers; disable it.
  set_basic_auth_header: false,
})
```

인증서 *및* 사용자 지정 *HTTPS* Agent를 사용하는 경우, TLS 헤더와 충돌할 수 있으므로 `set_basic_auth_header` 설정(1.2.0에 도입됨)으로 기본 Authorization 헤더를 비활성화해야 할 가능성이 높습니다. 모든 TLS 헤더는 수동으로 지정해야 합니다.

<div id="known-limitations-nodejsweb">
  ## 알려진 제한 사항 (Node.js/web)
</div>

* 결과 집합에 대한 데이터 매퍼가 없으므로 언어 기본 타입만 사용됩니다. 일부 데이터 타입 매퍼는 [RowBinary 포맷 지원](https://github.com/ClickHouse/clickhouse-js/issues/216)과 함께 추가될 예정입니다.
* 일부 [Decimal\* 및 Date\* / DateTime\* 데이터 타입 관련 유의 사항](/docs/ko/integrations/language-clients/js/index#datedate32-types-caveats)이 있습니다.
* JSON\* 계열 포맷을 사용할 때 Int32보다 큰 숫자는 문자열로 표현됩니다. Int64+ 타입의 최댓값이 `Number.MAX_SAFE_INTEGER`보다 크기 때문입니다. 자세한 내용은 [Integral types](/docs/ko/integrations/language-clients/js/index#integral-types-int64-int128-int256-uint64-uint128-uint256) 섹션을 참조하십시오.

<div id="known-limitations-web">
  ## 알려진 제한 사항 (web)
</div>

* `select` 쿼리의 스트리밍은 작동하지만, 삽입에는 사용할 수 없습니다(타입 수준에서도 마찬가지입니다).
* 요청 압축은 비활성화되어 있고 구성은 무시됩니다. 응답 압축은 작동합니다.
* 아직 로깅을 지원하지 않습니다.

<div id="tips-for-performance-optimizations">
  ## 성능 최적화를 위한 팁
</div>

* 애플리케이션 메모리 사용량을 줄이려면, 해당되는 경우 대용량 삽입(예: 파일에서)과 select 쿼리에 스트림을 사용하는 방안을 고려하십시오. 이벤트 listener 및 이와 유사한 사용 사례에서는 [async inserts](/docs/ko/concepts/features/operations/insert/asyncinserts)도 좋은 선택지가 될 수 있으며, 클라이언트 측 배칭을 최소화하거나 완전히 없앨 수도 있습니다. Async insert 예시는 [client 리포지토리](https://github.com/ClickHouse/clickhouse-js/tree/main/examples/node)에서 확인할 수 있으며, 파일 이름 prefix는 `async_insert_`입니다.
* 클라이언트는 기본적으로 request 또는 response 압축(Compression)을 활성화하지 않습니다. 하지만 대용량 데이터셋을 select하거나 삽입할 때는 `ClickHouseClientConfigOptions.compression`을 통해 이를 활성화하는 것을 고려할 수 있습니다(`request` 또는 `response`만, 혹은 둘 다 설정 가능).
* 압축(Compression)에는 상당한 성능 비용이 따릅니다. 이를 `request` 또는 `response`에 활성화하면 각각 삽입 또는 select 속도에 부정적인 영향을 주지만, 애플리케이션이 전송하는 네트워크 트래픽 양은 줄일 수 있습니다.

<div id="contact-us">
  ## 문의하기
</div>

질문이 있거나 도움이 필요하면 [Community Slack](https://clickhouse.com/slack)의 (`#clickhouse-js` 채널) 또는 [GitHub issues](https://github.com/ClickHouse/clickhouse-js/issues)를 통해 편하게 문의하세요.