> ## Documentation Index
> Fetch the complete documentation index at: https://clickhouse.com/docs/llms.txt
> Use this file to discover all available pages before exploring further.

> Omni는 BI, 데이터 애플리케이션, 임베디드 애널리틱스를 위한 엔터프라이즈 플랫폼으로, 실시간으로 데이터를 탐색하고 인사이트를 공유할 수 있도록 지원합니다.

# Omni

export const PartnerBadge = () => {
  return <div className="PartnerBadge">
            <div className="PartnerBadgeIcon">
                <svg width="16" height="16" viewBox="0 0 16 16" fill="none" xmlns="http://www.w3.org/2000/svg">
                    <polyline points="12.5 9.5 10 12 6 11 2.5 8.5" stroke="currentColor" strokeLinecap="round" strokeLinejoin="round" strokeWidth="1" />
                    <polyline points="4.54 4.41 8 3.5 11.46 4.41" stroke="currentColor" strokeLinecap="round" strokeLinejoin="round" strokeWidth="1" />
                    <path d="M2.15,3.78 L0.55,6.95 A0.5,0.5 0,0,0 0.77,7.62 L2.5,8.5 L4.54,4.41 L2.82,3.55 A0.5,0.5 0,0,0 2.15,3.78 Z" stroke="currentColor" strokeLinecap="round" strokeLinejoin="round" strokeWidth="1" />
                    <path d="M13.5,8.5 L15.23,7.62 A0.5,0.5 0,0,0 15.45,6.95 L13.85,3.78 A0.5,0.5 0,0,0 13.18,3.55 L11.46,4.41 Z" stroke="currentColor" strokeLinecap="round" strokeLinejoin="round" strokeWidth="1" />
                    <path d="M11.5,4.5 L9,4.5 L6.15,7.27 A0.5,0.5 0,0,0 6.24,8.05 C7.33,8.74 8.81,8.72 10,7.5 L12.5,9.5 L13.5,8.5" stroke="currentColor" strokeLinecap="round" strokeLinejoin="round" strokeWidth="1" />
                    <polyline points="7.75 13.5 5.15 12.85 3.5 11.67" stroke="currentColor" strokeLinecap="round" strokeLinejoin="round" strokeWidth="1" />
                </svg>
            </div>
            파트너 통합
        </div>;
};

export const Image = ({img, alt, size = "lg"}) => {
  const normalizedSize = ["sm", "md", "lg"].includes(size) ? size : "lg";
  return <div className={`ch-image-${normalizedSize}`}>
      <Frame>
        <img src={img} alt={alt} />
      </Frame>
    </div>;
};

<PartnerBadge />

Omni는 공식 ClickHouse 데이터 소스를 통해 ClickHouse Cloud 또는 온프레미스 배포 환경에 연결할 수 있습니다.

<Steps>
  <Step title="연결 정보 수집" id="1-gather-your-connection-details">
    HTTP(S)로 ClickHouse에 연결하려면 다음 정보가 필요합니다.

    | 매개변수                      | 설명                                                         |
    | ------------------------- | ---------------------------------------------------------- |
    | `HOST` and `PORT`         | 일반적으로 TLS를 사용하는 경우 포트는 8443, TLS를 사용하지 않는 경우 8123입니다.      |
    | `DATABASE NAME`           | 기본적으로 `default`라는 이름의 데이터베이스가 제공되며, 연결할 데이터베이스 이름을 사용하십시오. |
    | `USERNAME` and `PASSWORD` | 기본 사용자 이름은 `default`입니다. 사용 사례에 맞는 사용자 이름을 사용하십시오.         |

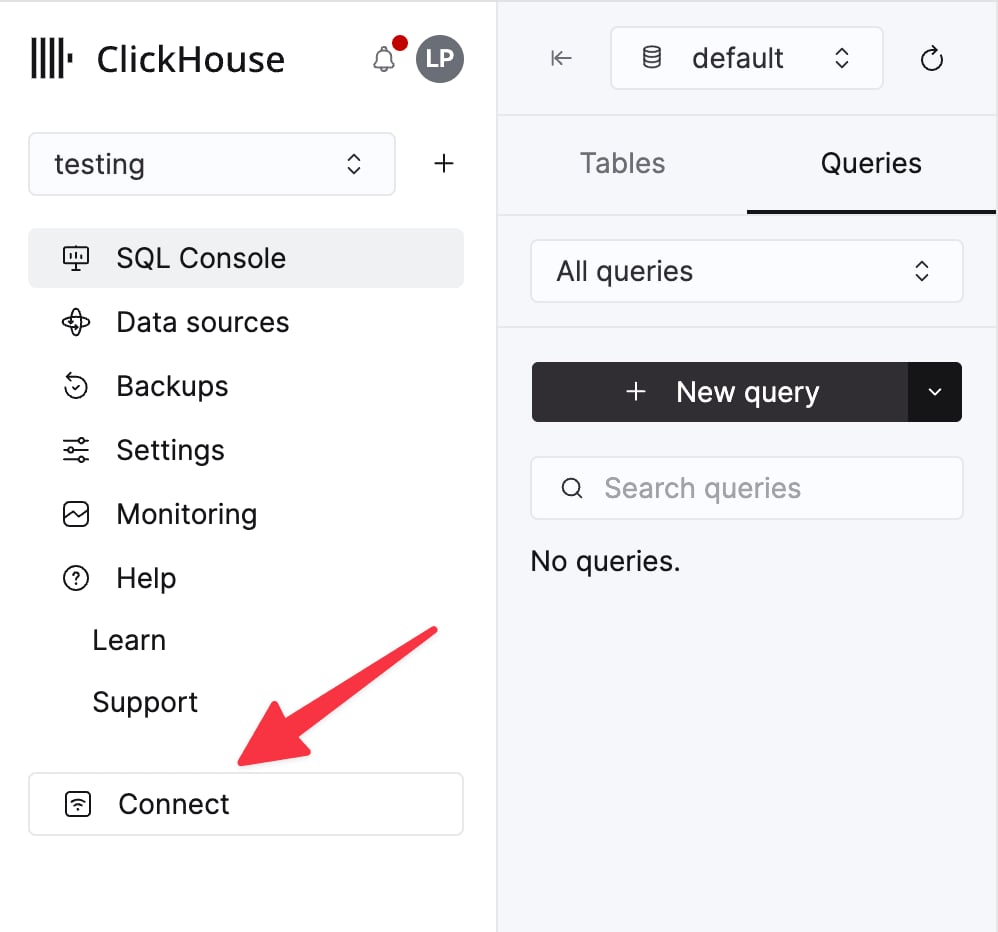
    ClickHouse Cloud 서비스의 연결 정보는 ClickHouse Cloud 콘솔에서 확인할 수 있습니다.
    서비스를 선택한 다음 **Connect**를 클릭하십시오.

    <div className="ch-image-md">
      <Frame>
        <img src="https://mintcdn.com/private-7c7dfe99/CFFsa2agBPbviR4r/images/_snippets/cloud-connect-button.webp?fit=max&auto=format&n=CFFsa2agBPbviR4r&q=85&s=ec0a298a33ca841e947fa5e8bae47362" alt="ClickHouse Cloud 서비스 연결 버튼" width="998" height="932" data-path="images/_snippets/cloud-connect-button.webp" />
      </Frame>
    </div>

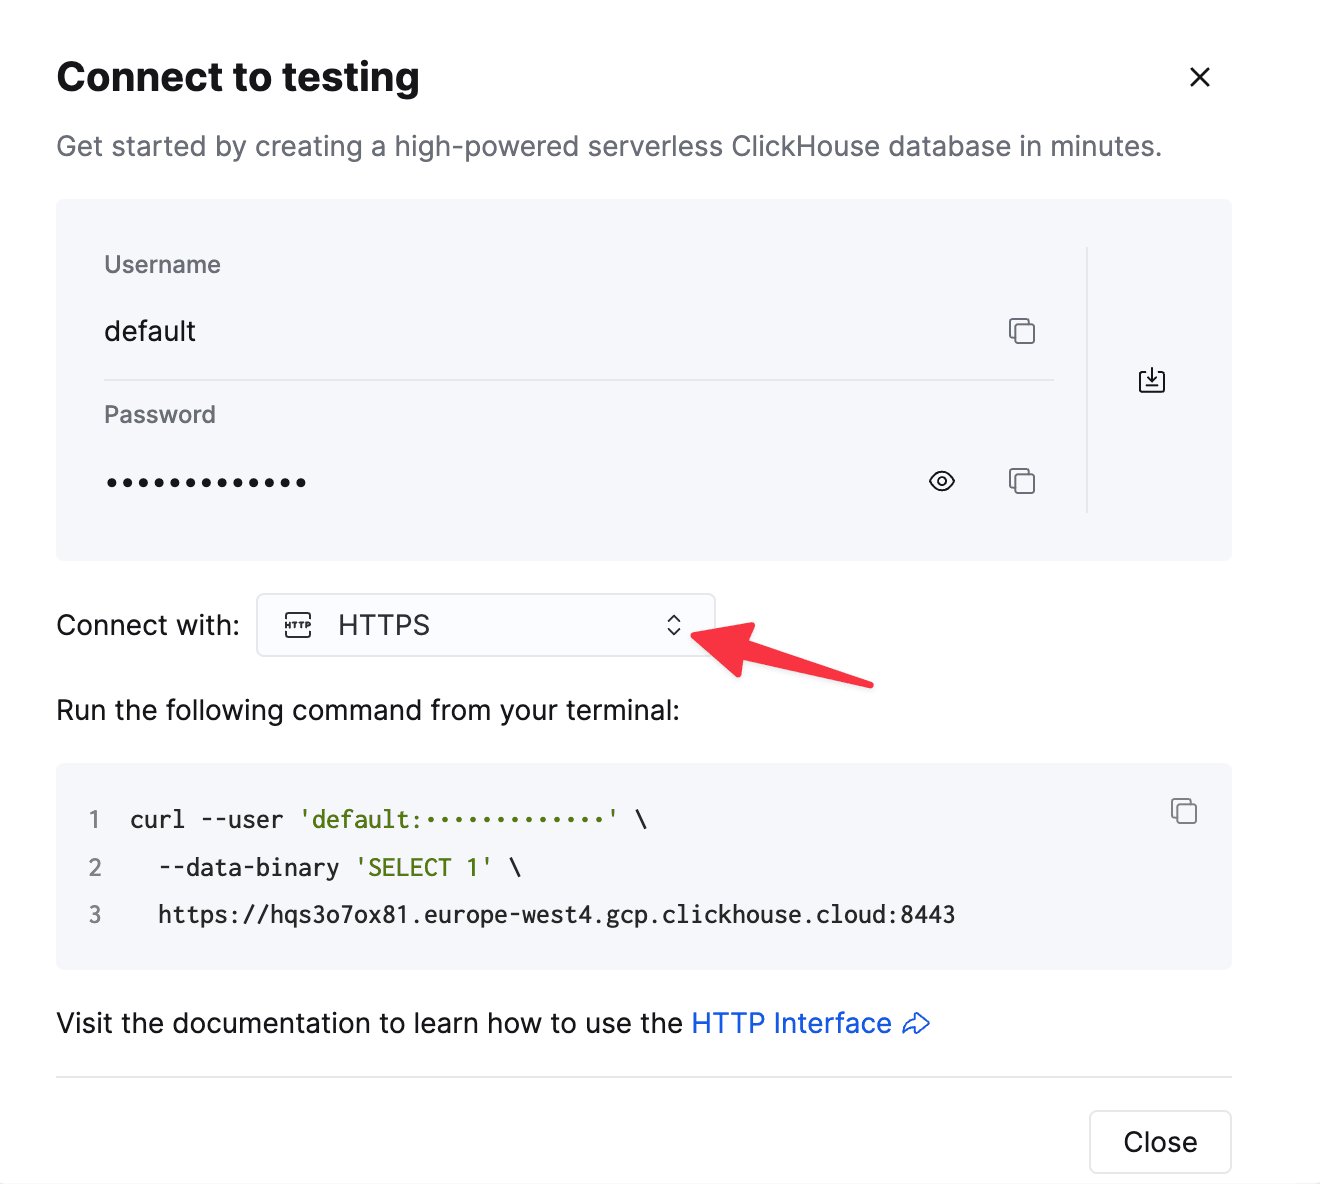
    **HTTPS**를 선택하십시오. 연결 정보가 예시 `curl` 명령으로 표시됩니다.

    <div className="ch-image-md">
      <Frame>
        <img src="https://mintcdn.com/private-7c7dfe99/CFFsa2agBPbviR4r/images/_snippets/connection-details-https.webp?fit=max&auto=format&n=CFFsa2agBPbviR4r&q=85&s=cb0fbd98aa2b5b7ca484c9f53395ee07" alt="ClickHouse Cloud HTTPS 연결 정보" width="1320" height="1184" data-path="images/_snippets/connection-details-https.webp" />
      </Frame>
    </div>

    자가 관리형 ClickHouse를 사용하는 경우 연결 정보는 ClickHouse 관리자가 설정합니다.
  </Step>

  <Step title="ClickHouse 데이터 소스 생성" id="2-create-a-clickhouse-data-source">
    Admin -> Connections로 이동한 다음 오른쪽 상단에 있는 "Add Connection" 버튼을 클릭하세요.

    <Image size="lg" img="https://mintcdn.com/private-7c7dfe99/etDiFo_9fGSe5rMN/images/integrations/data-visualization/omni_01.webp?fit=max&auto=format&n=etDiFo_9fGSe5rMN&q=85&s=d914724bdadc1145d4df6d600bb2225b" alt="Connections 섹션에서 Add Connection 버튼이 표시된 Omni 관리자 인터페이스" border width="3019" height="1635" data-path="images/integrations/data-visualization/omni_01.webp" />

    <br />

    `ClickHouse`를 선택하세요. 양식에 자격 증명을 입력하세요.

    <Image size="lg" img="https://mintcdn.com/private-7c7dfe99/etDiFo_9fGSe5rMN/images/integrations/data-visualization/omni_02.webp?fit=max&auto=format&n=etDiFo_9fGSe5rMN&q=85&s=653c875b6171d093ca16728f8a8dc271" alt="자격 증명 입력 필드가 표시된 ClickHouse용 Omni 연결 구성 인터페이스" border width="3008" height="1552" data-path="images/integrations/data-visualization/omni_02.webp" />

    <br />

    이제 Omni에서 ClickHouse 데이터를 쿼리하고 시각화할 수 있습니다.
  </Step>
</Steps>