レプリケーションとスケーリング
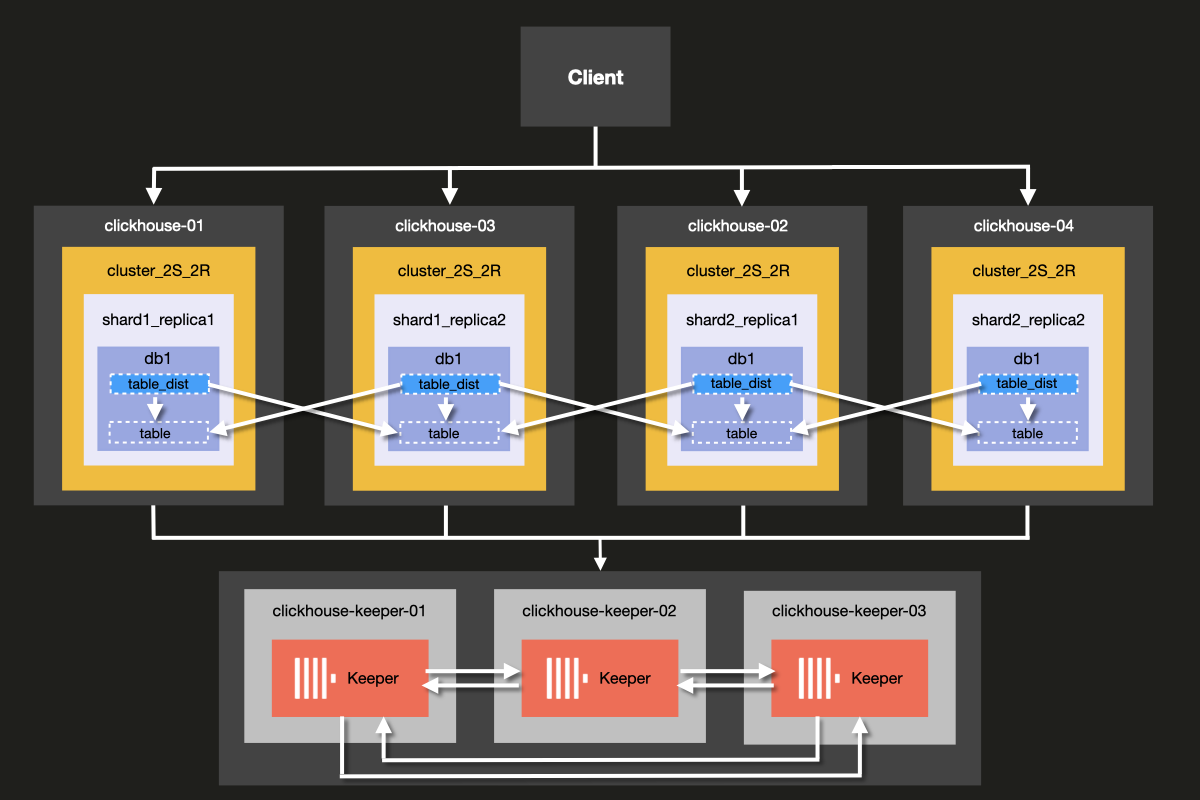
この例では、レプリケーションとスケールの両方に対応したシンプルな ClickHouse クラスターをセットアップする方法を学びます。クラスターは 2 つのシャードと 2 つのレプリカに加え、クラスター内の調整とクォーラムの維持を行う 3 ノード構成の ClickHouse Keeper クラスターで構成されています。
これから構成するクラスターのアーキテクチャは、次の図のとおりです。

ClickHouse Server と ClickHouse Keeper を同じサーバー上で動かすことも可能ですが、 本番環境では ClickHouse Keeper 用に 専用 ホストを使用することを強く推奨します。 この例でもその構成を用いて説明します。
Keeper サーバーは小さめの構成でも問題なく、各 Keeper サーバーあたり 4GB の RAM があれば、 ClickHouse Server 群が大きくなるまでは一般的には十分です。
前提条件
- すでに ローカルの ClickHouse サーバー をセットアップしている
- 設定ファイル など、ClickHouse の基本的な設定の概念に慣れている
- 使用しているマシンに Docker がインストールされている
ディレクトリ構造とテスト環境のセットアップ
以下の手順では、クラスターをゼロからセットアップする方法を順を追って説明します。これらの手順をスキップしてすぐにクラスターを起動したい場合は、examples リポジトリの 'docker-compose-recipes' ディレクトリ からサンプルファイルを取得できます。
このチュートリアルでは、Docker composeを使用してClickHouseクラスタをセットアップします。このセットアップは、個別のローカルマシン、仮想マシン、クラウドインスタンスでも動作するように変更可能です。
この例のディレクトリ構造をセットアップするには、以下のコマンドを実行します:
以下の docker-compose.yml ファイルを clickhouse-cluster ディレクトリに追加します:
以下のサブディレクトリとファイルを作成します:
config.dディレクトリには ClickHouse サーバーの設定ファイルconfig.xmlが含まれており、 各 ClickHouse ノード向けのカスタム設定がここで定義されます。 この設定は、すべての ClickHouse インストールに付属するデフォルトの ClickHouse 設定ファイルconfig.xmlとマージされて使用されます。users.dディレクトリにはユーザー設定ファイルusers.xmlが含まれており、 ユーザーに対するカスタム設定がここで定義されます。 この設定は、すべての ClickHouse インストールに付属するデフォルトの ClickHouse 設定ファイルusers.xmlとマージされて使用されます。
独自の設定を記述する際には、/etc/clickhouse-server/config.xml および
etc/clickhouse-server/users.xml のデフォルト設定を直接変更するのではなく、
config.d および users.d ディレクトリを利用することがベストプラクティスです。
The line
config.d および users.d ディレクトリで定義された設定セクションが、デフォルトの config.xml および users.xml ファイルで定義されている設定セクションより優先されるようにします。
ClickHouseノードの設定
サーバーのセットアップ
次に、fs/volumes/clickhouse-{}/etc/clickhouse-server/config.dに配置されている各空の設定ファイルconfig.xmlを修正します。以下で強調表示されている行は、各ノードに固有の内容に変更する必要があります:
| ディレクトリ | ファイル |
|---|---|
fs/volumes/clickhouse-01/etc/clickhouse-server/config.d | config.xml |
fs/volumes/clickhouse-02/etc/clickhouse-server/config.d | config.xml |
fs/volumes/clickhouse-03/etc/clickhouse-server/config.d | config.xml |
fs/volumes/clickhouse-04/etc/clickhouse-server/config.d | config.xml |
上記の設定ファイルの各セクションについて、以下で詳細に説明します。
ネットワーキングとロギング
ネットワークインターフェースへの外部からの通信は、listen_host 設定を有効にすることで行えるようになります。これにより、ClickHouse サーバーホストには他のホストから接続できるようになります。
HTTP API 用のポートは 8123 に設定されています:
ClickHouse のネイティブプロトコルを使用した clickhouse-client と他のネイティブ ClickHouse ツール間、ならびに clickhouse-server と他の clickhouse-server 間の通信に用いられる TCP ポートは 9000 です。
ログ設定は <logger> ブロックで定義します。この設定例では、サイズが1000Mに達するたびに最大3世代までローテーションするデバッグログになります:
ログ設定の詳細については、デフォルトの ClickHouse 設定ファイル内のコメントを参照してください。
クラスター設定
クラスタの設定は <remote_servers> ブロックで定義します。
ここでクラスタ名 cluster_2S_2R が定義されます。
<cluster_2S_2R></cluster_2S_2R> ブロックは <shard></shard> と <replica></replica> の設定を使ってクラスタのレイアウトを定義し、ON CLUSTER 句を使用してクラスタ全体で実行される分散DDLクエリのテンプレートとして機能します。デフォルトでは分散DDLクエリは許可されていますが、allow_distributed_ddl_queries 設定で無効にすることもできます。
internal_replication を true に設定すると、データはレプリカのうち 1 つにのみ書き込まれるようになります。
<cluster_2S_2R></cluster_2S_2R> セクションは、クラスタのレイアウトを定義し、
分散DDLクエリ(ON CLUSTER 句を使用してクラスタ全体で実行されるクエリ)のテンプレートとして機能します。
Keeper の設定
<ZooKeeper> セクションは、ClickHouse Keeper(または ZooKeeper)がどこで動作しているかを ClickHouse に伝えます。
ClickHouse Keeper クラスタを使用する場合、クラスタの各 <node> を指定する必要があります。
ホスト名とポート番号はそれぞれ <host> タグと <port> タグを使用して指定します。
ClickHouse Keeperのセットアップは、チュートリアルの次のステップで説明されています。
ClickHouse KeeperをClickHouse Serverと同じサーバー上で実行することは可能ですが、本番環境では専用ホスト上で実行することを強く推奨します。
マクロの設定
また、<macros> セクションは、レプリケートテーブル向けのパラメータ置換を定義するために使用されます。これらは system.macros に一覧表示され、クエリ内で {shard} や {replica} といった置換を利用できるようになります。
ユーザー設定
次に、fs/volumes/clickhouse-{}/etc/clickhouse-server/users.d にある各空の設定ファイル users.xml を次の内容に変更します:
この例では、簡略化のためデフォルトユーザーをパスワードなしで設定しています。 実際の運用環境では、この設定は推奨されません。
この例では、クラスター内のすべてのノードでusers.xmlファイルが同一です。
ClickHouse Keeperの設定
次に、クラスタの調整に使用されるClickHouse Keeperを設定します。
Keeperのセットアップ
レプリケーションを機能させるためには、ClickHouse Keeper クラスターをセットアップして 構成する必要があります。ClickHouse Keeper はデータレプリケーションのためのコーディネーションシステムを提供し、 ZooKeeper の代替として動作しますが、ZooKeeper を使用することも可能です。 ただし ClickHouse Keeper は、より強い保証と高い信頼性を提供し、ZooKeeper よりも少ないリソースで 動作するため推奨されます。高可用性とクォーラム維持のために、少なくとも 3 つの ClickHouse Keeper ノードを 実行することを推奨します。
ClickHouse Keeper はクラスター内の任意のノード上で ClickHouse と一緒に実行できますが、 スケーリングおよびデータベースクラスターとは独立した ClickHouse Keeper クラスターの管理を可能にするため、 専用ノード上で実行することを推奨します。
各 ClickHouse Keeper ノード用の keeper_config.xml ファイルを、
サンプルディレクトリのルートから次のコマンドを使用して作成します:
各ノードのディレクトリ fs/volumes/clickhouse-keeper-{}/etc/clickhouse-keeper に作成された空の設定ファイルを編集します。
以下のハイライトされた行を、各ノードに固有の設定となるように変更してください。
| ディレクトリ | ファイル |
|---|---|
fs/volumes/clickhouse-keeper-01/etc/clickhouse-keeper | keeper_config.xml |
fs/volumes/clickhouse-keeper-02/etc/clickhouse-keeper | keeper_config.xml |
fs/volumes/clickhouse-keeper-03/etc/clickhouse-keeper | keeper_config.xml |
各設定ファイルには、以下のような固有の設定が含まれています(下記参照)。
使用する server_id は、そのクラスタ内で該当する ClickHouse Keeper ノードごとに一意であり、
<raft_configuration> セクションで定義されているサーバーの <id> と一致している必要があります。
tcp_port は ClickHouse Keeper の クライアント が使用するポートです。
次のセクションでは、Raft 合意アルゴリズム の クォーラムに参加するサーバーを構成します。
ClickHouse Cloud は、シャードおよびレプリカの管理に伴う運用上の負担を取り除きます。 プラットフォームが高可用性の確保、レプリケーション、およびスケーリングに関する判断を自動的に行います。 コンピュートリソースとストレージは分離されており、需要に応じて自動的にスケールするため、手動での設定や継続的なメンテナンスは不要です。
セットアップのテスト
マシン上でDockerが実行されていることを確認してください。
cluster_2S_2Rディレクトリのルートからdocker-compose upコマンドを使用してクラスタを起動します:
dockerがClickHouseとKeeperのイメージをプルし始め、 その後コンテナが起動する様子が表示されます:
クラスタが稼働していることを確認するには、いずれかのノードに接続して以下のクエリを実行します。最初のノードへの接続コマンドは次のとおりです:
成功すると、ClickHouseクライアントのプロンプトが表示されます:
以下のクエリを実行して、各ホストに定義されているクラスタトポロジを確認します:
以下のクエリを実行して、ClickHouse Keeperクラスタのステータスを確認します:
mntr コマンドは、ClickHouse Keeper が稼働していることを確認し、
3 つの Keeper ノード間の関係に関する状態情報を取得するためにも一般的に使用されます。
この例で使用している構成では、3 つのノードが協調して動作しています。
ノード間でリーダーを選出し、残りのノードはフォロワーになります。
mntr コマンドは、パフォーマンスに関連する情報と、特定のノードが
フォロワーかリーダーかを示します。
Keeper に mntr コマンドを送信するには、netcat をインストールする必要がある場合があります。
ダウンロード情報については nmap.org のページを参照してください。
各 Keeper ノードのステータスを確認するために、clickhouse-keeper-01、clickhouse-keeper-02、
clickhouse-keeper-03 上のシェルから以下のコマンドを実行します。
clickhouse-keeper-01 用のコマンドは次のとおりです。
以下は、フォロワーノードからの応答例です。
以下は、リーダーノードからの応答例です。
これで、2つの分片と2つのレプリカを持つClickHouseクラスタのセットアップが完了しました。 次のステップでは、クラスタにテーブルを作成します。
データベースを作成する
クラスタが正しくセットアップされ、実行されていることを確認したので、UK property pricesサンプルデータセットチュートリアルで使用されているものと同じテーブルを再作成します。このデータセットは、1995年以降にイングランドとウェールズで取引された不動産物件の価格データ約3,000万行で構成されています。
各ホストのクライアントに接続するには、以下の各コマンドを別々のターミナルタブまたはウィンドウから実行します:
各ホストのclickhouse-clientから以下のクエリを実行して、デフォルトのもの以外のデータベースがまだ作成されていないことを確認してください:
clickhouse-01 クライアントから、ON CLUSTER 句を使用して以下の分散型 DDL クエリを実行し、uk という名前の新しいデータベースを作成します:
各ホストのクライアントから先ほどと同じクエリを再度実行し、clickhouse-01からのみクエリを実行したにもかかわらず、クラスタ全体でデータベースが作成されていることを確認できます:
クラスタ上にテーブルを作成する
データベースが作成できたので、次にレプリケーション対応のテーブルを作成します。
いずれかのホストクライアントから以下のクエリを実行します:
これは、英国不動産価格サンプルデータセットチュートリアルの元のCREATE文で使用されたクエリと同一です。ただし、ON CLUSTER句とReplicatedMergeTreeエンジンの使用が異なる点に注意してください。
ON CLUSTER句は、CREATE、DROP、ALTER、RENAMEなどのDDL(Data Definition Language)クエリを分散実行するために設計されており、これらのスキーマ変更をクラスタ内のすべてのノードに適用します。
ReplicatedMergeTreeエンジンは、通常のMergeTreeテーブルエンジンと同様に動作しますが、データのレプリケーションも実行します。
2つのパラメータの指定が必要です:
zoo_path: Keeper/ZooKeeper 上にあるテーブルメタデータへのパス。replica_name: テーブルのレプリカ名。
zoo_pathパラメータは任意の値に設定できますが、プレフィックスを使用する慣例に従うことを推奨します
各項目の説明:
{database}と{table}は自動的に置換されます。{shard}と{replica}は、各 ClickHouse ノードのconfig.xmlファイル内であらかじめ定義されたマクロです。
各ホストのクライアントから以下のクエリを実行し、クラスタ全体でテーブルが作成されていることを確認してください:
分散テーブルへのデータ挿入
テーブルへのデータ挿入時にはON CLUSTERを使用できません。これはINSERT、UPDATE、DELETEなどのDML(Data Manipulation Language:データ操作言語)クエリには適用されないためです。データを挿入するには、Distributedテーブルエンジンを利用する必要があります。
2分片1レプリカ構成のクラスタをセットアップするガイドで学んだように、分散テーブルとは異なるホスト上に配置された分片にアクセス可能なテーブルであり、Distributedテーブルエンジンを使用して定義されます。
分散テーブルは、クラスタ内の全分片に対するインターフェースとして機能します。
いずれかのホストクライアントから、以下のクエリを実行して、前のステップで作成した既存のレプリケートテーブルを使用する分散テーブルを作成します:
各ホストのukデータベースに、以下のテーブルが表示されるようになります:
データは、以下のクエリを使用して、いずれかのホストクライアントから uk_price_paid_distributed テーブルに挿入できます:
次のクエリを実行して、挿入されたデータがクラスタの各ノードに均等に分散されていることを確認します:
結論
2つのシャードと2つのレプリカを持つこのクラスター・トポロジーの利点は、スケーラビリティとフォールトトレランスの両方を提供できる点にあります。 データは個別のホスト間で分散されるため、ノードごとのストレージおよび I/O 要件が削減される一方で、クエリは両方のシャードにまたがって並列に処理されるため、パフォーマンスとメモリ効率が向上します。 重要な点として、各シャードには別ノード上にバックアップのレプリカが存在するため、クラスターはノードを1つ失ってもクエリを中断することなく処理し続けられます。
このクラスター・トポロジーの主な欠点は、ストレージのオーバーヘッドが増加することです。レプリカなしの構成と比較すると、各シャードが複製されるため、必要なストレージ容量は2倍になります。 さらに、クラスターは単一ノード障害には耐えられますが、どのノードが障害するかやシャードの配置によっては、2ノードが同時に失われるとクラスターが動作不能になる可能性があります。 このトポロジーは可用性とコストのバランスを取るものであり、より高いレプリケーション係数のコストをかけずに、一定レベルのフォールトトレランスが求められる本番環境に適しています。
スケーラビリティとフォールトトレランスの両方を提供する ClickHouse Cloud におけるクエリ処理の仕組みについては、"Parallel Replicas" セクションを参照してください。

