> ## Documentation Index
> Fetch the complete documentation index at: https://clickhouse.com/docs/llms.txt
> Use this file to discover all available pages before exploring further.

> ClickHouse に接続するための公式 JS クライアント。

# ClickHouse JS

ClickHouse に接続するための公式 JS Client です。
この Client は TypeScript で記述されており、公開 API の型定義を提供します。

依存関係はゼロで、最大限のパフォーマンスが得られるよう最適化されており、さまざまな ClickHouse のバージョンと構成 (オンプレミスの単一ノード、オンプレミスのクラスター、ClickHouse Cloud) でテストされています。

異なる環境向けに、Client には 2 つのバージョンがあります。

* `@clickhouse/client` - Node.js のみ
* `@clickhouse/client-web` - ブラウザー (Chrome/Firefox) 、Cloudflare workers

TypeScript を使用する場合は、少なくとも [version 4.5](https://www.typescriptlang.org/docs/handbook/release-notes/typescript-4-5.html) 以降を使用してください。これにより、[inline import and export syntax](https://www.typescriptlang.org/docs/handbook/release-notes/typescript-4-5.html#type-modifiers-on-import-names) が有効になります。

この Client のソースコードは、[ClickHouse-JS GitHub repository](https://github.com/ClickHouse/clickhouse-js) で公開されています。

<Info>
  **AI agent スキル**

  この JS Client には、コーディングエージェントが Client を扱う際に役立つ AI agent スキルが含まれています。次のようにインストールしてください。

  ```sh theme={null}
  npm skills add ClickHouse/clickhouse-js
  ```
</Info>

<div id="environment-requirements-nodejs">
  ## 環境要件 (node.js)
</div>

クライアントを実行するには、環境で Node.js が利用可能である必要があります。
このクライアントは、現在[メンテナンス対象](https://github.com/nodejs/release#readme)となっているすべての Node.js リリースに対応しています。

Node.js のバージョンがサポート終了 (End-of-Life) に近づくと、そのバージョンは古く安全ではないと見なされるため、クライアントはそのサポートを打ち切ります。

現在の Node.js バージョンのサポート状況:

| Node.js version | Supported? |
| --------------- | ---------- |
| 24.x            | ✔          |
| 22.x            | ✔          |
| 20.x            | ✔          |
| 18.x            | ベストエフォート   |

<div id="environment-requirements-web">
  ## 環境要件 (Web 版)
</div>

クライアントの Web 版は、最新の Chrome/Firefox ブラウザーで公式にテストされており、たとえば React/Vue/Angular アプリケーションや Cloudflare workers の依存関係として使用できます。

<div id="installation">
  ## インストール
</div>

最新の安定版 Node.js Client をインストールするには、次を実行します。

```sh theme={null}
npm i @clickhouse/client
```

Web 版のインストール:

```sh theme={null}
npm i @clickhouse/client-web
```

<div id="compatibility-with-clickhouse">
  ## ClickHouseとの互換性
</div>

| クライアント バージョン | ClickHouse |
| ------------ | ---------- |
| 1.12.0       | 24.8+      |

このクライアントは古いバージョンでも動作する可能性がありますが、これはベストエフォートでのサポートであり、保証されるものではありません。ClickHouseのバージョンが23.3より古い場合は、[ClickHouse のセキュリティポリシー](https://github.com/ClickHouse/ClickHouse/blob/master/SECURITY.md)を参照し、アップグレードを検討してください。

<div id="examples">
  ## 例
</div>

クライアントリポジトリ内の[examples](https://github.com/ClickHouse/clickhouse-js/blob/main/examples)では、クライアントの利用に関するさまざまなシナリオを取り上げています。

概要は [examples README](https://github.com/ClickHouse/clickhouse-js/blob/main/examples/README.md#overview) で確認できます。

examples または以下のドキュメントに不明点や不足している内容があれば、お気軽に[お問い合わせください](/docs/ja/integrations/language-clients/js/index#contact-us)。

<div id="client-api">
  ### クライアント API
</div>

特に明記されていない限り、ほとんどの例はクライアントの Node.js 版と Web 版の両方に対応しています。

<div id="creating-a-client-instance">
  #### Clientインスタンスの作成
</div>

`createClient` ファクトリを使うと、必要な数のClientインスタンスを作成できます。

```ts theme={null}
import { createClient } from '@clickhouse/client' // or '@clickhouse/client-web'

const client = createClient({
  /* configuration */
})
```

ご利用の環境でESMモジュールがサポートされていない場合は、代わりにCJS構文を使用できます。

```ts theme={null}
const { createClient } = require('@clickhouse/client');

const client = createClient({
  /* configuration */
})
```

Clientインスタンスは、生成時に[事前設定](/docs/ja/integrations/language-clients/js/index#configuration)しておくことができます。

<div id="configuration">
  #### 設定
</div>

クライアントインスタンスの作成時に、以下の接続設定を調整できます。

| 設定                                                                       | 説明                                      | デフォルト値                        | 関連項目                                                                                                |                                                                                                  |
| ------------------------------------------------------------------------ | --------------------------------------- | ----------------------------- | --------------------------------------------------------------------------------------------------- | ------------------------------------------------------------------------------------------------ |
| **url**?: string                                                         | ClickHouseインスタンスのURL。                   | `http://localhost:8123`       | [URL設定ドキュメント](/docs/ja/integrations/language-clients/js/index#url-configuration)                         |                                                                                                  |
| **pathname**?: string                                                    | クライアントによる解析後、ClickHouseのURLに追加する任意のパス名。 | `''`                          | [パス名付きプロキシのドキュメント](/docs/ja/integrations/language-clients/js/index#proxy-with-a-pathname)                |                                                                                                  |
| **request\_timeout**?: number                                            | リクエストのタイムアウト (ミリ秒) 。                    | `30_000`                      | -                                                                                                   |                                                                                                  |
| **compression**?: `{ **response**?: boolean; **request**?: boolean }`    | 圧縮を有効にします。                              | -                             | [圧縮のドキュメント](/docs/ja/integrations/language-clients/js/index#compression)                                 |                                                                                                  |
| **username**?: string                                                    | リクエストの送信元となるユーザー名。                      | `default`                     | -                                                                                                   |                                                                                                  |
| **password**?: string                                                    | ユーザーのパスワード。                             | `''`                          | -                                                                                                   |                                                                                                  |
| **application**?: string                                                 | Node.js Clientを使用するアプリケーション名。           | `clickhouse-js`               | -                                                                                                   |                                                                                                  |
| **database**?: string                                                    | 使用するデータベース名。                            | `default`                     | -                                                                                                   |                                                                                                  |
| **clickhouse\_settings**?: ClickHouseSettings                            | すべてのリクエストに適用するClickHouse設定。             | `{}`                          | -                                                                                                   |                                                                                                  |
| **log**?: `{ **LoggerClass**?: Logger, **level**?: ClickHouseLogLevel }` | クライアント内部ログの設定。                          | -                             | [ロギングのドキュメント](/docs/ja/integrations/language-clients/js/index#logging-nodejs-only)                       |                                                                                                  |
| **session\_id**?: string                                                 | すべてのリクエストに送信する任意のClickHouseセッションID。     | -                             | -                                                                                                   |                                                                                                  |
| **keep\_alive**?: `{ **enabled**?: boolean }`                            | Node.jsとWeb 版の両方で、デフォルトで有効です。           | -                             | -                                                                                                   |                                                                                                  |
| **http\_headers**?: `Record<string, string>`                             | 送信するClickHouseリクエストに追加するHTTPヘッダー。       | -                             | [認証付きリバースプロキシのドキュメント](/docs/ja/integrations/language-clients/js/index#reverse-proxy-with-authentication) |                                                                                                  |
| **roles**?: string                                                       | string\[]                               | 送信するリクエストに付与するClickHouseロール名。 | -                                                                                                   | [HTTPインターフェイスでのロールの使用](/docs/ja/concepts/features/interfaces/http#setting-role-with-query-parameters) |

<div id="nodejs-specific-configuration-parameters">
  #### Node.js 固有の設定パラメーター
</div>

| 設定                                                                                         | 説明                                                              | デフォルト値                   | 関連項目                                                                                                                       |                                                                                                                 |
| ------------------------------------------------------------------------------------------ | --------------------------------------------------------------- | ------------------------ | -------------------------------------------------------------------------------------------------------------------------- | --------------------------------------------------------------------------------------------------------------- |
| **max\_open\_connections**?: number                                                        | ホストごとに許可される接続済みソケットの最大数。                                        | `10`                     | -                                                                                                                          |                                                                                                                 |
| **tls**?: `{ **ca_cert**: Buffer, **cert**?: Buffer, **key**?: Buffer }`                   | TLS 証明書を設定します。                                                  | -                        | [TLS ドキュメント](/docs/ja/integrations/language-clients/js/index#tls-certificates-nodejs-only)                                      |                                                                                                                 |
| **keep\_alive**?: `{ **enabled**?: boolean, **idle_socket_ttl**?: number }`                | -                                                               | -                        | [Keep Alive ドキュメント](/docs/ja/integrations/language-clients/js/index#keep-alive-configuration-nodejs-only)                       |                                                                                                                 |
| **http\_agent**?: http.Agent                                                               | https.Agent <br /><Badge color="green" icon="flask">実験的</Badge> | クライアント用のカスタム HTTP agent。 | -                                                                                                                          | [HTTP agent ドキュメント](/docs/ja/integrations/language-clients/js/index#custom-httphttps-agent-experimental-nodejs-only) |
| **set\_basic\_auth\_header**?: boolean <br /><Badge color="green" icon="flask">実験的</Badge> | ベーシック認証の認証情報を使用して `Authorization` ヘッダーを設定します。                   | `true`                   | [HTTP agent ドキュメントでのこの設定の使用方法](/docs/ja/integrations/language-clients/js/index#custom-httphttps-agent-experimental-nodejs-only) |                                                                                                                 |

<div id="url-configuration">
  ### URL設定
</div>

<Warning>
  URL設定はハードコードされた値を *常に* 上書きし、この場合は警告がログに記録されます。
</Warning>

URL を使用して、クライアントインスタンスのほとんどのパラメータを設定できます。URL の形式は `http[s]://[username:password@]hostname:port[/database][?param1=value1&param2=value2]` です。ほとんどの場合、各パラメータ名は設定オプションのインターフェイス内でのパスに対応していますが、いくつか例外があります。サポートされているパラメータは次のとおりです。

| パラメータ                                       | 型                                                         |
| ------------------------------------------- | --------------------------------------------------------- |
| `pathname`                                  | 任意の文字列。                                                   |
| `application_id`                            | 任意の文字列。                                                   |
| `session_id`                                | 任意の文字列。                                                   |
| `request_timeout`                           | 0 以上の数。                                                   |
| `max_open_connections`                      | 0 より大きい数。                                                 |
| `compression_request`                       | ブール値。以下の (1) を参照。                                         |
| `compression_response`                      | ブール値。                                                     |
| `log_level`                                 | 使用可能な値: `OFF`, `TRACE`, `DEBUG`, `INFO`, `WARN`, `ERROR`。 |
| `keep_alive_enabled`                        | ブール値。                                                     |
| `clickhouse_setting_*` or `ch_*`            | 以下の (2) を参照。                                              |
| `http_header_*`                             | 以下の (3) を参照。                                              |
| (Node.js only) `keep_alive_idle_socket_ttl` | 0 以上の数。                                                   |

* (1) ブール値で有効な値は `true`/`1` と `false`/`0` です。
* (2) `clickhouse_setting_` または `ch_` で始まるパラメータは、このプレフィックスを取り除いたうえで、残りの部分がクライアントの `clickhouse_settings` に追加されます。たとえば、`?ch_async_insert=1&ch_wait_for_async_insert=1` は次と同じです:

```ts theme={null}
createClient({
  clickhouse_settings: {
    async_insert: 1,
    wait_for_async_insert: 1,
  },
})
```

注: `clickhouse_settings` のブール値は、URL では `1`/`0` として指定する必要があります。

* (3) (2) と同様ですが、`http_header` の設定用です。たとえば、`?http_header_x-clickhouse-auth=foobar` は次と同等です。

```ts theme={null}
createClient({
  http_headers: {
    'x-clickhouse-auth': 'foobar',
  },
})
```

<div id="connecting">
  ### 接続
</div>

<div id="gather-your-connection-details">
  #### 接続情報を用意する
</div>

HTTP(S) で ClickHouse に接続するには、次の情報が必要です。

| Parameter(s)              | Description                                               |
| ------------------------- | --------------------------------------------------------- |
| `HOST` and `PORT`         | 通常、TLS を使用する場合のポートは 8443、TLS を使用しない場合は 8123 です。           |
| `DATABASE NAME`           | デフォルトでは `default` という名前のデータベースがあります。接続先のデータベース名を使用してください。 |
| `USERNAME` and `PASSWORD` | デフォルトのユーザー名は `default` です。用途に応じたユーザー名を使用してください。           |

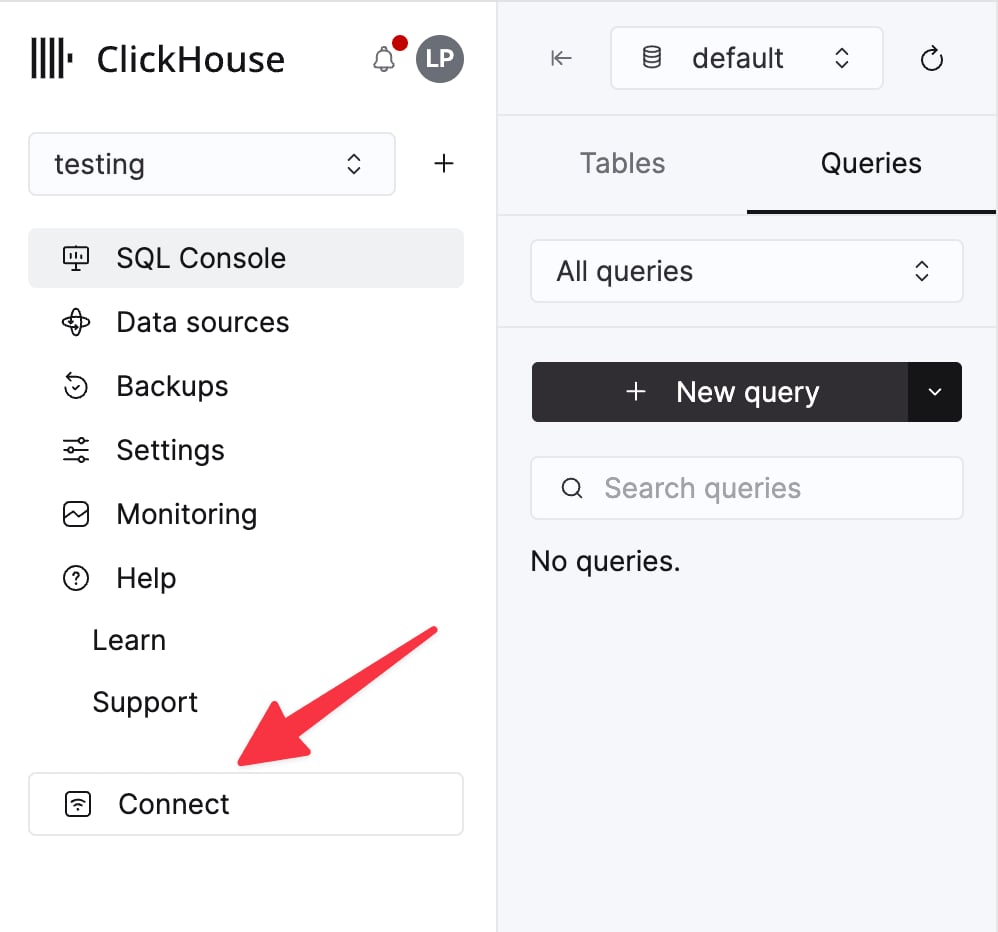
ClickHouse Cloud サービスの詳細は、ClickHouse Cloud コンソールで確認できます。
サービスを選択し、**Connect** をクリックします。
<div className="ch-image-md">
  <Frame>
    <img src="https://mintcdn.com/private-7c7dfe99/CFFsa2agBPbviR4r/images/_snippets/cloud-connect-button.webp?fit=max&auto=format&n=CFFsa2agBPbviR4r&q=85&s=ec0a298a33ca841e947fa5e8bae47362" alt="ClickHouse Cloud サービスの接続ボタン" width="998" height="932" data-path="images/_snippets/cloud-connect-button.webp" />
  </Frame>
</div>

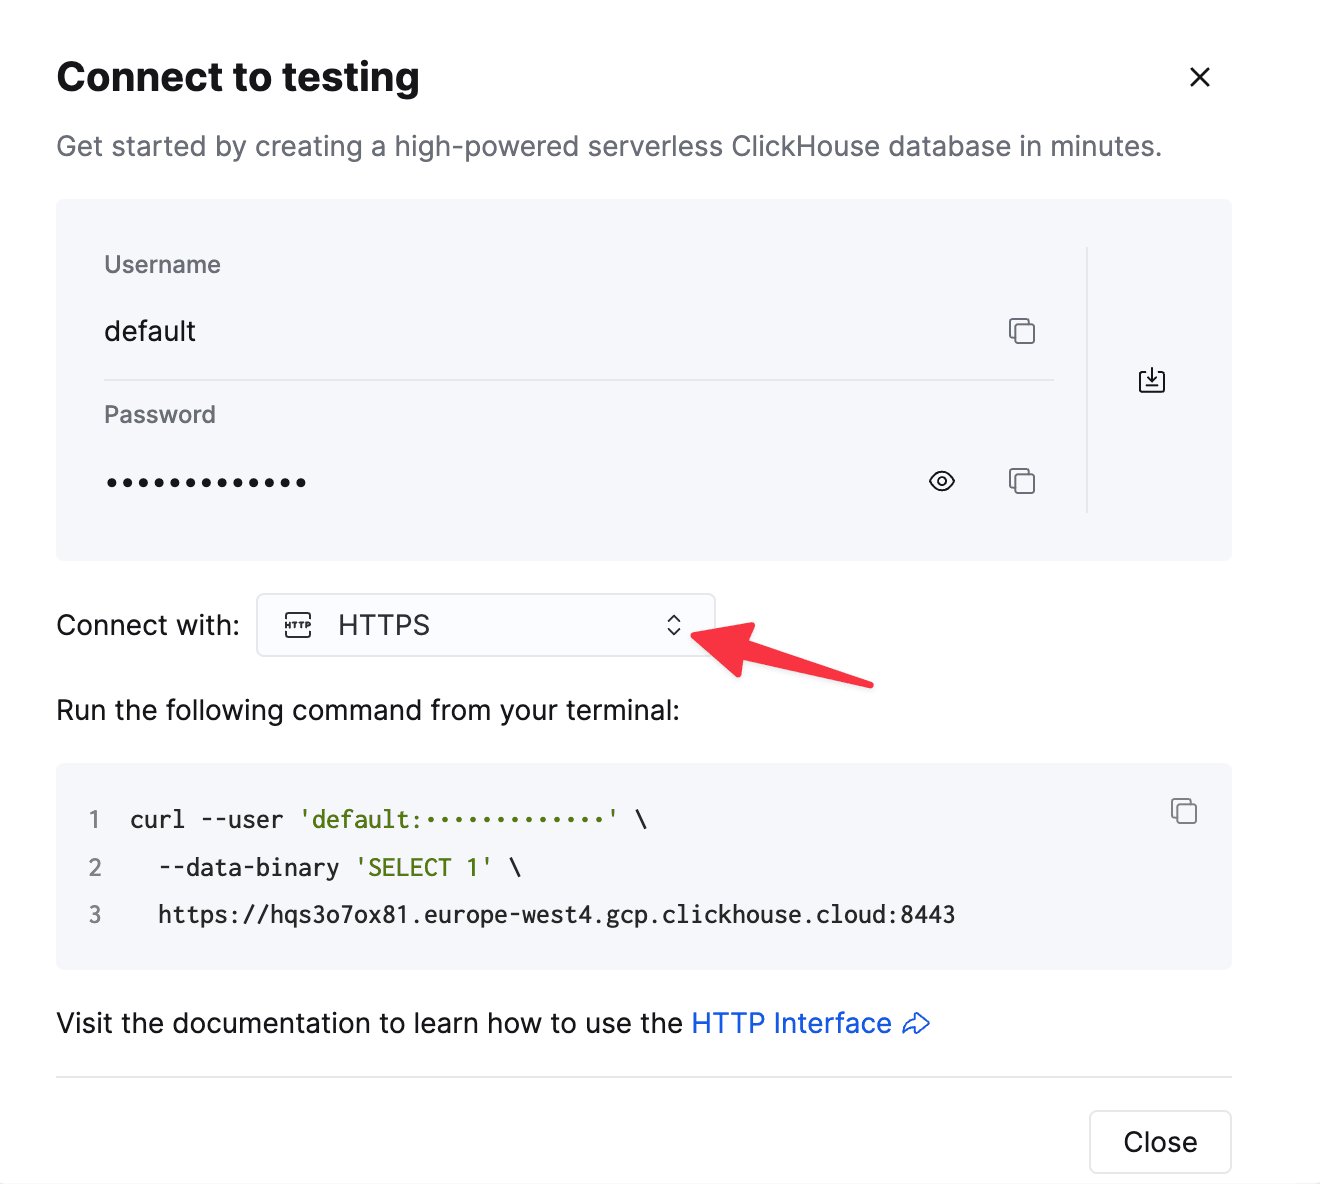
**HTTPS** を選択します。接続情報は `curl` コマンドの例として表示されます。

<div className="ch-image-md">
  <Frame>
    <img src="https://mintcdn.com/private-7c7dfe99/CFFsa2agBPbviR4r/images/_snippets/connection-details-https.webp?fit=max&auto=format&n=CFFsa2agBPbviR4r&q=85&s=cb0fbd98aa2b5b7ca484c9f53395ee07" alt="ClickHouse Cloud HTTPS 接続情報" width="1320" height="1184" data-path="images/_snippets/connection-details-https.webp" />
  </Frame>
</div>

セルフマネージド ClickHouse を使用している場合、接続情報は ClickHouse 管理者によって設定されます。

<div id="connection-overview">
  #### 接続の概要
</div>

このクライアントは、HTTP または HTTPS プロトコル経由の接続を実装しています。RowBinary のサポートも進行中です。詳しくは[関連 issue](https://github.com/ClickHouse/clickhouse-js/issues/216)を参照してください。

次の例では、ClickHouse Cloud への接続を設定する方法を示します。`url` (プロトコルとポートを含む) および `password` の値は環境変数で指定し、`default` ユーザーを使用することを前提としています。

**例:** 設定に環境変数を使用して Node.js のクライアントインスタンスを作成します。

```ts theme={null}
import { createClient } from '@clickhouse/client'

const client = createClient({
  url: process.env.CLICKHOUSE_HOST ?? 'http://localhost:8123',
  username: process.env.CLICKHOUSE_USER ?? 'default',
  password: process.env.CLICKHOUSE_PASSWORD ?? '',
})
```

クライアントリポジトリには、[ClickHouse Cloud でのテーブル作成](https://github.com/ClickHouse/clickhouse-js/blob/main/examples/node/schema-and-deployments/create_table_cloud.ts)、[非同期 INSERT の使用](https://github.com/ClickHouse/clickhouse-js/blob/main/examples/node/coding/async_insert.ts) など、環境変数を使用するサンプルが複数あり、そのほかにも多数含まれています。

<div id="connection-pool-nodejs-only">
  #### 接続プール (Node.js のみ)
</div>

リクエストごとに接続を確立するオーバーヘッドを避けるため、Clientは Keep-Alive メカニズムを利用して ClickHouse への接続プールを作成し、接続を再利用します。デフォルトでは Keep-Alive が有効になっており、接続プールのサイズは `10` に設定されていますが、[設定オプション](/docs/ja/integrations/language-clients/js/index#configuration) `max_open_connections` で変更できます。

ユーザーが `max_open_connections: 1` を設定しない限り、プール内の同じ接続が後続のクエリでも使用されるとは限りません。これが必要になることはまれですが、一時テーブルを使用する場合には必要になることがあります。

関連項目: [Keep-Alive の設定](/docs/ja/integrations/language-clients/js/index#keep-alive-configuration-nodejs-only)。

<div id="query-id">
  ### Query ID
</div>

クエリまたはステートメントを送信するすべてのメソッド (`command`、`exec`、`insert`、`select`) は、結果に `query_id` を含みます。この一意の識別子はクエリごとにクライアントによって割り当てられ、[サーバー設定](/docs/ja/reference/settings/server-settings/settings) で有効になっていれば `system.query_log` からデータを取得したり、長時間実行中のクエリをキャンセルしたりする際に役立つ場合があります ([例](https://github.com/ClickHouse/clickhouse-js/blob/main/examples/node/troubleshooting/cancel_query.ts) を参照) 。必要に応じて、`query_id` は `command`/`query`/`exec`/`insert` メソッドのパラメータでユーザーが上書きできます。

<Tip>
  `query_id` パラメータを上書きする場合は、呼び出しごとに一意であることを必ず確保してください。ランダムな UUID を使うのが適切です。
</Tip>

<div id="base-parameters-for-all-client-methods">
  ### すべてのクライアントメソッドに共通の基本パラメータ
</div>

すべてのClientメソッド ([query](/docs/ja/integrations/language-clients/js/index#query-method)/[command](/docs/ja/integrations/language-clients/js/index#command-method)/[insert](/docs/ja/integrations/language-clients/js/index#insert-method)/[exec](/docs/ja/integrations/language-clients/js/index#exec-method)) に適用できるパラメーターがいくつかあります。

```ts theme={null}
interface BaseQueryParams {
  // ClickHouse settings that can be applied on query level.
  clickhouse_settings?: ClickHouseSettings
  // Parameters for query binding.
  query_params?: Record<string, unknown>
  // AbortSignal instance to cancel a query in progress.
  abort_signal?: AbortSignal
  // query_id override; if not specified, a random identifier will be generated automatically.
  query_id?: string
  // session_id override; if not specified, the session id will be taken from the client configuration.
  session_id?: string
  // credentials override; if not specified, the client's credentials will be used.
  auth?: { username: string, password: string }
  // A specific list of roles to use for this query. Overrides the roles set in the client configuration.
  role?: string | Array<string>
}
```

<div id="query-method">
  ### クエリメソッド
</div>

これは、`SELECT` のようにレスポンスを返すステートメントのほとんどや、`CREATE TABLE` のような DDL の送信に使用するメソッドで、await する必要があります。返された結果セットは、アプリケーション側で処理することが想定されています。

<Note>
  データの挿入には専用のメソッド [insert](/docs/ja/integrations/language-clients/js/index#insert-method) があり、DDL には [command](/docs/ja/integrations/language-clients/js/index#command-method) を使用します。
</Note>

```ts theme={null}
interface QueryParams extends BaseQueryParams {
  // Query to execute that might return some data.
  query: string
  // Format of the resulting dataset. Default: JSON.
  format?: DataFormat
}

interface ClickHouseClient {
  query(params: QueryParams): Promise<ResultSet>
}
```

関連項目: [すべてのクライアントメソッドに共通の基本パラメータ](/docs/ja/integrations/language-clients/js/index#base-parameters-for-all-client-methods).

<Tip>
  `query` では FORMAT 句を指定せず、代わりに `format` パラメータを使用してください。
</Tip>

<div id="result-set-and-row-abstractions">
  #### 結果セットと行の抽象化
</div>

`ResultSet` には、アプリケーションでのデータ処理に便利なメソッドがいくつか用意されています。

Node.js の `ResultSet` 実装は内部で `Stream.Readable` を使用し、Web 版では Web API の `ReadableStream` を使用します。

`ResultSet` の `text` または `json` メソッドを呼び出すことで、クエリが返した行のセット全体をメモリに読み込んで処理できます。

`ResultSet` はレスポンスストリームを開いたまま保持するため、その間は基盤となる接続が使用中のままになります。そのため、できるだけ早く `ResultSet` の読み取りを開始してください。Clientは、アプリケーションのメモリ使用量が過大になる可能性を避けるため、受信データをバッファリングしません。

また、データが大きすぎて一度にメモリに収まらない場合は、`stream` メソッドを呼び出してストリーミングモードで処理できます。この場合、各レスポンス chunk は比較的小さな行の配列に変換され、1 回に 1 つの chunk ずつ処理されます (この配列のサイズは、Clientがサーバーから受信する chunk のサイズ (可変) と、個々の行のサイズに依存します) 。

どのフォーマットがこのケースのストリーミングに最適かを判断するには、[サポートされているデータフォーマット](/docs/ja/integrations/language-clients/js/index#supported-data-formats) の一覧を参照してください。たとえば、JSON オブジェクトをストリーミングしたい場合は、[JSONEachRow](/docs/ja/reference/formats/JSON/JSONEachRow) を選ぶと、各行が JS オブジェクトとしてパースされます。あるいは、よりコンパクトな [JSONCompactColumns](/docs/ja/reference/formats/JSON/JSONCompactColumns) フォーマットを選べば、各行はコンパクトな値の配列になります。関連項目: [ファイルのストリーミング](/docs/ja/integrations/language-clients/js/index#streaming-files-nodejs-only)。

<Warning>
  `ResultSet` またはそのストリームが最後まで読み取られなかった場合、非アクティブ状態が `request_timeout` の間続くと破棄されます。
</Warning>

```ts theme={null}
interface BaseResultSet<Stream> {
  // See "Query ID" section above
  query_id: string

  // Consume the entire stream and get the contents as a string
  // Can be used with any DataFormat
  // Should be called only once
  text(): Promise<string>

  // Consume the entire stream and parse the contents as a JS object
  // Can be used only with JSON formats
  // Should be called only once
  json<T>(): Promise<T>

  // Returns a readable stream for responses that can be streamed
  // Every iteration over the stream provides an array of Row[] in the selected DataFormat
  // Should be called only once
  stream(): Stream
}

interface Row {
  // Get the content of the row as a plain string
  text: string

  // Parse the content of the row as a JS object
  json<T>(): T
}
```

**例:** (Node.js/Web) 結果のデータセットが `JSONEachRow` フォーマットのクエリで、ストリーム全体を消費し、その内容を JS オブジェクトとしてパースします。
[ソースコード](https://github.com/ClickHouse/clickhouse-js/blob/main/examples/node/coding/array_json_each_row.ts).

```ts theme={null}
const resultSet = await client.query({
  query: 'SELECT * FROM my_table',
  format: 'JSONEachRow',
})
const dataset = await resultSet.json() // or `row.text` to avoid parsing JSON
```

**例:** (Node.js のみ) 従来の `on('data')` アプローチを使って、`JSONEachRow` フォーマットのクエリ結果をストリーミングする例です。これは `for await const` 構文でも同様に実装できます。[ソースコード](https://github.com/ClickHouse/clickhouse-js/blob/main/examples/node/performance/select_streaming_json_each_row.ts)。

```ts theme={null}
const rows = await client.query({
  query: 'SELECT number FROM system.numbers_mt LIMIT 5',
  format: 'JSONEachRow', // or JSONCompactEachRow, JSONStringsEachRow, etc.
})
const stream = rows.stream()
stream.on('data', (rows: Row[]) => {
  rows.forEach((row: Row) => {
    console.log(row.json()) // or `row.text` to avoid parsing JSON
  })
})
await new Promise((resolve, reject) => {
  stream.on('end', () => {
    console.log('Completed!')
    resolve(0)
  })
  stream.on('error', reject)
})
```

**例:**  (Node.js のみ) 従来の `on('data')` アプローチを使って、`CSV` フォーマットのクエリ結果をストリーミングで取得する例です。これは `for await const` 構文に置き換えることもできます。
[ソースコード](https://github.com/ClickHouse/clickhouse-js/blob/main/examples/node/performance/select_streaming_text_line_by_line.ts)

```ts theme={null}
const resultSet = await client.query({
  query: 'SELECT number FROM system.numbers_mt LIMIT 5',
  format: 'CSV', // or TabSeparated, CustomSeparated, etc.
})
const stream = resultSet.stream()
stream.on('data', (rows: Row[]) => {
  rows.forEach((row: Row) => {
    console.log(row.text)
  })
})
await new Promise((resolve, reject) => {
  stream.on('end', () => {
    console.log('Completed!')
    resolve(0)
  })
  stream.on('error', reject)
})
```

**例:** (Node.js のみ) `JSONEachRow` フォーマットのストリーミングクエリ結果を JS オブジェクトとして `for await const` 構文で処理します。これは従来の `on('data')` アプローチと同じように使用できます。
[ソースコード](https://github.com/ClickHouse/clickhouse-js/blob/main/examples/node/performance/select_streaming_json_each_row_for_await.ts).

```ts theme={null}
const resultSet = await client.query({
  query: 'SELECT number FROM system.numbers LIMIT 10',
  format: 'JSONEachRow', // or JSONCompactEachRow, JSONStringsEachRow, etc.
})
for await (const rows of resultSet.stream()) {
  rows.forEach(row => {
    console.log(row.json())
  })
}
```

<Note>
  `for await const` 構文は `on('data')` を使う方法よりコード量をやや減らせますが、パフォーマンスに悪影響を与える可能性があります。
  詳細は、[Node.js リポジトリのこの issue](https://github.com/nodejs/node/issues/31979) を参照してください。
</Note>

**例:** (Web のみ) オブジェクトの `ReadableStream` を反復処理する例です。

```ts theme={null}
const resultSet = await client.query({
  query: 'SELECT * FROM system.numbers LIMIT 10',
  format: 'JSONEachRow'
})

const reader = resultSet.stream().getReader()
while (true) {
  const { done, value: rows } = await reader.read()
  if (done) { break }
  rows.forEach(row => {
    console.log(row.json())
  })
}
```

<div id="insert-method">
  ### Insert メソッド
</div>

これはデータを挿入するための主要なメソッドです。

```ts theme={null}
export interface InsertResult {
  query_id: string
  executed: boolean
}

interface ClickHouseClient {
  insert(params: InsertParams): Promise<InsertResult>
}
```

戻り値の型は最小限です。これは、サーバーからデータが返されることを想定しておらず、レスポンスストリームを即座に drain するためです。

空の配列が `insert` メソッドに渡された場合、`insert` ステートメントはサーバーに送信されません。代わりに、メソッドはただちに `{ query_id: '...', executed: false }` を返して resolve されます。この場合、`query_id` がメソッドの `params` で指定されていなければ、結果では空文字列になります。クライアントが生成したランダムな UUID を返すとかえって混乱を招く可能性があるためです。というのも、そのような `query_id` を持つクエリは `system.query_log` テーブルには存在しないからです。

`insert` ステートメントがサーバーに送信された場合、`executed` フラグは `true` になります。

<div id="insert-method-and-streaming-in-nodejs">
  #### Node.js における Insert メソッドとストリーミング
</div>

`insert` メソッドで指定する[データフォーマット](/docs/ja/integrations/language-clients/js/index#supported-data-formats)に応じて、`Stream.Readable` と通常の `Array<T>` のどちらも使用できます。[file streaming](/docs/ja/integrations/language-clients/js/index#streaming-files-nodejs-only) に関するこのセクションも参照してください。

Insert メソッドは `await` して使用することを前提としています。ただし、入力ストリームを指定しておき、そのストリームの完了後に `insert` 操作を `await` することも可能です (この時点で `insert` の Promise も resolve されます) 。これはイベントリスナーなどの用途では有用な場合がありますが、エラーハンドリングは簡単ではなく、クライアント側でさまざまなエッジケースへの対応が必要になる可能性があります。代わりに、[この例](https://github.com/ClickHouse/clickhouse-js/blob/main/examples/node/performance/async_insert_without_waiting.ts)で示しているように、[非同期 INSERT](/docs/ja/concepts/features/operations/insert/asyncinserts)の利用を検討してください。

<Tip>
  このメソッドでは扱いにくいカスタムの INSERT ステートメントがある場合は、[command メソッド](/docs/ja/integrations/language-clients/js/index#command-method) の使用を検討してください。

  使用方法は、[INSERT INTO ... VALUES](https://github.com/ClickHouse/clickhouse-js/blob/main/examples/node/coding/insert_values_and_functions.ts) または [INSERT INTO ... SELECT](https://github.com/ClickHouse/clickhouse-js/blob/main/examples/node/coding/insert_from_select.ts) の例を参照してください。
</Tip>

```ts theme={null}
interface InsertParams<T> extends BaseQueryParams {
  // Table name to insert the data into
  table: string
  // A dataset to insert.
  values: ReadonlyArray<T> | Stream.Readable
  // Format of the dataset to insert.
  format?: DataFormat
  // Allows to specify which columns the data will be inserted into.
  // - An array such as `['a', 'b']` will generate: `INSERT INTO table (a, b) FORMAT DataFormat`
  // - An object such as `{ except: ['a', 'b'] }` will generate: `INSERT INTO table (* EXCEPT (a, b)) FORMAT DataFormat`
  // By default, the data is inserted into all columns of the table,
  // and the generated statement will be: `INSERT INTO table FORMAT DataFormat`.
  columns?: NonEmptyArray<string> | { except: NonEmptyArray<string> }
}
```

関連項目: [すべてのクライアントメソッドに共通の基本パラメータ](/docs/ja/integrations/language-clients/js/index#base-parameters-for-all-client-methods).

<Warning>
  `abort_signal` でキャンセルされたリクエストでは、データが挿入されなかったことは保証されません。キャンセル前に、サーバーがストリーミングされたデータの一部を受信していた可能性があるためです。
</Warning>

**例:** (Node.js/Web) 値の配列を挿入します。
[ソースコード](https://github.com/ClickHouse/clickhouse-js/blob/main/examples/node/coding/array_json_each_row.ts).

```ts theme={null}
await client.insert({
  table: 'my_table',
  // structure should match the desired format, JSONEachRow in this example
  values: [
    { id: 42, name: 'foo' },
    { id: 42, name: 'bar' },
  ],
  format: 'JSONEachRow',
})
```

**例:**  (Node.js のみ) CSVファイルのストリームを insert します。
[ソースコード](https://github.com/ClickHouse/clickhouse-js/blob/main/examples/node/performance/insert_file_stream_csv.ts)。関連項目: [ファイルストリーミング](/docs/ja/integrations/language-clients/js/index#streaming-files-nodejs-only)。

```ts theme={null}
await client.insert({
  table: 'my_table',
  values: fs.createReadStream('./path/to/a/file.csv'),
  format: 'CSV',
})
```

**例**: insert ステートメントから特定のカラムを除外します。

次のようなテーブル定義を例にします:

```sql theme={null}
CREATE OR REPLACE TABLE mytable
(id UInt32, message String)
ENGINE MergeTree()
ORDER BY (id)
```

特定のカラムにのみ挿入します:

```ts theme={null}
// Generated statement: INSERT INTO mytable (message) FORMAT JSONEachRow
await client.insert({
  table: 'mytable',
  values: [{ message: 'foo' }],
  format: 'JSONEachRow',
  // `id` column value for this row will be zero (default for UInt32)
  columns: ['message'],
})
```

特定のカラムを除外する:

```ts theme={null}
// Generated statement: INSERT INTO mytable (* EXCEPT (message)) FORMAT JSONEachRow
await client.insert({
  table: tableName,
  values: [{ id: 144 }],
  format: 'JSONEachRow',
  // `message` column value for this row will be an empty string
  columns: {
    except: ['message'],
  },
})
```

詳細は、[ソースコード](https://github.com/ClickHouse/clickhouse-js/blob/main/examples/node/coding/insert_exclude_columns.ts)を参照してください。

**例**: クライアントインスタンスに指定したものとは別のデータベースに挿入します。[ソースコード](https://github.com/ClickHouse/clickhouse-js/blob/main/examples/node/coding/insert_into_different_db.ts)。

```ts theme={null}
await client.insert({
  table: 'mydb.mytable', // Fully qualified name including the database
  values: [{ id: 42, message: 'foo' }],
  format: 'JSONEachRow',
})
```

<div id="web-version-limitations">
  #### Web 版の制限
</div>

現在、`@clickhouse/client-web` では、insert は `Array<T>` および `JSON*` フォーマットでのみ利用できます。
ブラウザの互換性が十分でないため、Web 版ではストリーム挿入はまだサポートされていません。

そのため、Web 版の `InsertParams` インターフェイスは Node.js 版と少し異なり、
`values` に指定できるのは `ReadonlyArray<T>` 型のみです:

```ts theme={null}
interface InsertParams<T> extends BaseQueryParams {
  // Table name to insert the data into
  table: string
  // A dataset to insert.
  values: ReadonlyArray<T>
  // Format of the dataset to insert.
  format?: DataFormat
  // Allows to specify which columns the data will be inserted into.
  // - An array such as `['a', 'b']` will generate: `INSERT INTO table (a, b) FORMAT DataFormat`
  // - An object such as `{ except: ['a', 'b'] }` will generate: `INSERT INTO table (* EXCEPT (a, b)) FORMAT DataFormat`
  // By default, the data is inserted into all columns of the table,
  // and the generated statement will be: `INSERT INTO table FORMAT DataFormat`.
  columns?: NonEmptyArray<string> | { except: NonEmptyArray<string> }
}
```

今後変更される可能性があります。関連項目: [すべてのクライアントメソッドに共通の基本パラメータ](/docs/ja/integrations/language-clients/js/index#base-parameters-for-all-client-methods).

<div id="command-method">
  ### command メソッド
</div>

これは、出力を持たないステートメントや、`FORMAT` 句を適用できない場合、あるいはレスポンス自体が不要な場合に使用できます。そのようなステートメントの例としては、`CREATE TABLE` や `ALTER TABLE` があります。

await する必要があります。

レスポンスストリームは直ちに破棄されるため、基盤となるソケットは解放されます。

```ts theme={null}
interface CommandParams extends BaseQueryParams {
  // Statement to execute.
  query: string
}

interface CommandResult {
  query_id: string
}

interface ClickHouseClient {
  command(params: CommandParams): Promise<CommandResult>
}
```

関連項目: [すべてのクライアントメソッドに共通の基本パラメータ](/docs/ja/integrations/language-clients/js/index#base-parameters-for-all-client-methods).

**例:** (Node.js/Web) ClickHouse Cloud でテーブルを作成します。
[ソースコード](https://github.com/ClickHouse/clickhouse-js/blob/main/examples/node/schema-and-deployments/create_table_cloud.ts).

```ts theme={null}
await client.command({
  query: `
    CREATE TABLE IF NOT EXISTS my_cloud_table
    (id UInt64, name String)
    ORDER BY (id)
  `,
  // Recommended for cluster usage to avoid situations where a query processing error occurred after the response code,
  // and HTTP headers were already sent to the client.
  // See https://clickhouse.com/docs/interfaces/http/#response-buffering
  clickhouse_settings: {
    wait_end_of_query: 1,
  },
})
```

**例:** (Node.js/Web) セルフホストのClickHouseインスタンスでテーブルを作成します。
[ソースコード](https://github.com/ClickHouse/clickhouse-js/blob/main/examples/node/schema-and-deployments/create_table_single_node.ts).

```ts theme={null}
await client.command({
  query: `
    CREATE TABLE IF NOT EXISTS my_table
    (id UInt64, name String)
    ENGINE MergeTree()
    ORDER BY (id)
  `,
})
```

**例:** (Node.js/Web) INSERT FROM SELECT

```ts theme={null}
await client.command({
  query: `INSERT INTO my_table SELECT '42'`,
})
```

<Warning>
  `abort_signal` でキャンセルされたリクエストであっても、そのステートメントがサーバーで実行されていないことは保証されません。
</Warning>

<div id="exec-method">
  ### Exec メソッド
</div>

`query`/`insert` に当てはまらないカスタムクエリがあり、
その結果を扱いたい場合は、`command` の代わりに `exec` を使用できます。

`exec` は、アプリケーション側で必ず消費または破棄する必要がある、読み取り可能なストリームを返します。

```ts theme={null}
interface ExecParams extends BaseQueryParams {
  // Statement to execute.
  query: string
}

interface ClickHouseClient {
  exec(params: ExecParams): Promise<QueryResult>
}
```

関連項目: [すべてのクライアントメソッドに共通の基本パラメータ](/docs/ja/integrations/language-clients/js/index#base-parameters-for-all-client-methods)。

ストリームの戻り値の型は、Node.js 版と Web 版で異なります。

Node.js:

```ts theme={null}
export interface QueryResult {
  stream: Stream.Readable
  query_id: string
}
```

Web:

```ts theme={null}
export interface QueryResult {
  stream: ReadableStream
  query_id: string
}
```

<div id="ping">
  ### Ping
</div>

接続状態を確認するための `ping` メソッドは、サーバーに到達できる場合に `true` を返します。

サーバーに到達できない場合は、原因となったエラーも結果に含まれます。

```ts theme={null}
type PingResult =
  | { success: true }
  | { success: false; error: Error }

/** Parameters for the health-check request - using the built-in `/ping` endpoint.
 *  This is the default behavior for the Node.js version. */
export type PingParamsWithEndpoint = {
  select: false
  /** AbortSignal instance to cancel a request in progress. */
  abort_signal?: AbortSignal
  /** Additional HTTP headers to attach to this particular request. */
  http_headers?: Record<string, string>
}
/** Parameters for the health-check request - using a SELECT query.
 *  This is the default behavior for the Web version, as the `/ping` endpoint does not support CORS.
 *  Most of the standard `query` method params, e.g., `query_id`, `abort_signal`, `http_headers`, etc. will work,
 *  except for `query_params`, which does not make sense to allow in this method. */
export type PingParamsWithSelectQuery = { select: true } & Omit<
  BaseQueryParams,
  'query_params'
>
export type PingParams = PingParamsWithEndpoint | PingParamsWithSelectQuery

interface ClickHouseClient {
  ping(params?: PingParams): Promise<PingResult>
}
```

Ping は、アプリケーションの起動時にサーバーが利用可能かどうかを確認するのに役立ちます。特に ClickHouse Cloud では、インスタンスがアイドル状態になっており、ping を送ると起動する場合があります。そのような場合は、間隔を空けて数回再試行するとよいでしょう。

デフォルトでは、Node.js 版は `/ping` エンドポイントを使用します。一方、Web 版は `/ping` エンドポイントが CORS をサポートしていないため、同様の結果を得るために単純な `SELECT 1` クエリを使用します。

**例:** (Node.js/Web) ClickHouse サーバーインスタンスに対するシンプルな ping。注: Web 版では、キャッチされるエラーは異なります。
[ソースコード](https://github.com/ClickHouse/clickhouse-js/blob/main/examples/ping.ts).

```ts theme={null}
const result = await client.ping();
if (!result.success) {
  // process result.error
}
```

**例:** `ping`メソッドの呼び出し時に認証情報も確認したい場合や、`query_id`などの追加パラメータを指定したい場合は、次のように使用できます。

```ts theme={null}
const result = await client.ping({ select: true, /* query_id, abort_signal, http_headers, or any other query params */ });
```

ping メソッドでは、標準的な `query` メソッドのパラメータのほとんどを利用できます。`PingParamsWithSelectQuery` の型定義を参照してください。

<div id="close-nodejs-only">
  ### Close (Node.js のみ)
</div>

開いている接続をすべて閉じ、リソースを解放します。Web 版では no-op です。

```ts theme={null}
await client.close()
```

<div id="streaming-files-nodejs-only">
  ## ファイルストリーミング (Node.js のみ)
</div>

一般的なデータフォーマット (NDJSON、CSV、Parquet) を使ったファイルストリーミングの例が、client repository にいくつかあります。

* [NDJSON ファイルからのストリーミング](https://github.com/ClickHouse/clickhouse-js/blob/main/examples/node/performance/insert_file_stream_ndjson.ts)
* [CSV ファイルからのストリーミング](https://github.com/ClickHouse/clickhouse-js/blob/main/examples/node/performance/insert_file_stream_csv.ts)
* [Parquet ファイルからのストリーミング](https://github.com/ClickHouse/clickhouse-js/blob/main/examples/node/performance/insert_file_stream_parquet.ts)
* [Parquet ファイルへのストリーミング](https://github.com/ClickHouse/clickhouse-js/blob/main/examples/node/performance/select_parquet_as_file.ts)

他のフォーマットをファイルへストリーミングする場合も、Parquet とほぼ同様です。
異なるのは、`query` 呼び出しで使用するフォーマット (`JSONEachRow`、`CSV` など) と出力ファイル名だけです。

<div id="supported-data-formats">
  ## サポートされるデータフォーマット
</div>

クライアントは、データフォーマットを JSON またはテキストとして扱います。

`format` に JSON 系のフォーマット (`JSONEachRow`、`JSONCompactEachRow` など) のいずれかを指定すると、クライアントは通信時にデータを serialize / deserialize します。

「raw」テキストフォーマット (`CSV`、`TabSeparated`、`CustomSeparated` 系) で提供されたデータは、追加の変換を行わずにそのまま送信されます。

<Tip>
  一般的なフォーマットとしての JSON と [ClickHouse JSON format](/docs/ja/reference/formats/JSON/JSON) は混同しやすいため、注意してください。

  クライアントは、[JSONEachRow](/docs/ja/reference/formats/JSON/JSONEachRow) などのフォーマットによる JSON オブジェクトのストリーミングをサポートしています (ストリーミングに適したその他のフォーマットについては下表を参照してください。あわせて、client repository の `select_streaming_` [examples](https://github.com/ClickHouse/clickhouse-js/tree/main/examples/node) も参照してください) 。

  一方、[ClickHouse JSON](/docs/ja/reference/formats/JSON/JSON) など一部のフォーマットは、レスポンス内で単一のオブジェクトとして表現されるため、クライアントではストリーミングできません。
</Tip>

| フォーマット                                     | 入力 (配列) | 入力 (オブジェクト) | 入出力 (ストリーム) | 出力 (JSON) | 出力 (テキスト)  |
| ------------------------------------------ | ------- | ----------- | ----------- | --------- | ---------- |
| JSON                                       | ❌       | ✔️          | ❌           | ✔️        | ✔️         |
| JSONCompact                                | ❌       | ✔️          | ❌           | ✔️        | ✔️         |
| JSONObjectEachRow                          | ❌       | ✔️          | ❌           | ✔️        | ✔️         |
| JSONColumnsWithMetadata                    | ❌       | ✔️          | ❌           | ✔️        | ✔️         |
| JSONStrings                                | ❌       | ❌️          | ❌           | ✔️        | ✔️         |
| JSONCompactStrings                         | ❌       | ❌           | ❌           | ✔️        | ✔️         |
| JSONEachRow                                | ✔️      | ❌           | ✔️          | ✔️        | ✔️         |
| JSONEachRowWithProgress                    | ❌️      | ❌           | ✔️ ❗- 以下を参照 | ✔️        | ✔️         |
| JSONStringsEachRow                         | ✔️      | ❌           | ✔️          | ✔️        | ✔️         |
| JSONCompactEachRow                         | ✔️      | ❌           | ✔️          | ✔️        | ✔️         |
| JSONCompactStringsEachRow                  | ✔️      | ❌           | ✔️          | ✔️        | ✔️         |
| JSONCompactEachRowWithNames                | ✔️      | ❌           | ✔️          | ✔️        | ✔️         |
| JSONCompactEachRowWithNamesAndTypes        | ✔️      | ❌           | ✔️          | ✔️        | ✔️         |
| JSONCompactStringsEachRowWithNames         | ✔️      | ❌           | ✔️          | ✔️        | ✔️         |
| JSONCompactStringsEachRowWithNamesAndTypes | ✔️      | ❌           | ✔️          | ✔️        | ✔️         |
| CSV                                        | ❌       | ❌           | ✔️          | ❌         | ✔️         |
| CSVWithNames                               | ❌       | ❌           | ✔️          | ❌         | ✔️         |
| CSVWithNamesAndTypes                       | ❌       | ❌           | ✔️          | ❌         | ✔️         |
| TabSeparated                               | ❌       | ❌           | ✔️          | ❌         | ✔️         |
| TabSeparatedRaw                            | ❌       | ❌           | ✔️          | ❌         | ✔️         |
| TabSeparatedWithNames                      | ❌       | ❌           | ✔️          | ❌         | ✔️         |
| TabSeparatedWithNamesAndTypes              | ❌       | ❌           | ✔️          | ❌         | ✔️         |
| CustomSeparated                            | ❌       | ❌           | ✔️          | ❌         | ✔️         |
| CustomSeparatedWithNames                   | ❌       | ❌           | ✔️          | ❌         | ✔️         |
| CustomSeparatedWithNamesAndTypes           | ❌       | ❌           | ✔️          | ❌         | ✔️         |
| Parquet                                    | ❌       | ❌           | ✔️          | ❌         | ✔️❗- 以下を参照 |

Parquet では、SELECT の主な用途として考えられるのは、結果のストリームをファイルに書き出すことです。クライアントリポジトリの[例](https://github.com/ClickHouse/clickhouse-js/blob/main/examples/node/performance/select_parquet_as_file.ts)を参照してください。

`JSONEachRowWithProgress` は、ストリーム内で進捗を報告できる出力専用フォーマットです。詳しくは[この例](https://github.com/ClickHouse/clickhouse-js/blob/main/examples/node/performance/select_json_each_row_with_progress.ts)を参照してください。

ClickHouse の入力および出力フォーマットの一覧は、
[こちら](/docs/ja/reference/formats/index)で確認できます。

<div id="supported-clickhouse-data-types">
  ## サポートされている ClickHouse データ型
</div>

<Note>
  対応する JS 型は、すべてを文字列として表現するもの (例: `JSONStringEachRow`) を除く `JSON*` フォーマットで該当します
</Note>

| Type                   | ステータス      | JS 型                    |
| ---------------------- | ---------- | ----------------------- |
| UInt8/16/32            | ✔️         | number                  |
| UInt64/128/256         | ✔️ ❗- 下記参照 | string                  |
| Int8/16/32             | ✔️         | number                  |
| Int64/128/256          | ✔️ ❗- 下記参照 | string                  |
| Float32/64             | ✔️         | number                  |
| Decimal                | ✔️ ❗- 下記参照 | number                  |
| Boolean                | ✔️         | boolean                 |
| String                 | ✔️         | string                  |
| FixedString            | ✔️         | string                  |
| UUID                   | ✔️         | string                  |
| Date32/64              | ✔️         | string                  |
| DateTime32/64          | ✔️ ❗- 下記参照 | string                  |
| Enum                   | ✔️         | string                  |
| LowCardinality         | ✔️         | string                  |
| Array(T)               | ✔️         | T\[]                    |
| (new) JSON             | ✔️         | object                  |
| Variant(T1, T2...)     | ✔️         | T (variant に依存)         |
| Dynamic                | ✔️         | T (variant に依存)         |
| Nested                 | ✔️         | T\[]                    |
| Tuple(T1, T2, ...)     | ✔️         | \[T1, T2, ...]          |
| Tuple(n1 T1, n2 T2...) | ✔️         | \{ n1: T1; n2: T2; ...} |
| Nullable(T)            | ✔️         | T に対応する JS 型または null    |
| IPv4                   | ✔️         | string                  |
| IPv6                   | ✔️         | string                  |
| Point                  | ✔️         | \[ number, number ]     |
| Ring                   | ✔️         | Array\<Point>           |
| Polygon                | ✔️         | Array\<Ring>            |
| MultiPolygon           | ✔️         | Array\<Polygon>         |
| Map(K, V)              | ✔️         | Record\<K, V>           |
| Time/Time64            | ✔️         | string                  |

サポートされている ClickHouse フォーマットの一覧は
[こちら](/docs/ja/reference/data-types/index)を参照してください。

関連項目:

* [Dynamic/Variant/JSON の使用例](https://github.com/ClickHouse/clickhouse-js/blob/main/examples/node/coding/dynamic_variant_json.ts)
* [Time/Time64 の使用例](https://github.com/ClickHouse/clickhouse-js/blob/main/examples/node/coding/time_time64.ts)

<div id="datedate32-types-caveats">
  ### Date/Date32 型の注意点
</div>

クライアントは追加の型変換を行わずに値を挿入するため、`Date`/`Date32` 型のカラムには文字列としてしか挿入できません。

**例:** `Date` 型の値を挿入します。
[ソースコード](https://github.com/ClickHouse/clickhouse-js/blob/ba387d7f4ce375a60982ac2d99cb47391cf76cec/__tests__/integration/date_time.test.ts)

```ts theme={null}
await client.insert({
  table: 'my_table',
  values: [ { date: '2022-09-05' } ],
  format: 'JSONEachRow',
})
```

ただし、`DateTime` または `DateTime64` カラムを使用している場合は、文字列と JS Date オブジェクトの両方を使用できます。JS Date オブジェクトは、`date_time_input_format` を `best_effort` に設定すれば、そのまま `insert` に渡せます。詳しくは、こちらの[例](https://github.com/ClickHouse/clickhouse-js/blob/main/examples/node/coding/insert_js_dates.ts)を参照してください。

<div id="decimal-types-caveats">
  ### Decimal\* 型の注意事項
</div>

`JSON*` ファミリーのフォーマットを使って Decimal を挿入できます。たとえば、次のようなテーブルが定義されているとします。

```sql theme={null}
CREATE TABLE my_table
(
  id     UInt32,
  dec32  Decimal(9, 2),
  dec64  Decimal(18, 3),
  dec128 Decimal(38, 10),
  dec256 Decimal(76, 20)
)
ENGINE MergeTree()
ORDER BY (id)
```

文字列表現を使えば、精度を損なうことなく値を挿入できます。

```ts theme={null}
await client.insert({
  table: 'my_table',
  values: [{
    id: 1,
    dec32:  '1234567.89',
    dec64:  '123456789123456.789',
    dec128: '1234567891234567891234567891.1234567891',
    dec256: '12345678912345678912345678911234567891234567891234567891.12345678911234567891',
  }],
  format: 'JSONEachRow',
})
```

ただし、`JSON*`フォーマットでデータをクエリすると、ClickHouse はデフォルトで Decimal を*数値*として返すため、精度が失われる可能性があります。これを避けるには、クエリ内で Decimal を文字列に CAST できます。

```ts theme={null}
await client.query({
  query: `
    SELECT toString(dec32)  AS decimal32,
           toString(dec64)  AS decimal64,
           toString(dec128) AS decimal128,
           toString(dec256) AS decimal256
    FROM my_table
  `,
  format: 'JSONEachRow',
})
```

詳しくは、[この例](https://github.com/ClickHouse/clickhouse-js/blob/main/examples/node/coding/insert_decimals.ts)を参照してください。

<div id="integral-types-int64-int128-int256-uint64-uint128-uint256">
  ### 整数型: Int64, Int128, Int256, UInt64, UInt128, UInt256
</div>

サーバーはこれらを数値として受け取れますが、これらの型の最大値は `Number.MAX_SAFE_INTEGER` を超えるため、
整数オーバーフローを避ける目的で、`JSON*` 系の出力フォーマットでは文字列として返されます。

ただし、この動作は
[`output_format_json_quote_64bit_integers` 設定](/docs/ja/reference/settings/formats#output_format_json_quote_64bit_integers)
で変更できます。

**例:** 64 ビット整数の JSON 出力フォーマットを調整します。

```ts theme={null}
const resultSet = await client.query({
  query: 'SELECT * from system.numbers LIMIT 1',
  format: 'JSONEachRow',
})

expect(await resultSet.json()).toEqual([ { number: '0' } ])
```

```ts theme={null}
const resultSet = await client.query({
  query: 'SELECT * from system.numbers LIMIT 1',
  format: 'JSONEachRow',
  clickhouse_settings: { output_format_json_quote_64bit_integers: 0 },
})

expect(await resultSet.json()).toEqual([ { number: 0 } ])
```

<div id="clickhouse-settings">
  ## ClickHouse の設定
</div>

クライアントは、[settings](/docs/ja/reference/settings/session-settings)
の仕組みを通じて ClickHouse の動作を調整できます。
設定はクライアントインスタンス単位で指定できるため、ClickHouse に送信されるすべてのリクエストに
適用されます:

```ts theme={null}
const client = createClient({
  clickhouse_settings: {}
})
```

また、設定はリクエストレベルで指定することもできます。

```ts theme={null}
client.query({
  clickhouse_settings: {}
})
```

サポートされているすべての ClickHouse settings を含む型宣言ファイルは、
[こちら](https://github.com/ClickHouse/clickhouse-js/blob/main/packages/client-common/src/settings.ts)で確認できます。

<Warning>
  クエリを実行するユーザーに、settings を変更するための十分な権限があることを確認してください。
</Warning>

<div id="advanced-topics">
  ## 応用トピック
</div>

<div id="queries-with-parameters">
  ### パラメータ付きクエリ
</div>

パラメータ付きのクエリを作成し、クライアントアプリケーションから値を渡せます。これにより、クライアント側で
特定の動的な値を使ってクエリをフォーマットする必要がなくなります。

通常どおりにクエリを記述したら、アプリケーションのパラメータからクエリに渡したい値を、次の形式で
波かっこ内に配置します。

```text theme={null}
{<name>: <data_type>}
```

ここで:

* `name` — プレースホルダー識別子。
* `data_type` - アプリケーションパラメーター値の[データ型](/docs/ja/reference/data-types/index)。

**例:**: パラメーター付きクエリ。
[ソースコード](https://github.com/ClickHouse/clickhouse-js/blob/main/examples/node/coding/query_with_parameter_binding.ts)
.

```ts theme={null}
await client.query({
  query: 'SELECT plus({val1: Int32}, {val2: Int32})',
  format: 'CSV',
  query_params: {
    val1: 10,
    val2: 20,
  },
})
```

詳細については、[https://clickhouse.com/docs/interfaces/cli#cli-queries-with-parameters-syntax](https://clickhouse.com/docs/interfaces/cli#cli-queries-with-parameters-syntax) を参照してください。

<div id="compression">
  ### 圧縮
</div>

注: リクエストの圧縮は現在 Web 版では利用できません。レスポンスの圧縮は通常どおり利用できます。Node.js 版は両方に対応しています。

大規模なデータセットをネットワーク経由で扱うデータアプリケーションでは、圧縮を有効にすることで効果が得られます。現在サポートされているのは、[zlib](https://nodejs.org/docs/latest-v14.x/api/zlib.html) を使用した `GZIP` のみです。

```typescript theme={null}
createClient({
  compression: {
    response: true,
    request: true
  }
})
```

設定パラメーターは次のとおりです:

* `response: true` は、ClickHouseサーバーが圧縮されたレスポンスボディを返すようにします。デフォルト値: `response: false`
* `request: true` は、クライアントのリクエストボディの圧縮を有効にします。デフォルト値: `request: false`

<div id="logging-nodejs-only">
  ### ロギング (Node.js のみ)
</div>

<Warning>
  このロギング機能は 実験的 であり、今後変更される可能性があります。
</Warning>

デフォルトのロガー実装では、`console.debug/info` メソッド経由でログレコードを `stdout` に、`console.warn/error` メソッド経由で `stderr` に出力します。
`LoggerClass` を指定することでロギングの処理をカスタマイズでき、`level` パラメーターで任意のログレベルを選択できます (デフォルトは `WARN`) :

```typescript theme={null}
import type { Logger } from '@clickhouse/client'

// All three LogParams types are exported by the client
interface LogParams {
  module: string
  message: string
  args?: Record<string, unknown>
}
type ErrorLogParams = LogParams & { err: Error }
type WarnLogParams = LogParams & { err?: Error }

class MyLogger implements Logger {
  trace({ module, message, args }: LogParams) {
    // ...
  }
  debug({ module, message, args }: LogParams) {
    // ...
  }
  info({ module, message, args }: LogParams) {
    // ...
  }
  warn({ module, message, args }: WarnLogParams) {
    // ...
  }
  error({ module, message, args, err }: ErrorLogParams) {
    // ...
  }
}

const client = createClient({
  log: {
    LoggerClass: MyLogger,
    level: ClickHouseLogLevel.DEBUG,
  }
})
```

現在、クライアントは次のイベントをログに記録します。

* `TRACE` - Keep-Alive ソケットのライフサイクルに関する低レベルの情報
* `DEBUG` - レスポンス情報 (認証ヘッダーとホスト情報を除く)
* `INFO` - ほとんど使われません。クライアントの初期化時に現在のログレベルを出力します
* `WARN` - 致命的でない error。`ping` リクエストの失敗は警告としてログに記録されます。これは、基になる error が戻り値に含まれているためです
* `ERROR` - 失敗したリクエストなど、`query`/`insert`/`exec`/`command` メソッドで発生する致命的な error

デフォルトのロガー実装は[こちら](https://github.com/ClickHouse/clickhouse-js/blob/main/packages/client-common/src/logger.ts)で確認できます。

<div id="tls-certificates-nodejs-only">
  ### TLS 証明書 (Node.js のみ)
</div>

Node.js client は、basic (Certificate Authority のみ) TLS と
mutual (Certificate Authority とクライアント証明書) TLS の両方をオプションでサポートしています。

証明書が `certs` フォルダにあり、
CA ファイル名が `CA.pem` であると仮定した basic TLS の設定例:

```ts theme={null}
const client = createClient({
  url: 'https://<hostname>:<port>',
  username: '<username>',
  password: '<password>', // if required
  tls: {
    ca_cert: fs.readFileSync('certs/CA.pem'),
  },
})
```

クライアント証明書を使用した相互TLS設定例：

```ts theme={null}
const client = createClient({
  url: 'https://<hostname>:<port>',
  username: '<username>',
  tls: {
    ca_cert: fs.readFileSync('certs/CA.pem'),
    cert: fs.readFileSync(`certs/client.crt`),
    key: fs.readFileSync(`certs/client.key`),
  },
})
```

リポジトリ内の[基本的な](https://github.com/ClickHouse/clickhouse-js/blob/main/examples/node/security/basic_tls.ts)TLSと[相互](https://github.com/ClickHouse/clickhouse-js/blob/main/examples/node/security/mutual_tls.ts)TLSの完全な例を参照してください。

<div id="keep-alive-configuration-nodejs-only">
  ### Keep-Alive の設定 (Node.js のみ)
</div>

クライアントは、基盤となる HTTP エージェントでデフォルトで Keep-Alive を有効にします。つまり、接続されたソケットは後続のリクエストで再利用され、`Connection: keep-alive` ヘッダーが送信されます。アイドル状態のソケットは、デフォルトでは 2500 ミリ秒のあいだ接続プールに保持されます ([このオプションの調整に関する注意事項](/docs/ja/integrations/language-clients/js/index#adjusting-idle_socket_ttl) を参照) 。

`keep_alive.idle_socket_ttl` の値は、サーバー/LB の設定よりも十分に低くする必要があります。主な理由は、HTTP/1.1 ではサーバーがクライアントに通知せずにソケットを閉じられるため、サーバーまたはロードバランサーがクライアントより *先に* 接続を閉じると、クライアントが閉じられたソケットを再利用しようとして、`socket hang up` エラーが発生する可能性があるからです。

`keep_alive.idle_socket_ttl` を変更する場合は、常にサーバー/LB の Keep-Alive 設定と整合している必要があり、さらにサーバーが開いている接続を先に閉じないよう、その値は **必ずそれより低く** しなければならない点に注意してください。

<div id="adjusting-idle_socket_ttl">
  #### `idle_socket_ttl` の調整
</div>

クライアントでは、最も安全なデフォルト値と考えられるため、`keep_alive.idle_socket_ttl` を 2500 ミリ秒に設定しています。サーバー側の `keep_alive_timeout` は、`config.xml` を変更しなくても、[ClickHouse 23.11 より前のバージョンでは 3 秒まで短く設定される場合があります](https://github.com/ClickHouse/ClickHouse/commit/1685cdcb89fe110b45497c7ff27ce73cc03e82d1)。

<Warning>
  パフォーマンスに満足しており、問題も発生していない場合は、`keep_alive.idle_socket_ttl` の値を**増やさない**ことを推奨します。値を大きくすると、"Socket hang-up" エラーが発生するおそれがあるためです。また、アプリケーションが大量のクエリを送信し、それらの間に長いダウンタイムがない場合は、ソケットが十分長くアイドル状態にならず、クライアントがそれらをプール内に保持するため、デフォルト値のままで十分です。
</Warning>

次のコマンドを実行すると、サーバーのレスポンスヘッダーで正しい Keep-Alive タイムアウト値を確認できます。

```sh theme={null}
curl -is --data-binary "SELECT 1" <clickhouse_url>
```

レスポンスの`Connection`ヘッダーと`Keep-Alive`ヘッダーの値を確認してください。たとえば、次のとおりです。

```text theme={null}
Connection: Keep-Alive
Keep-Alive: timeout=10
```

この場合、`keep_alive_timeout` は 10 秒なので、デフォルトより少し長くアイドル状態のソケットを開いたままにするために、`keep_alive.idle_socket_ttl` を 9000、あるいは 9500 ミリ秒に増やしてみてください。"Socket hang-up" エラーが発生していないか注意して確認してください。これは、クライアントより先にサーバーが接続を閉じていることを示します。エラーが出なくなるまで値を下げていってください。

<div id="troubleshooting">
  #### トラブルシューティング
</div>

最新バージョンの client を使用していても `socket hang up` エラーが発生する場合は、次の対処方法を試してください。

* 少なくとも `WARN` のログレベル (デフォルト) でログを有効にしてください。これにより、application code 内に未消費または宙に浮いた stream がないか確認できます。こうした状態は server 側で socket が閉じられる原因になり得るため、transport layer が WARN レベルでログを出力します。client の設定でログを有効にするには、次のようにします。

  ```ts theme={null}
  const client = createClient({
    log: { level: ClickHouseLogLevel.WARN },
  })
  ```

* 意図した設定が正しいクライアントインスタンスに適用されていることを確認してください。アプリケーション内に複数の client instance がある場合は、queries に使用しているものに正しい `keep_alive.idle_socket_ttl` の値が設定されているか再確認してください。

* client 設定の `keep_alive.idle_socket_ttl` を 500 ミリ秒短くしてください。状況によっては、たとえば client と server 間の network latency が高い場合、server がまもなく閉じる socket を送信リクエストが取得してしまう状況を避けるうえで有効です。

* このエラーが、データの入出力がない長時間実行クエリ中 (たとえば長時間実行される `INSERT FROM SELECT`) に発生する場合は、load balancer やその他の network components が長時間維持される connection や長時間実行中のリクエストを閉じている可能性があります。以下の ClickHouse settings を組み合わせて使い、長時間実行クエリ中にも何らかのデータが流入するようにしてみてください。

  ```ts theme={null}
  const client = createClient({
    // ここでは、5 分を超える execution time の queries があると想定しています
    request_timeout: 400_000,
    /** これらの settings を組み合わせることで、データの入出力がない長時間実行クエリにおける LB timeout の問題を回避できます。
     *  `INSERT FROM SELECT` などでは、connection が LB に idle と見なされ、突然閉じられる可能性があります。
     *  この場合、LB の idle connection timeout は 120 秒と想定し、安全な値として 110 秒を設定しています。 */
    clickhouse_settings: {
      send_progress_in_http_headers: 1,
      http_headers_progress_interval_ms: '110000', // UInt64, 文字列として渡す必要があります
    },
  })
  ```

  ただし、最近の Node.js バージョンでは、受信した headers の合計サイズに 16KB の制限がある点に注意してください。一定数の progress headers を受信すると (私たちのテストではおよそ 70～80 個) 、Exception が発生します。

  また、on the wire での待機時間を完全になくす、まったく別のアプローチを取ることも可能です。これは、connection が失われても mutations がキャンセルされないという HTTP interface の「feature」を利用する方法です。詳細は [this example (part 2)](https://github.com/ClickHouse/clickhouse-js/blob/main/examples/long_running_queries_timeouts.ts) を参照してください。

* Keep-Alive 機能は完全に無効化することもできます。この場合、client はすべての request に `Connection: close` header も追加し、基盤となる HTTP agent は connections を再利用しません。アイドル状態の sockets が存在しないため、`keep_alive.idle_socket_ttl` 設定は無視されます。その結果、リクエストごとに新しい connection を確立することになり、追加の overhead が発生します。

  ```ts theme={null}
  const client = createClient({
    keep_alive: {
      enabled: false,
    },
  })
  ```

* `curl` などを使って、同じ ClickHouse instance と同じ network path (つまり同じマシンまたは同じ network segment、たとえば Kubernetes pod から) で簡単な command-line テストを実行し、Node.js 自体を含む network stack の残りの部分に問題がないか切り分けてください。

  ```sh theme={null}
  curl -is --user '<user>:<password>' --data-binary "SELECT 1" <clickhouse_url>
  ```

  数分間ループで実行してみるとよいでしょう。`curl` でも同様のエラーが出る場合、問題は client 設定ではなく、network stack または server configuration にある可能性が高いです。

* 素の Node.js 機能で connection をテストするには、組み込みの `fetch` API を使って ClickHouse server に対する単純な HTTP request を作成してみてください。

```ts theme={null}
  const response = await fetch('<clickhouse_url>?query=SELECT+1', {
    method: 'POST',
    headers: {
      'Authorization': 'Basic ' + Buffer.from('<user>:<password>').toString('base64'),
    }
  })
```

* 場合によっては、アプリケーションコードやフレームワークのアダプターが、実際のクエリ実行の前に `ping()` を先行して送ることがあります。その結果、`ping()` リクエストは成功しても、後続のクエリリクエストが、アイドル接続に関する同じ根本原因によって "socket hang up" エラーで失敗することがあります。ログにそのパターンが見られる場合は、フレームワークやアプリケーションコードで先行 `ping()` を無効化できるオプションがないか確認してみてください。これは、途中のネットワークコンポーネントによるレート制限を受ける可能性を下げるうえでも役立ちます。

* アプリケーション自体に十分な CPU time が割り当てられており、ネットワークがホスティングプロバイダーによって帯域制限されていないことを確認してください。GC pause メトリクスや event loop lag メトリクスなど、各種の監視手段も、リソース枯渇の可能性を切り分けるのに役立ちます。

* [no-floating-promises](https://typescript-eslint.io/rules/no-floating-promises/) ESLint ルールを有効にして、アプリケーションコードを確認してみてください。これにより、ストリームやソケットがぶら下がったままになる原因となる、未処理の Promise を特定しやすくなります。

<div id="read-only-users">
  ### 読み取り専用ユーザー
</div>

[readonly=1 ユーザー](/docs/ja/concepts/features/configuration/settings/permissions-for-queries#readonly) でクライアントを使用する場合、レスポンス圧縮は `enable_http_compression` 設定が必要なため、有効にできません。次の設定ではエラーになります。

```ts theme={null}
const client = createClient({
  compression: {
    response: true, // won't work with a readonly=1 user
  },
})
```

`readonly=1` ユーザーの制限についてさらに詳しく説明している[例](https://github.com/ClickHouse/clickhouse-js/blob/main/examples/node/security/read_only_user.ts)を参照してください。

<div id="proxy-with-a-pathname">
  ### パス名付きプロキシ
</div>

ClickHouse インスタンスがプロキシの背後にあり、たとえば `http://proxy:8123/clickhouse&#95;server` のように URL にパス名が含まれている場合は、`pathname` 設定オプションに `clickhouse_server` を指定してください (先頭のスラッシュの有無は問いません) 。そうしないと、これを `url` に直接含めた場合、`database` オプションとして扱われます。複数のセグメントにも対応しており、たとえば `/my_proxy/db` のように指定できます。

```ts theme={null}
const client = createClient({
  url: 'http://proxy:8123',
  pathname: '/clickhouse_server',
})
```

<div id="reverse-proxy-with-authentication">
  ### 認証付きリバースプロキシ
</div>

ClickHouse のデプロイメントの前段に認証付きリバースプロキシがある場合は、`http_headers` 設定を使って、そこで必要なヘッダーを指定できます。

```ts theme={null}
const client = createClient({
  http_headers: {
    'My-Auth-Header': '...',
  },
})
```

<div id="custom-httphttps-agent-experimental-nodejs-only">
  ### カスタム HTTP/HTTPS エージェント (実験的、Node.js のみ)
</div>

<Warning>
  これは実験的な機能であり、今後のリリースで後方互換性のない変更が加えられる可能性があります。クライアントが提供するデフォルト実装と設定で、ほとんどのユースケースには十分対応できます。この機能は、必要であることが確実な場合にのみ使用してください。
</Warning>

デフォルトでは、クライアントは、クライアント設定 (`max_open_connections`、`keep_alive.enabled`、`tls` など) で指定された値を使って、ClickHouse server への接続を処理する基盤の HTTP または HTTPS エージェントを構成します。さらに、TLS 証明書を使用する場合は、基盤エージェントに必要な証明書が設定され、適切な TLS 認証ヘッダーが適用されます。

1.2.0 以降では、デフォルトの基盤エージェントを置き換えるために、カスタムの HTTP または HTTPS エージェントをクライアントに渡せるようになりました。これは、複雑なネットワーク構成で役立つ場合があります。カスタムエージェントを指定した場合は、次の条件が適用されます。

* `max_open_connections` と `tls` オプションは基盤エージェント設定の一部であるため、*効果はなく*、クライアントによって無視されます。
* `keep_alive.enabled` は、`Connection` ヘッダーのデフォルト値 (`true` -> `Connection: keep-alive`、`false` -> `Connection: close`) のみを制御します。
* アイドル状態の keep-alive ソケット管理は引き続き機能します (これはエージェントではなく、個々のソケット自体に紐づいているため) が、`keep_alive.idle_socket_ttl` の値を `0` に設定することで、これを完全に無効化できるようになりました。

<div id="custom-agent-usage-examples">
  #### カスタムエージェントの使用例
</div>

証明書なしでカスタム HTTP または HTTPS Agent を使用する場合:

```ts theme={null}
const agent = new http.Agent({ // or https.Agent
  keepAlive: true,
  keepAliveMsecs: 2500,
  maxSockets: 10,
  maxFreeSockets: 10,
})
const client = createClient({
  http_agent: agent,
})
```

basic TLS と CA証明書を使用したカスタムHTTPS Agent:

```ts theme={null}
const agent = new https.Agent({
  keepAlive: true,
  keepAliveMsecs: 2500,
  maxSockets: 10,
  maxFreeSockets: 10,
  ca: fs.readFileSync('./ca.crt'),
})
const client = createClient({
  url: 'https://myserver:8443',
  http_agent: agent,
  // With a custom HTTPS agent, the client won't use the default HTTPS connection implementation; the headers should be provided manually
  http_headers: {
    'X-ClickHouse-User': 'username',
    'X-ClickHouse-Key': 'password',
  },
  // Important: authorization header conflicts with the TLS headers; disable it.
  set_basic_auth_header: false,
})
```

相互TLSを使用したカスタムHTTPS Agent:

```ts theme={null}
const agent = new https.Agent({
  keepAlive: true,
  keepAliveMsecs: 2500,
  maxSockets: 10,
  maxFreeSockets: 10,
  ca: fs.readFileSync('./ca.crt'),
  cert: fs.readFileSync('./client.crt'),
  key: fs.readFileSync('./client.key'),
})
const client = createClient({
  url: 'https://myserver:8443',
  http_agent: agent,
  // With a custom HTTPS agent, the client won't use the default HTTPS connection implementation; the headers should be provided manually
  http_headers: {
    'X-ClickHouse-User': 'username',
    'X-ClickHouse-Key': 'password',
    'X-ClickHouse-SSL-Certificate-Auth': 'on',
  },
  // Important: authorization header conflicts with the TLS headers; disable it.
  set_basic_auth_header: false,
})
```

証明書 *と* カスタム *HTTPS* Agent を併用する場合、TLS ヘッダーと競合するため、`set_basic_auth_header` 設定 (導入バージョン 1.2.0) でデフォルトの Authorization ヘッダーを無効にする必要がある可能性があります。TLS ヘッダーはすべて手動で指定する必要があります。

<div id="known-limitations-nodejsweb">
  ## 既知の制限事項 (Node.js/web)
</div>

* 結果セット用のデータマッパーは存在しないため、言語組み込みのプリミティブ型のみが使用されます。特定のデータ型マッパーについては、[RowBinary フォーマットのサポート](https://github.com/ClickHouse/clickhouse-js/issues/216)で対応が予定されています。
* [Decimal\* と Date\* / DateTime\* データ型に関する注意点](/docs/ja/integrations/language-clients/js/index#datedate32-types-caveats)がいくつかあります。
* JSON\* ファミリーのフォーマットを使用する場合、Int64+ 型の最大値は `Number.MAX_SAFE_INTEGER` を超えるため、Int32 を超える数値は文字列として表現されます。詳細は [整数型](/docs/ja/integrations/language-clients/js/index#integral-types-int64-int128-int256-uint64-uint128-uint256) セクションを参照してください。

<div id="known-limitations-web">
  ## 既知の制限事項 (web)
</div>

* `select` クエリのストリーミングは動作しますが、`insert` では無効になっています (型レベルでも同様です) 。
* リクエストの圧縮は無効になっており、設定は無視されます。レスポンスの圧縮は動作します。
* ロギングにはまだ対応していません。

<div id="tips-for-performance-optimizations">
  ## パフォーマンス最適化のヒント
</div>

* アプリケーションのメモリ消費を抑えるには、大規模な insert (たとえばファイルからの insert) や、該当する場合は select でストリームを使用することを検討してください。イベント listener や同様のユースケースでは、[非同期 INSERT](/docs/ja/concepts/features/operations/insert/asyncinserts) も有力な選択肢です。これにより、クライアント側でのバッチ化を最小限に抑えたり、完全に不要にしたりできます。非同期 INSERT の例は [client repository](https://github.com/ClickHouse/clickhouse-js/tree/main/examples/node) にあり、ファイル名のプレフィックスとして `async_insert_` が使われています。
* client は、デフォルトではリクエストまたはレスポンスの圧縮を有効にしていません。ただし、大規模なデータセットを select または insert する場合は、`ClickHouseClientConfigOptions.compression` で有効にすることを検討できます (`request` のみ、`response` のみ、またはその両方) 。
* 圧縮には大きな性能上のペナルティがあります。`request` または `response` に対して有効にすると、それぞれ insert または select の速度に悪影響を与えますが、アプリケーションで転送されるネットワークトラフィックの量は削減されます。

<div id="contact-us">
  ## お問い合わせ
</div>

ご不明な点やサポートが必要な場合は、[Community Slack](https://clickhouse.com/slack) (`#clickhouse-js` チャンネル) または [GitHub issues](https://github.com/ClickHouse/clickhouse-js/issues) からお気軽にご連絡ください。