> ## Documentation Index
> Fetch the complete documentation index at: https://clickhouse.com/docs/llms.txt
> Use this file to discover all available pages before exploring further.
> The ClickHouse Connect project suite for connecting Python to ClickHouse
# Introduction
ClickHouse Connect is a core database driver providing interoperability with a wide range of Python applications.
* The main interfaces are the synchronous `Client` and native aiohttp-based `AsyncClient` in `clickhouse_connect.driver`. The driver package also provides query and insert contexts, streaming helpers, DB-API support, and lower-level HTTP methods.
* The `clickhouse_connect.datatypes` package serializes and deserializes ClickHouse types using the ClickHouse Native binary columnar format.
* The optional Cython extensions in `clickhouse_connect.driverc` accelerate common serialization, conversion, and buffering paths. A pure Python path remains available on platforms where the extensions cannot be built.
* The package ships PEP 561 type information, so downstream type checkers consume annotations for the public driver, DB-API, and SQLAlchemy surfaces.
* The [SQLAlchemy](https://www.sqlalchemy.org/) dialect in `clickhouse_connect.cc_sqlalchemy` supports SQLAlchemy Core, schema reflection, ClickHouse-specific query clauses and table engines, and Alembic migrations. Basic ORM reads and inserts work, but the dialect is designed for analytical workloads rather than full unit-of-work ORM behavior.
* The core driver and [ClickHouse Connect SQLAlchemy](/docs/integrations/language-clients/python/sqlalchemy) implementation are the preferred method for connecting ClickHouse to Apache Superset. Use the `ClickHouse Connect` database connection, or `clickhousedb` SQLAlchemy dialect connection string.
This documentation is current as of clickhouse-connect 1.6.0. If you are upgrading from 0.15.x or earlier, see the [1.0 migration guide](https://github.com/ClickHouse/clickhouse-connect/blob/main/MIGRATION.md).
The standard ClickHouse Connect clients use the HTTP interface. This supports HTTP load balancers, proxies, and common enterprise network controls. ClickHouse Connect also has an experimental in-process [chDB](#embedded-chdb-backend) backend.
Requirements and compatibility
| Component | Supported versions |
| ---------- | ----------------------------------------------------------------------------------------------- |
| Python | 3.10 through 3.14. Free-threaded builds such as 3.14t are supported experimentally. |
| ClickHouse | Actively supported ClickHouse releases. CI tests against recent LTS and stable server releases. |
| SQLAlchemy | 1.4.40 or later, below 3.0 |
| Pandas | 2.x and 3.x |
| Polars | 1.0 or later |
| aiohttp | 3.9 or later |
| Platforms | Linux, macOS, and Windows on the wheel architectures published for each Python version |
The package includes compiled wheels where available and falls back to a pure Python implementation when the Cython extensions cannot be built. PyArrow is supported on Python 3.10 through 3.14. Python 3.14 requires PyArrow 22 or later.
Installation
Install ClickHouse Connect from [PyPI](https://pypi.org/project/clickhouse-connect/) via pip:
```bash theme={null}
pip install clickhouse-connect
```
Optional integrations are installed through extras:
```bash theme={null}
pip install "clickhouse-connect[async]" # Native asyncio client
pip install "clickhouse-connect[pandas]" # Pandas
pip install "clickhouse-connect[arrow]" # PyArrow
pip install "clickhouse-connect[polars]" # Polars
pip install "clickhouse-connect[sqlalchemy]" # SQLAlchemy dialect
pip install "clickhouse-connect[alembic]" # SQLAlchemy and Alembic
pip install "clickhouse-connect[chdb]" # Embedded chDB backend
pip install "clickhouse-connect[tzdata]" # IANA time zones on minimal systems
```
ClickHouse Connect can also be installed from source:
* `git clone` the [GitHub repository](https://github.com/ClickHouse/clickhouse-connect).
* Change to the project root and run `pip install .`. The build system installs Cython automatically to compile the optional C extensions.
The installed version is available as `clickhouse_connect.__version__`.
Support policy
Update to the latest ClickHouse Connect release before reporting an issue. File issues in the [GitHub project](https://github.com/ClickHouse/clickhouse-connect/issues). ClickHouse Connect targets the [actively supported ClickHouse releases](https://github.com/ClickHouse/ClickHouse/blob/master/SECURITY.md) at the time of each driver release. It often works with older server versions, but newer data types and protocol features can require a newer server.
Basic usage
Gather your connection details
To connect to ClickHouse with HTTP(S) you need this information:
| Parameter(s) | Description |
| ------------------------- | -------------------------------------------------------------------------------------------------------------- |
| `HOST` and `PORT` | Typically, the port is 8443 when using TLS or 8123 when not using TLS. |
| `DATABASE NAME` | Out of the box, there is a database named `default`, use the name of the database that you want to connect to. |
| `USERNAME` and `PASSWORD` | Out of the box, the username is `default`. Use the username appropriate for your use case. |
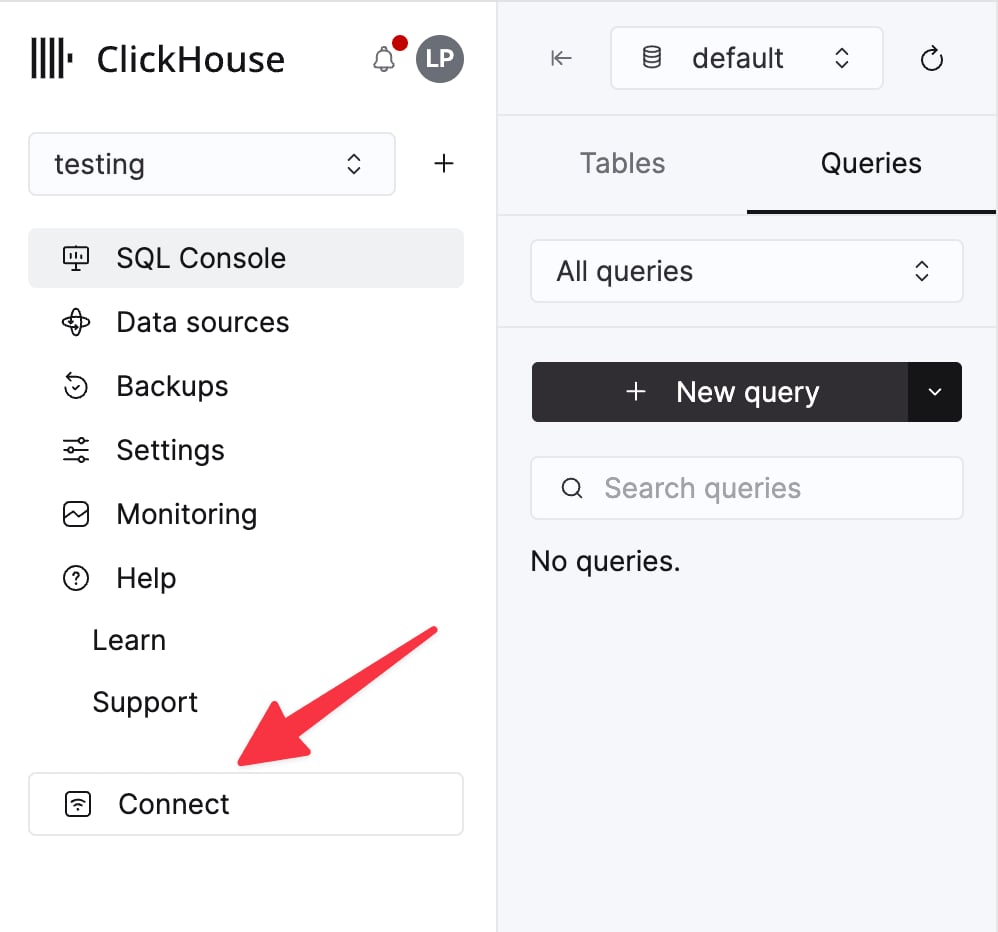
The details for your ClickHouse Cloud service are available in the ClickHouse Cloud console.
Select a service and click **Connect**:
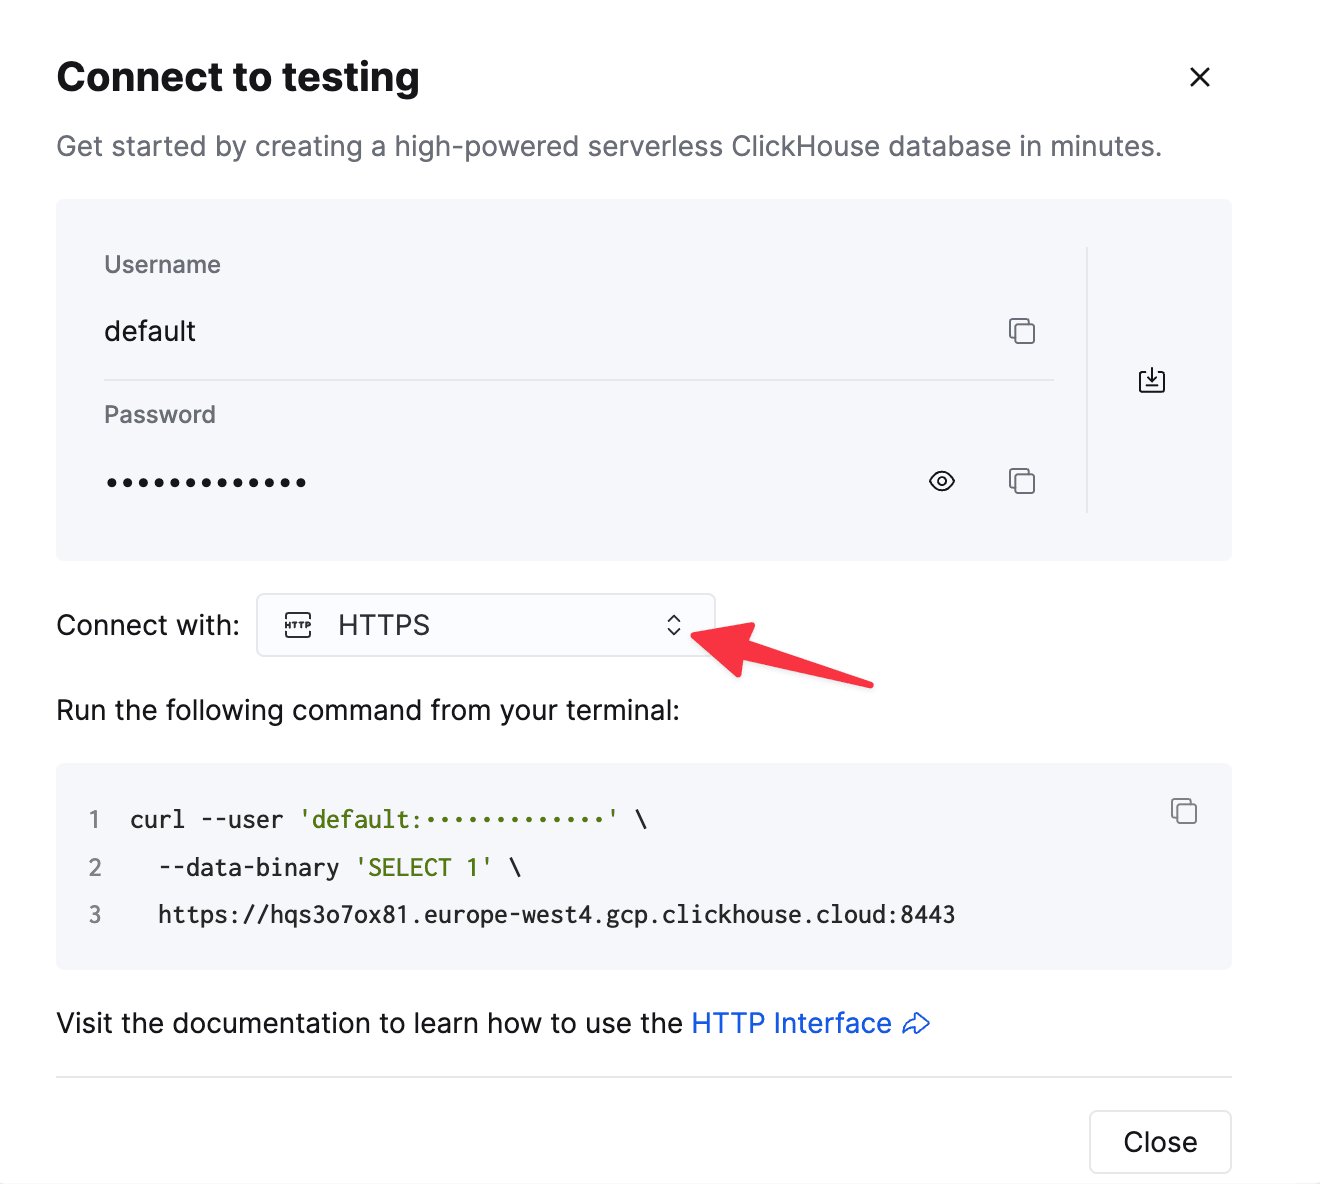
Choose **HTTPS**. Connection details are displayed in an example `curl` command.
If you're using self-managed ClickHouse, the connection details are set by your ClickHouse administrator.
Establish a connection
There are two examples shown for connecting to ClickHouse:
* Connecting to a ClickHouse server on localhost.
* Connecting to a ClickHouse Cloud service.
Use a ClickHouse Connect client instance to connect to a ClickHouse server on localhost:
```python theme={null}
import clickhouse_connect
client = clickhouse_connect.get_client(
host="localhost",
username="default",
password="password",
)
```
Use a ClickHouse Connect client instance to connect to a ClickHouse Cloud service:
Use the connection details gathered earlier. ClickHouse Cloud services require TLS, so use port 8443.
```python theme={null}
import clickhouse_connect
client = clickhouse_connect.get_client(
host="HOSTNAME.clickhouse.cloud",
port=8443,
username="default",
password="your password",
)
```
Interact with your database
To run a ClickHouse SQL command, use the client `command` method:
```python theme={null}
client.command(
"CREATE TABLE new_table "
"(key UInt32, value String, metric Float64) "
"ENGINE MergeTree ORDER BY key"
)
```
To insert batch data, use the client `insert` method with a two-dimensional array of rows and values:
```python theme={null}
row1 = [1000, "String Value 1000", 5.233]
row2 = [2000, "String Value 2000", -107.04]
data = [row1, row2]
client.insert("new_table", data, column_names=["key", "value", "metric"])
```
To retrieve data using ClickHouse SQL, use the client `query` method:
```python theme={null}
result = client.query("SELECT max(key), avg(metric) FROM new_table")
print(result.result_rows)
# Output: [(2000, -50.9035)]
client.close()
```
Embedded chDB backend
The experimental chDB backend runs ClickHouse queries inside the Python process without an HTTP server. Install the `chdb` extra, then select the backend with `interface="chdb"` or a `chdb://` DSN:
```python theme={null}
import clickhouse_connect
with clickhouse_connect.get_client(interface="chdb") as client:
result = client.query("SELECT number FROM numbers(3)")
print(result.result_rows)
# Output: [(0,), (1,), (2,)]
```
The default database is in memory. Pass `path="/data/my_chdb"` or use `dsn="chdb:///data/my_chdb"` for persistent storage. chDB allows one engine path per process. It does not support the async client or external data.