> ## Documentation Index
> Fetch the complete documentation index at: https://clickhouse.com/docs/llms.txt
> Use this file to discover all available pages before exploring further.

> Looker Studio, formerly Google Data Studio, is an online tool for converting data into customizable informative reports and dashboards.

# Looker Studio

export const PartnerBadge = () => {
  return <div className="PartnerBadge">
            <div className="PartnerBadgeIcon">
                <svg width="16" height="16" viewBox="0 0 16 16" fill="none" xmlns="http://www.w3.org/2000/svg">
                    <polyline points="12.5 9.5 10 12 6 11 2.5 8.5" stroke="currentColor" strokeLinecap="round" strokeLinejoin="round" strokeWidth="1" />
                    <polyline points="4.54 4.41 8 3.5 11.46 4.41" stroke="currentColor" strokeLinecap="round" strokeLinejoin="round" strokeWidth="1" />
                    <path d="M2.15,3.78 L0.55,6.95 A0.5,0.5 0,0,0 0.77,7.62 L2.5,8.5 L4.54,4.41 L2.82,3.55 A0.5,0.5 0,0,0 2.15,3.78 Z" stroke="currentColor" strokeLinecap="round" strokeLinejoin="round" strokeWidth="1" />
                    <path d="M13.5,8.5 L15.23,7.62 A0.5,0.5 0,0,0 15.45,6.95 L13.85,3.78 A0.5,0.5 0,0,0 13.18,3.55 L11.46,4.41 Z" stroke="currentColor" strokeLinecap="round" strokeLinejoin="round" strokeWidth="1" />
                    <path d="M11.5,4.5 L9,4.5 L6.15,7.27 A0.5,0.5 0,0,0 6.24,8.05 C7.33,8.74 8.81,8.72 10,7.5 L12.5,9.5 L13.5,8.5" stroke="currentColor" strokeLinecap="round" strokeLinejoin="round" strokeWidth="1" />
                    <polyline points="7.75 13.5 5.15 12.85 3.5 11.67" stroke="currentColor" strokeLinecap="round" strokeLinejoin="round" strokeWidth="1" />
                </svg>
            </div>
            Partner Integration
        </div>;
};

export const Image = ({img, alt, size = "lg"}) => {
  const normalizedSize = ["sm", "md", "lg"].includes(size) ? size : "lg";
  return <div className={`ch-image-${normalizedSize}`}>
      <Frame>
        <img src={img} alt={alt} />
      </Frame>
    </div>;
};

<PartnerBadge />

Looker Studio can connect to ClickHouse via the MySQL interface using the official Google MySQL data source.

<h2 id="clickhouse-cloud-setup">
  ClickHouse Cloud setup
</h2>

<Steps>
  <Step title={<>Select <code>Connect your app</code></>} id="select-connect-your-app">
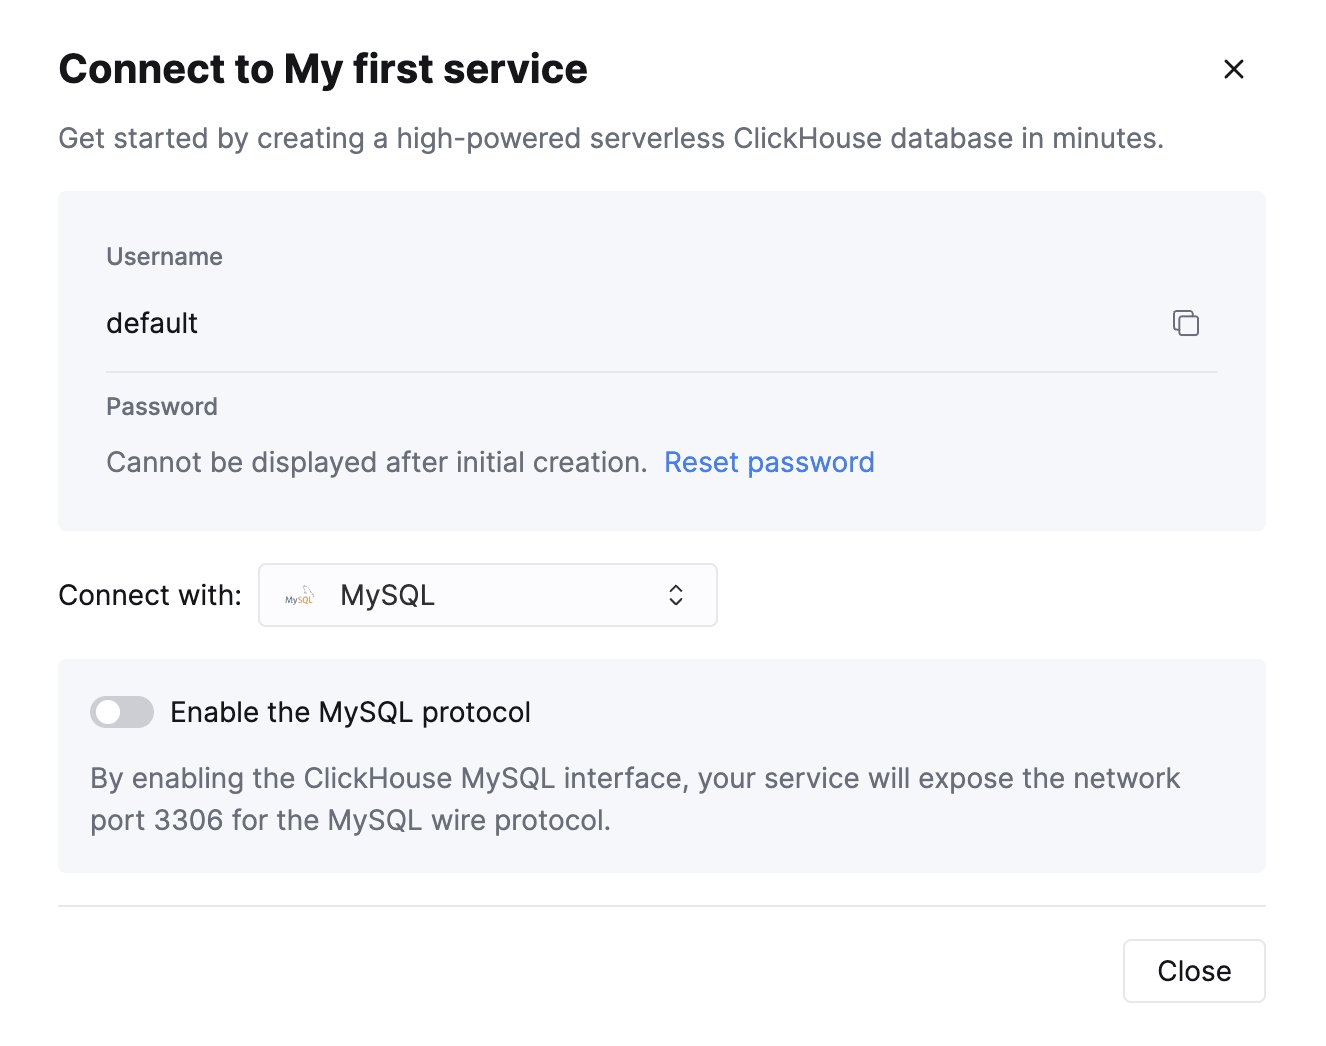
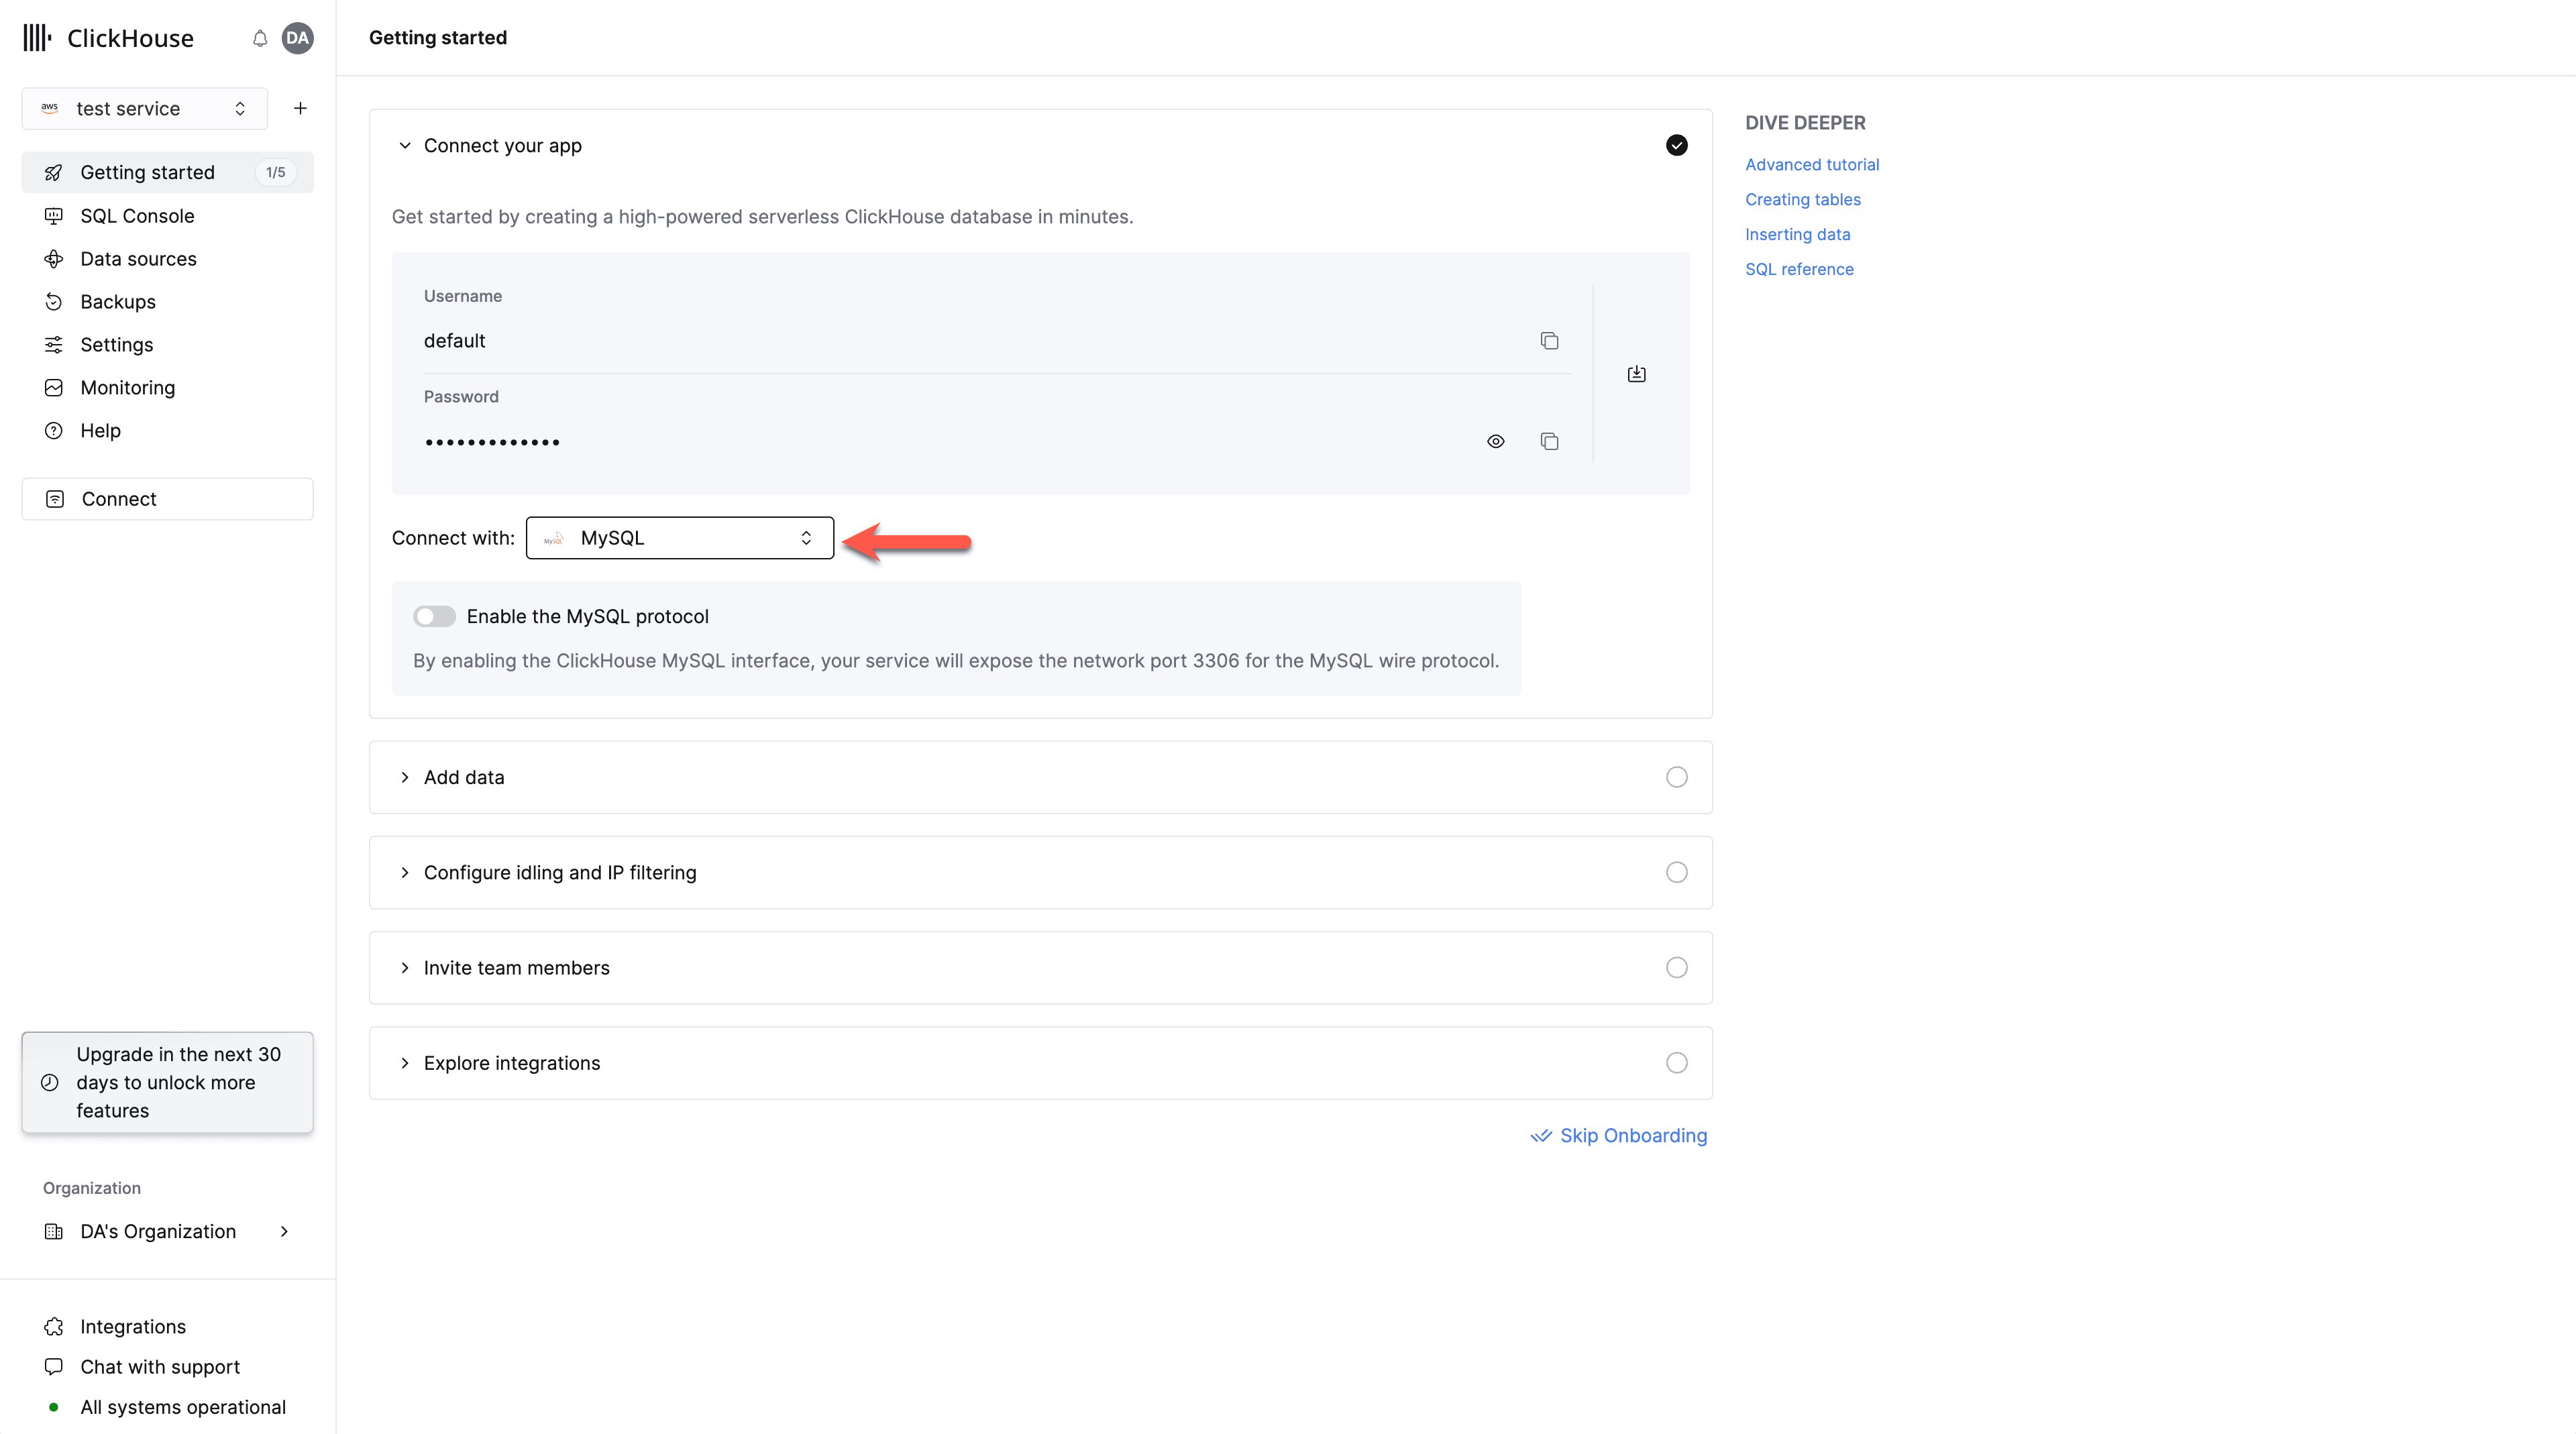
    After creating your ClickHouse Cloud Service, on the `Connect your app` screen, select MySQL from the drop down.
    <Frame>
      <img src="https://mintcdn.com/private-7c7dfe99/CFFsa2agBPbviR4r/images/_snippets/mysql1.webp?fit=max&auto=format&n=CFFsa2agBPbviR4r&q=85&s=3fee8b16269b6d6db4be00c671931dc6" alt="ClickHouse Cloud credentials screen showing MySQL interface selection dropdown" width="3840" height="2138" data-path="images/_snippets/mysql1.webp" />
    </Frame>
  </Step>

  <Step title="Enable the MySQL interface" id="enable-mysql-interface">
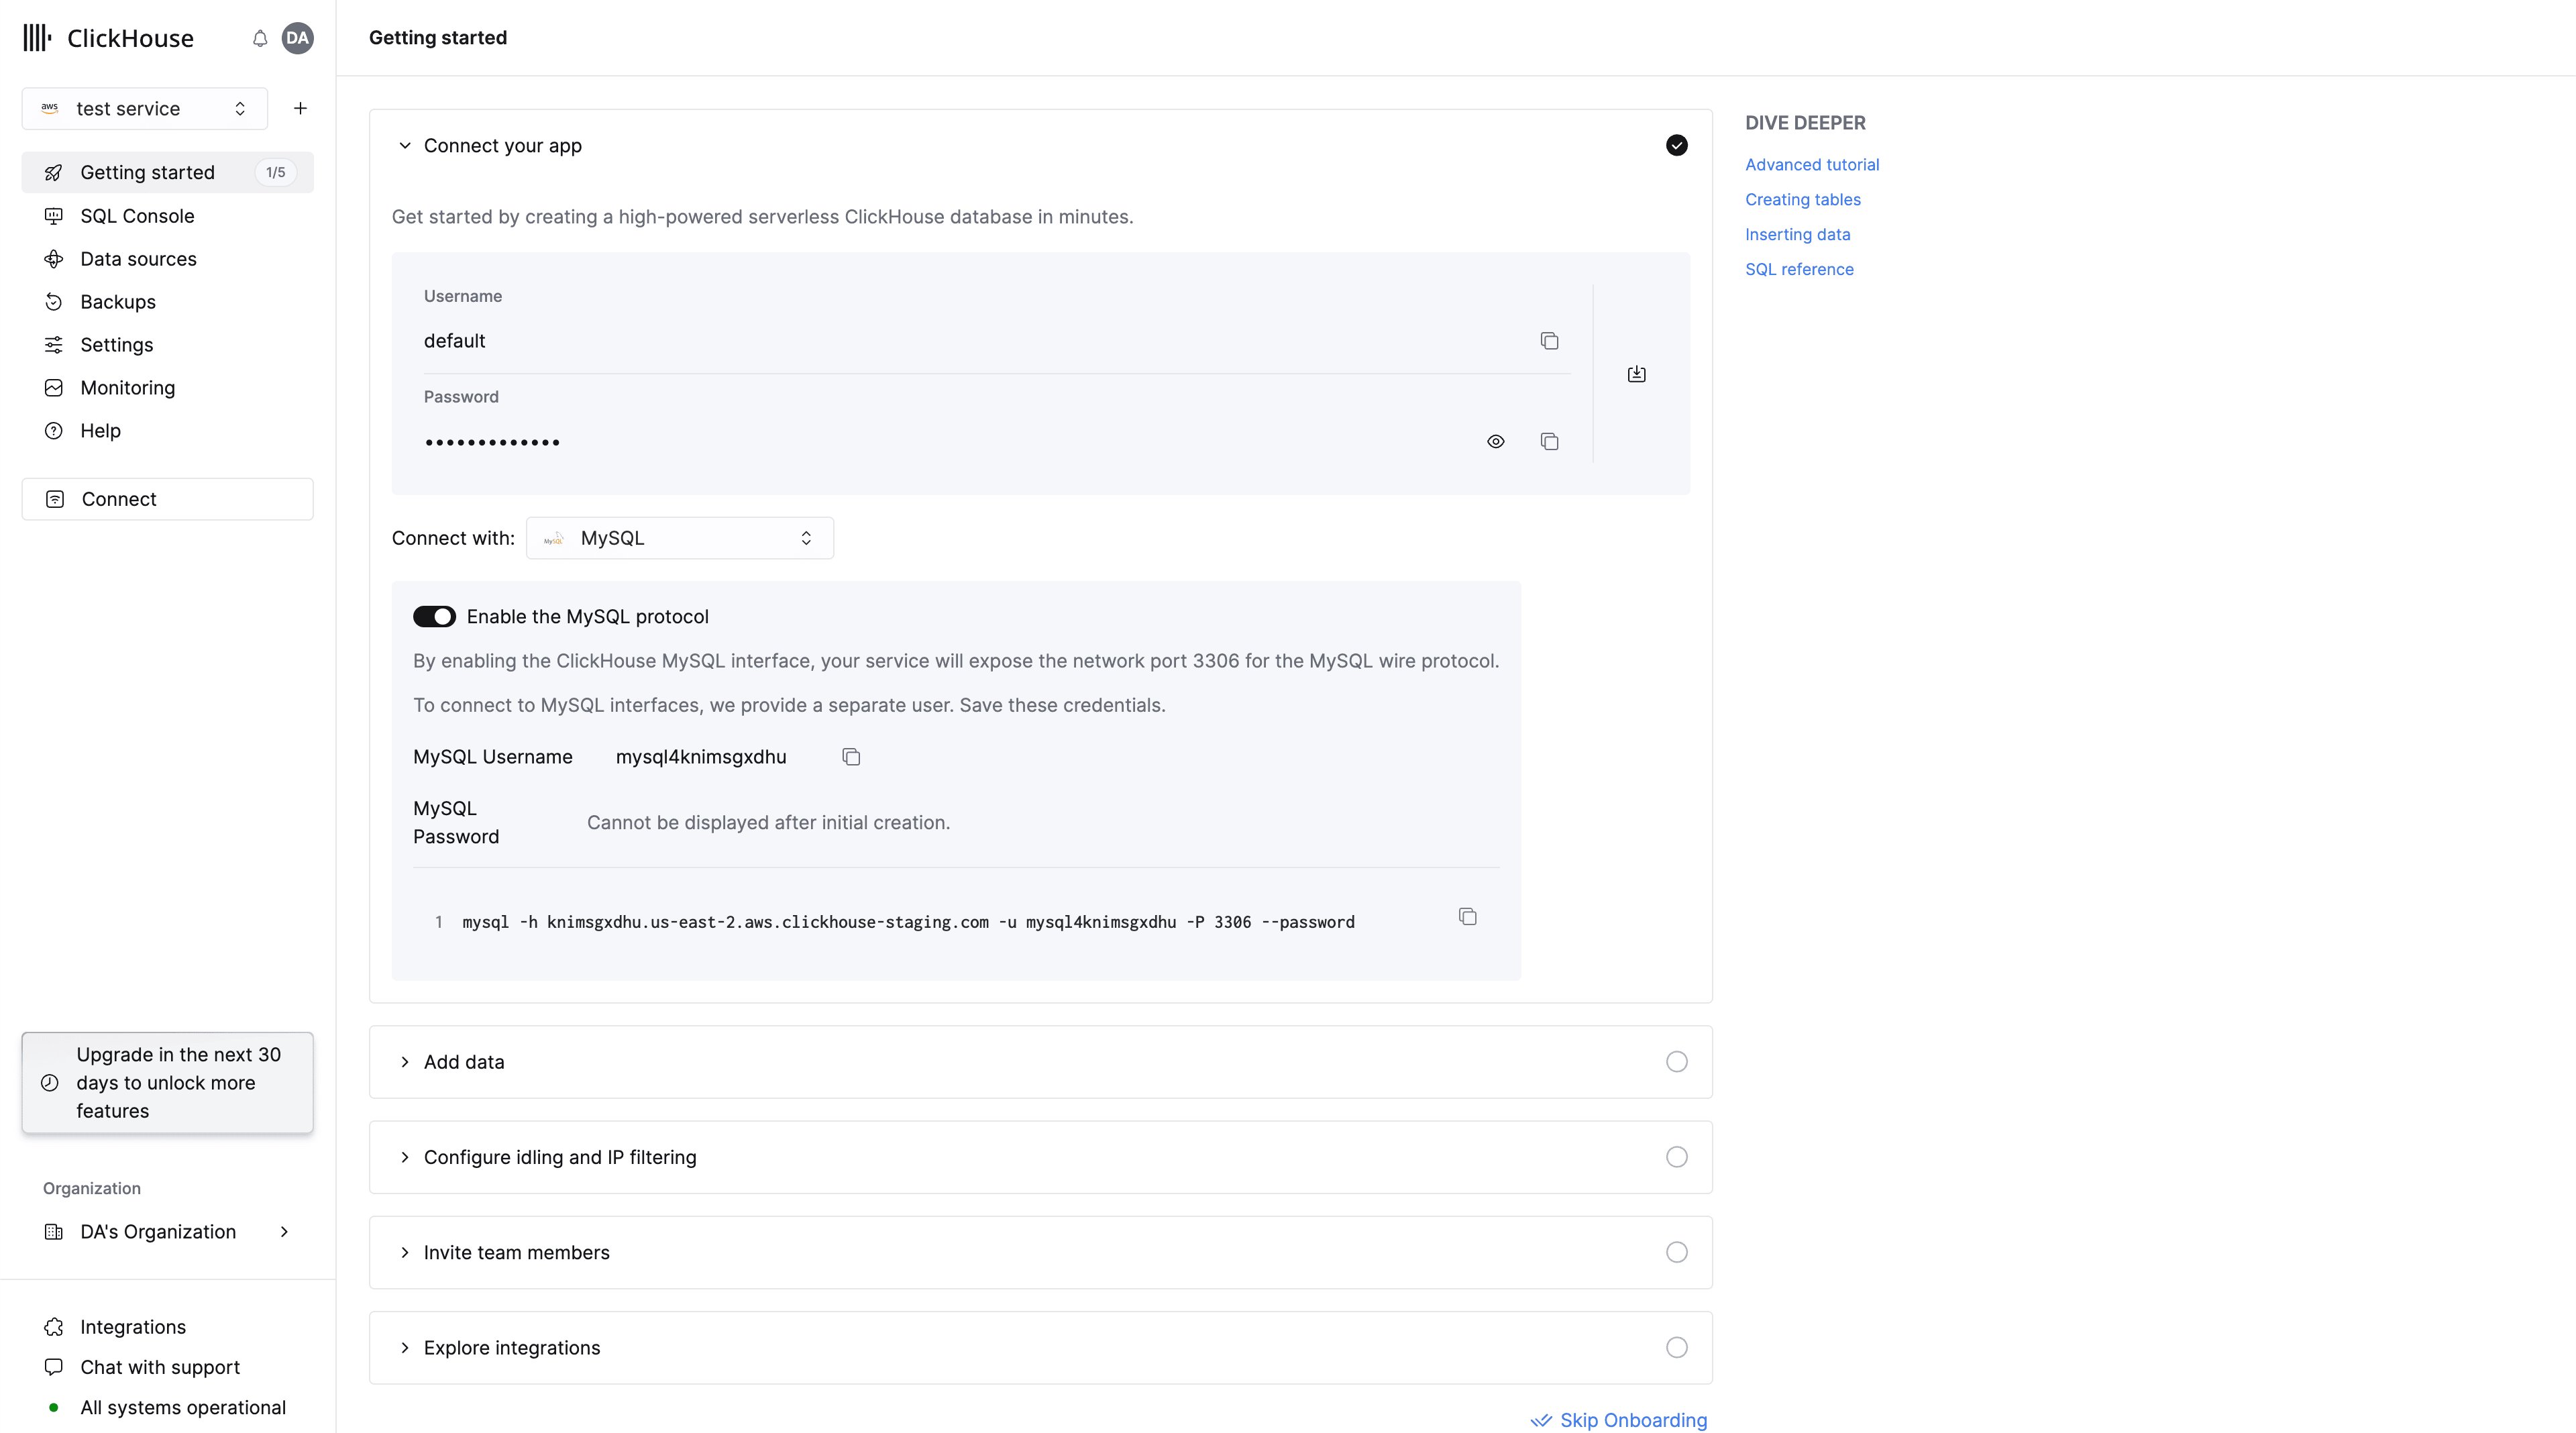
    Toggle the switch to enable the MySQL interface for this specific service.
    This will expose port `3306` for this service and prompt you with a MySQL connection screen that includes your unique MySQL username.
    <Frame>
      <img src="https://mintcdn.com/private-7c7dfe99/CFFsa2agBPbviR4r/images/_snippets/mysql2.webp?fit=max&auto=format&n=CFFsa2agBPbviR4r&q=85&s=1f1065226a43c32aee2f841823e97fa7" alt="ClickHouse Cloud MySQL interface enabling toggle and connection details" width="3840" height="2136" data-path="images/_snippets/mysql2.webp" />
    </Frame>

    Alternatively, in order to enable the MySQL interface for an existing service:
  </Step>

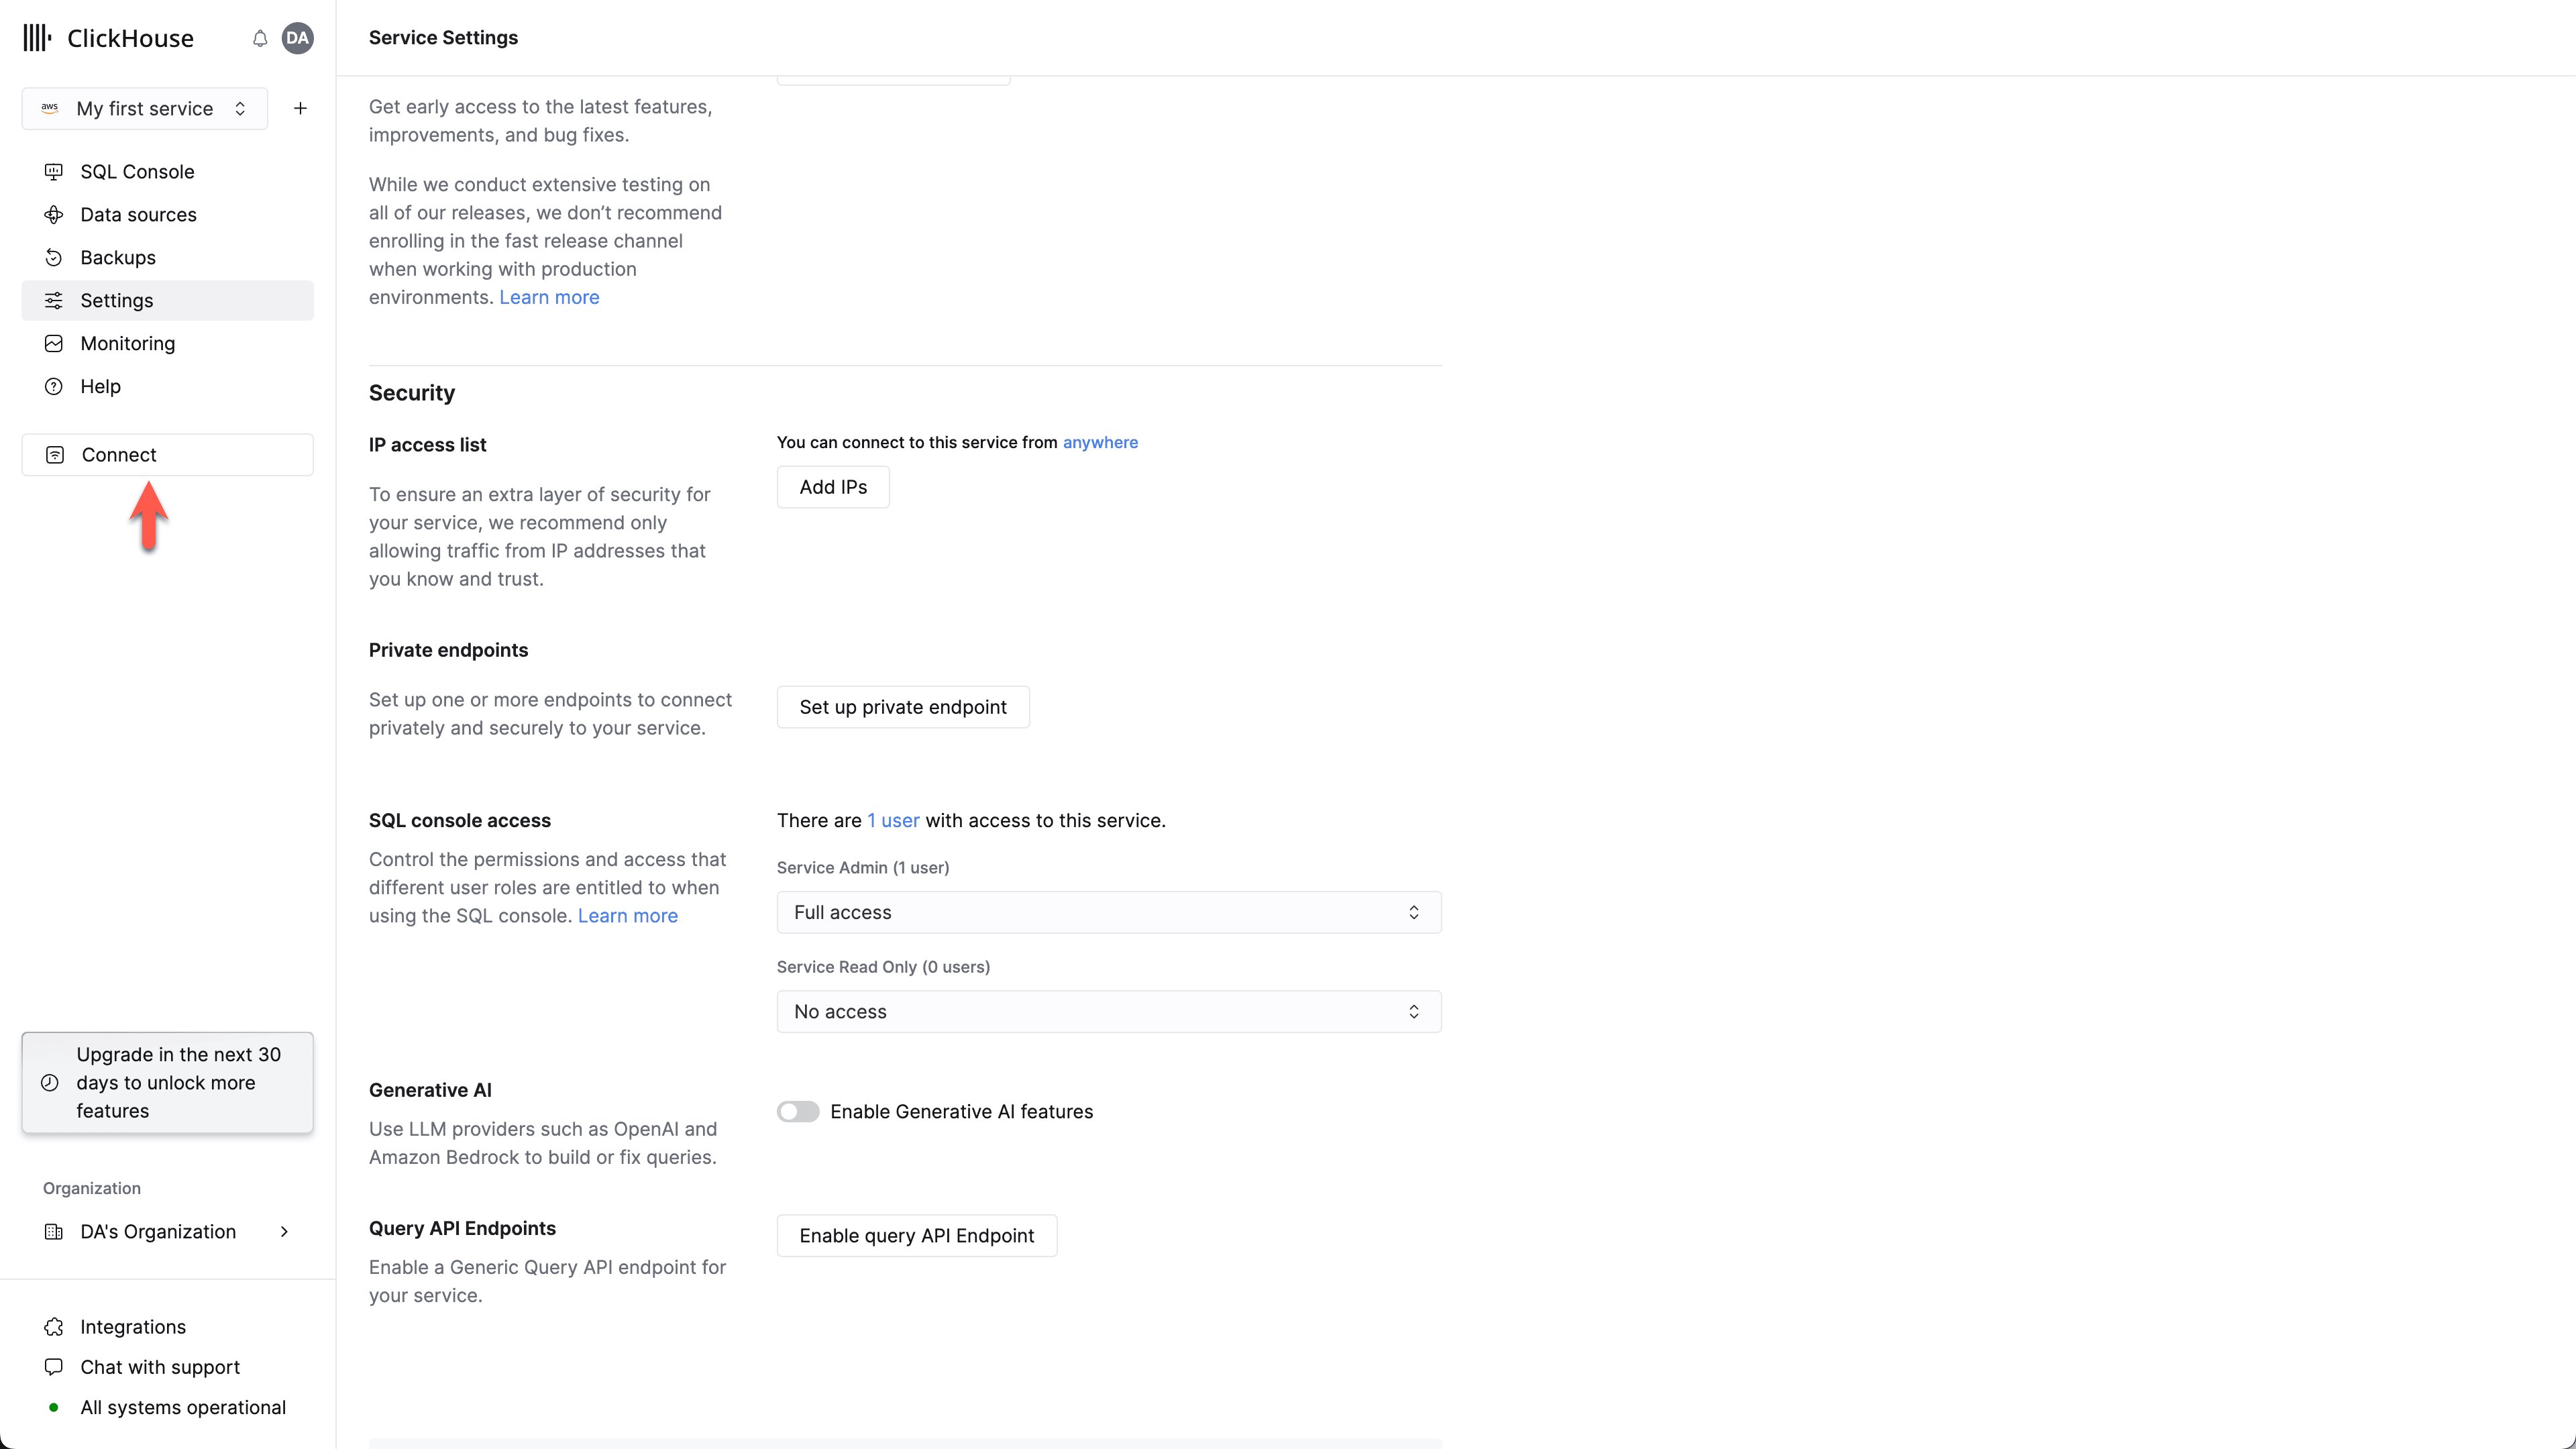
  <Step title={<>Select <code>Connect</code></>} id="select-connect">
    Ensure your service is in `Running` state then click on the service you want to enable the MySQL interface for.
    Select "Connect" from the left menu:
    <Frame>
      <img src="https://mintcdn.com/private-7c7dfe99/CFFsa2agBPbviR4r/images/_snippets/mysql3.webp?fit=max&auto=format&n=CFFsa2agBPbviR4r&q=85&s=563cda780487040d6da61f40bb612113" alt="ClickHouse Cloud service connection screen with Connect option highlighted" width="3840" height="2160" data-path="images/_snippets/mysql3.webp" />
    </Frame>
  </Step>

  <Step title={<>Choose <code>MySQL</code></>} id="choose-mysql">
    Select `MySQL` from the `Connect With` drop down.

    <div className="ch-image-md">
      <Frame>
        <img src="https://mintcdn.com/private-7c7dfe99/CFFsa2agBPbviR4r/images/_snippets/mysql4.webp?fit=max&auto=format&n=CFFsa2agBPbviR4r&q=85&s=7e7d9febe22e2d83b4edf27a3f1546ab" alt="ClickHouse Cloud connection screen showing MySQL option selection" width="1326" height="1046" data-path="images/_snippets/mysql4.webp" />
      </Frame>
    </div>
  </Step>

  <Step title="Enable the MySQL interface" id="enable-mysql-interface-existing-service">
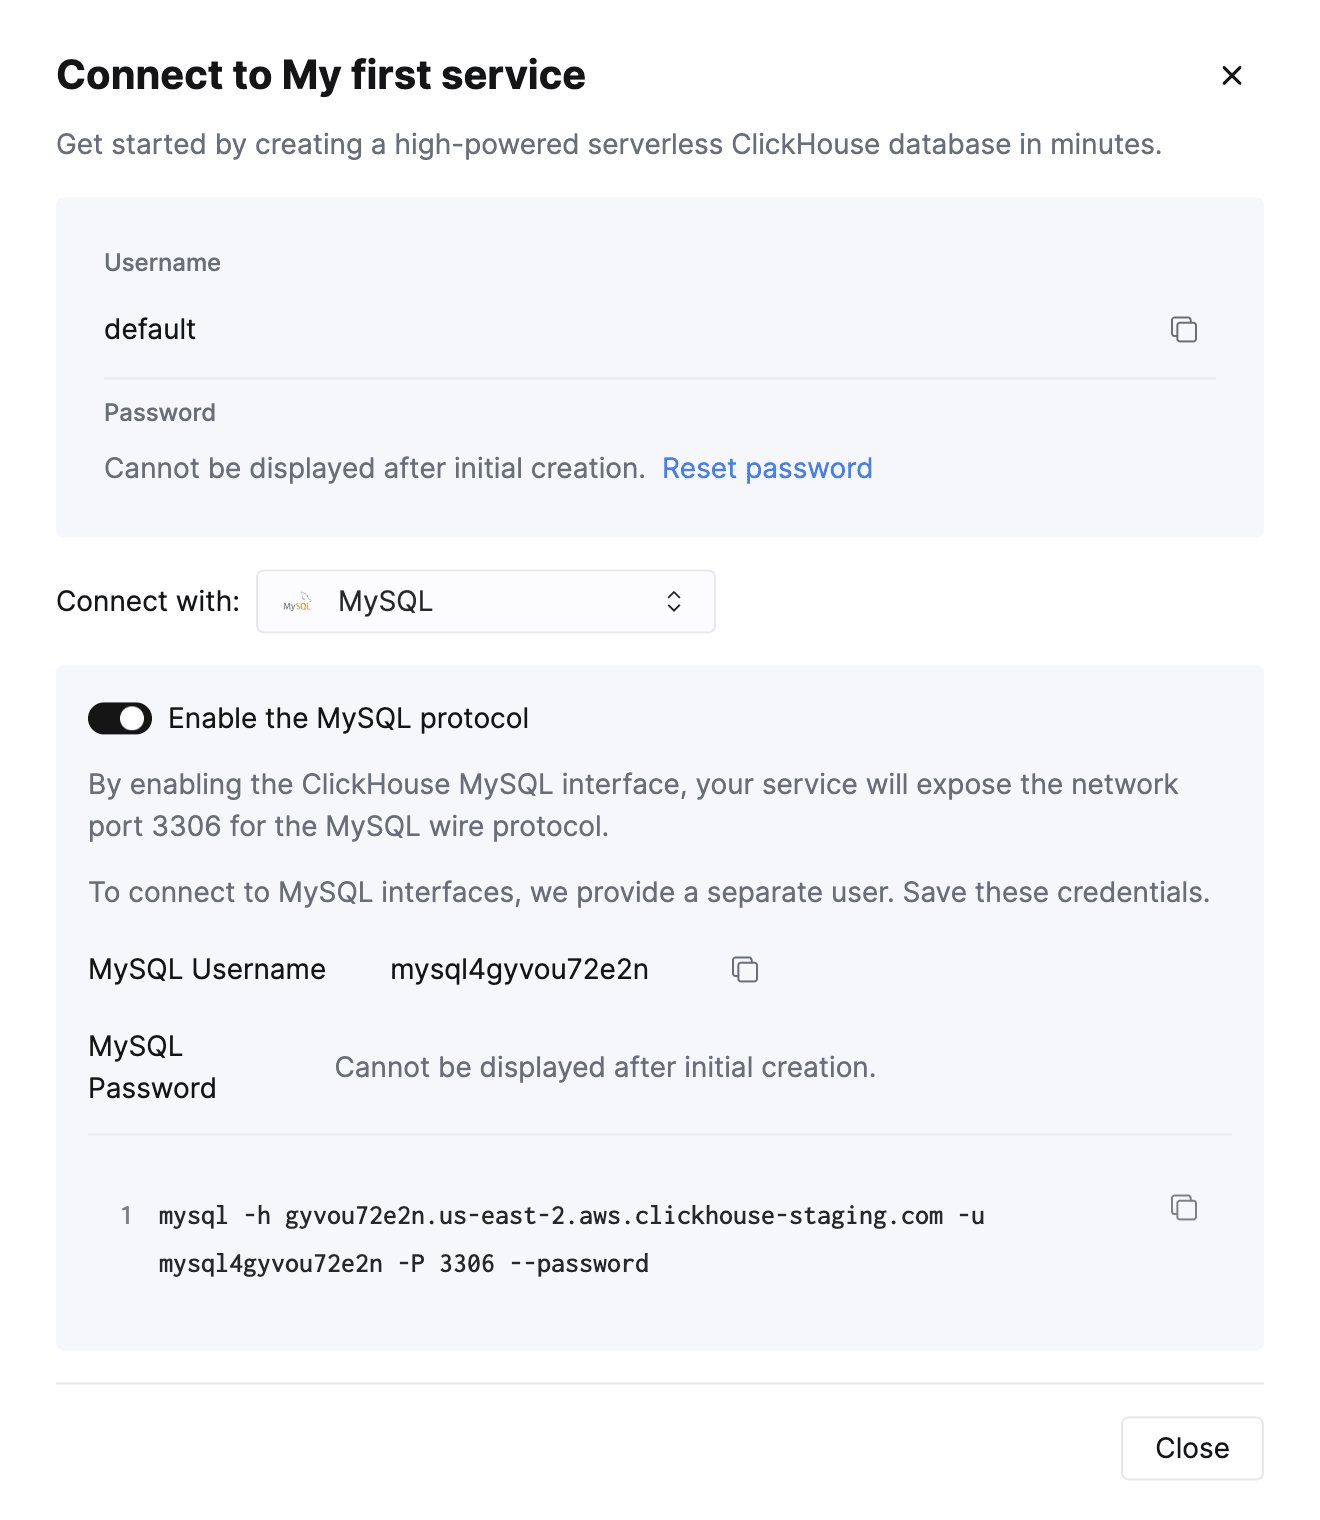
    Toggle the switch to enable the MySQL interface for this specific service.
    This will expose port `3306` for this service and prompt you with your MySQL connection screen that include your unique MySQL username.
  </Step>
</Steps>

<div className="ch-image-md">
  <Frame>
    <img src="https://mintcdn.com/private-7c7dfe99/CFFsa2agBPbviR4r/images/_snippets/mysql5.webp?fit=max&auto=format&n=CFFsa2agBPbviR4r&q=85&s=fe4db63a9a94f057aa6b57a2be5366a4" alt="ClickHouse Cloud connection screen with MySQL interface enabled showing connection details" width="1320" height="1520" data-path="images/_snippets/mysql5.webp" />
  </Frame>
</div>

<h2 id="creating-multiple-mysql-users-in-clickhouse-cloud">
  Creating a readonly MySQL user in ClickHouse Cloud
</h2>

ClickHouse Cloud automatically creates a `mysql4<subdomain>` user that shares the same password as the default user.
The `<subdomain>` portion corresponds to the first part of your ClickHouse Cloud hostname.

This username format is required for compatibility with tools that establish secure connections but don't include [SNI (Server Name Indication)](https://www.cloudflare.com/learning/ssl/what-is-sni) data in their TLS handshake.
Without SNI information, the system can't perform proper internal routing, so the subdomain hint embedded in the username provides the necessary routing information.
The MySQL console client is an example of a tool that requires this.

<Tip>
  A recommended best practice is to create a new readonly MySQL user.
</Tip>

<Note>
  For a ClickHouse Cloud hostname like `foobar.us-east1.aws.clickhouse.cloud`, the `<subdomain>` part equals to `foobar`, and a custom MySQL username could look like `mysql4foobar_team1`.
</Note>

<Steps>
  <Step title="Create a readonly settings profile" id="create-a-custom-settings-user">
    Create a [settings profile](/docs/reference/statements/create/settings-profile) to apply to your readonly user,
    setting the `readonly` setting to `1`:

    ```sql theme={null}
    CREATE SETTINGS PROFILE readonly_profile SETTINGS readonly = 1
    ```
  </Step>

  <Step title="Create a new readonly MySQL user" id="create-a-readonly-mysql-user">
    [Create a user](/docs/reference/statements/create/user) with a name following this format:

    ```sql theme={null}
    mysql4<subdomain>_<username>
    ```

    Apply the `readonly_profile` to the new user and make sure that the password is in double SHA1 format. For example:

    ```sql theme={null}
    CREATE USER mysql4foobar_readonly
    IDENTIFIED WITH double_sha1_password BY 'YourPassword42$'
    SETTINGS PROFILE 'readonly_profile';
    ```
  </Step>

  <Step title="Grant the new user permissions to access the desired tables" id="grant-the-new-user-the-necessary-permissions">
    [Grant](/docs/reference/statements/grant) the new user the necessary permissions to interact with the desired tables or databases.
    For example, if you want to grant access to `system.query_log` only:

    ```sql theme={null}
    GRANT SELECT ON system.query_log TO mysql4foobar_readonly;
    ```

    <Note>
      For the readonly user, make sure to only grant `SELECT` permissions to the tables you want to access.
    </Note>

    The newly created user can be used to connect to your ClickHouse Cloud service with the MySQL interface.
  </Step>
</Steps>

<h3 id="troubleshooting-multiple-mysql-users-in-clickhouse-cloud">
  Troubleshooting multiple MySQL users in ClickHouse Cloud
</h3>

If you created a new MySQL user, and you see the following error while connecting via MySQL CLI client:

```
ERROR 2013 (HY000): Lost connection to MySQL server at 'reading authorization packet', system error: 54
```

In this case, ensure that the username follows the `mysql4<subdomain>_<username>` format, as described ([above](#creating-multiple-mysql-users-in-clickhouse-cloud)).

<h2 id="on-premise-clickhouse-server-setup">
  On-premise ClickHouse server setup
</h2>

Please refer to [the official documentation](/docs/concepts/features/interfaces/mysql)
on how to set up a ClickHouse server with enabled MySQL interface.

Aside from adding an entry to the server's `config.xml`

```xml theme={null}
<clickhouse>
    <mysql_port>9004</mysql_port>
</clickhouse>
```

it is also *required* to use
[Double SHA1 password encryption](/docs/concepts/features/configuration/settings/settings-users#user-namepassword)
for the user that will be using MySQL interface.

Generating a random password encrypted with Double SHA1 from the shell:

```shell theme={null}
PASSWORD=$(base64 < /dev/urandom | head -c16); echo "$PASSWORD"; echo -n "$PASSWORD" | sha1sum | tr -d '-' | xxd -r -p | sha1sum | tr -d '-'
```

The output should look like the following:

```
LZOQYnqQN4L/T6L0
fbc958cc745a82188a51f30de69eebfc67c40ee4
```

The first line is the generated password, and the second line is the hash we could use to configure ClickHouse.

Here is an example configuration for `mysql_user` that uses the generated hash:

`/etc/clickhouse-server/users.d/mysql_user.xml`

```xml theme={null}
<users>
    <mysql_user>
        <password_double_sha1_hex>fbc958cc745a82188a51f30de69eebfc67c40ee4</password_double_sha1_hex>
        <networks>
            <ip>::/0</ip>
        </networks>
        <profile>default</profile>
        <quota>default</quota>
    </mysql_user>
</users>
```

Replace `password_double_sha1_hex` entry with your own generated Double SHA1 hash.

Additionally, it is recommended to use `use_mysql_types_in_show_columns`
to show the native MySQL types instead of ClickHouse ones in `SHOW [FULL] COLUMNS` query results,
which allows BI tools to properly introspect the database schema when using MySQL connectors.

For example:

`/etc/clickhouse-server/users.d/mysql_user.xml`

```xml theme={null}
<profiles>
    <default>
        <use_mysql_types_in_show_columns>1</use_mysql_types_in_show_columns>
    </default>
</profiles>
```

or assign it to a different profile instead of the default one.

If you have the `mysql` binary available, you can test the connection from the commandline.
Using the sample username (`mysql_user`) and password (`LZOQYnqQN4L/T6L0`) from above the command line would be:

```bash theme={null}
mysql --protocol tcp -h localhost -u mysql_user -P 9004 --password=LZOQYnqQN4L/T6L0
```

```
mysql> show databases;
+--------------------+
| name               |
+--------------------+
| INFORMATION_SCHEMA |
| default            |
| information_schema |
| system             |
+--------------------+
4 rows in set (0.00 sec)
Read 4 rows, 603.00 B in 0.00156 sec., 2564 rows/sec., 377.48 KiB/sec.
```

Finally, configure the Clickhouse Server to listen on the desired IP address(es). For example, in `config.xml`, uncomment out the following to listen on all addresses:

```bash theme={null}
<listen_host>::</listen_host> 
```

<h2 id="connecting-looker-studio-to-clickhouse">
  Connecting Looker Studio to ClickHouse
</h2>

First, login to [https://lookerstudio.google.com](https://lookerstudio.google.com) using your Google account and create a new Data Source:

<Image size="md" img="https://mintcdn.com/private-7c7dfe99/PWQnWTwcu17exYX2/images/integrations/data-visualization/looker_studio_01.webp?fit=max&auto=format&n=PWQnWTwcu17exYX2&q=85&s=8c75b27cc6c0f117651edcccc2a2068d" alt="Creating a new data source in Looker Studio interface" border width="1229" height="683" data-path="images/integrations/data-visualization/looker_studio_01.webp" />

<br />

Search for the official MySQL connector provided by Google (named just **MySQL**):

<Image size="md" img="https://mintcdn.com/private-7c7dfe99/PWQnWTwcu17exYX2/images/integrations/data-visualization/looker_studio_02.webp?fit=max&auto=format&n=PWQnWTwcu17exYX2&q=85&s=4991d78eb1285299605e6c16e46e40f1" alt="MySQL connector search in Looker Studio connectors list" border width="1923" height="709" data-path="images/integrations/data-visualization/looker_studio_02.webp" />

<br />

Specify your connection details. Please note that MySQL interface port is 9004 by default,
and it might be different depending on your server configuration.

<Image size="md" img="https://mintcdn.com/private-7c7dfe99/PWQnWTwcu17exYX2/images/integrations/data-visualization/looker_studio_03.webp?fit=max&auto=format&n=PWQnWTwcu17exYX2&q=85&s=02c7a1f9fda174bc02930e760a6b3724" alt="Specifying the ClickHouse MySQL connection details in Looker Studio" border width="999" height="1329" data-path="images/integrations/data-visualization/looker_studio_03.webp" />

<br />

Now, you have two options on how to fetch the data from ClickHouse. First, you could use the Table Browser feature:

<Image size="md" img="https://mintcdn.com/private-7c7dfe99/PWQnWTwcu17exYX2/images/integrations/data-visualization/looker_studio_04.webp?fit=max&auto=format&n=PWQnWTwcu17exYX2&q=85&s=0c2eab5e46c8d870ffbca9695c54c3fe" alt="Using the Table Browser to select ClickHouse tables in Looker Studio" border width="1299" height="1333" data-path="images/integrations/data-visualization/looker_studio_04.webp" />

<br />

Alternatively, you could specify a custom query to fetch your data:

<Image size="md" img="https://mintcdn.com/private-7c7dfe99/etDiFo_9fGSe5rMN/images/integrations/data-visualization/looker_studio_05.webp?fit=max&auto=format&n=etDiFo_9fGSe5rMN&q=85&s=0d286c6b3ebd359043becbfd8e9e4b6a" alt="Using a custom SQL query to fetch data from ClickHouse in Looker Studio" border width="1518" height="1333" data-path="images/integrations/data-visualization/looker_studio_05.webp" />

<br />

Finally, you should be able to see the introspected table structure and adjust the data types if necessary.

<Image size="md" img="https://mintcdn.com/private-7c7dfe99/etDiFo_9fGSe5rMN/images/integrations/data-visualization/looker_studio_06.webp?fit=max&auto=format&n=etDiFo_9fGSe5rMN&q=85&s=a5f83fa01e727de02d76c828073dae8b" alt="Viewing the introspected ClickHouse table structure in Looker Studio" border width="1774" height="1114" data-path="images/integrations/data-visualization/looker_studio_06.webp" />

<br />

Now you can proceed with exploring your data or creating a new report!

<h2 id="using-looker-studio-with-clickhouse-cloud">
  Using Looker Studio with ClickHouse Cloud
</h2>

When using ClickHouse Cloud, you need to enable MySQL interface first. You can do that in connection dialog, "MySQL" tab.

<Image size="md" img="https://mintcdn.com/private-7c7dfe99/etDiFo_9fGSe5rMN/images/integrations/data-visualization/looker_studio_enable_mysql.webp?fit=max&auto=format&n=etDiFo_9fGSe5rMN&q=85&s=bdf0d324a44a504830035a581028af32" alt="Enabling MySQL interface in ClickHouse Cloud settings" border width="1748" height="684" data-path="images/integrations/data-visualization/looker_studio_enable_mysql.webp" />

<br />

In the Looker Studio UI, choose the "Enable SSL" option. ClickHouse Cloud's SSL certificate is signed by [Let's Encrypt](https://letsencrypt.org/certificates/). You can download this root cert [here](https://letsencrypt.org/certs/isrgrootx1.pem).

<Image size="md" img="https://mintcdn.com/private-7c7dfe99/etDiFo_9fGSe5rMN/images/integrations/data-visualization/looker_studio_mysql_cloud.webp?fit=max&auto=format&n=etDiFo_9fGSe5rMN&q=85&s=856761a5f256b3a4c0e4eb3ee4aade70" alt="Looker Studio connection configuration with ClickHouse Cloud SSL settings" border width="858" height="530" data-path="images/integrations/data-visualization/looker_studio_mysql_cloud.webp" />

<br />

The rest of the steps are the same as listed above in the previous section.