> ## Documentation Index
> Fetch the complete documentation index at: https://clickhouse.com/docs/llms.txt
> Use this file to discover all available pages before exploring further.
> Using JDBC Connector Sink with Kafka Connect and ClickHouse
# JDBC connector
This connector should only be used if your data is simple and consists of primitive data types e.g., int. ClickHouse specific types such as maps aren't supported.
For our examples, we utilize the Confluent distribution of Kafka Connect.
Below we describe a simple installation, pulling messages from a single Kafka topic and inserting rows into a ClickHouse table. We recommend Confluent Cloud, which offers a generous free tier for those who don't have a Kafka environment.
Note that a schema is required for the JDBC Connector (You can't use plain JSON or CSV with the JDBC connector). Whilst the schema can be encoded in each message; it is [strongly advised to use the Confluent schema registry](https://www.confluent.io/blog/kafka-connect-deep-dive-converters-serialization-explained/#json-schemas)y to avoid the associated overhead. The insertion script provided automatically infers a schema from the messages and inserts this to the registry - this script can thus be reused for other datasets. Kafka's keys are assumed to be Strings. Further details on Kafka schemas can be found [here](https://docs.confluent.io/platform/current/schema-registry/index.html).
License
The JDBC Connector is distributed under the [Confluent Community License](https://www.confluent.io/confluent-community-license)
Steps
Gather your connection details
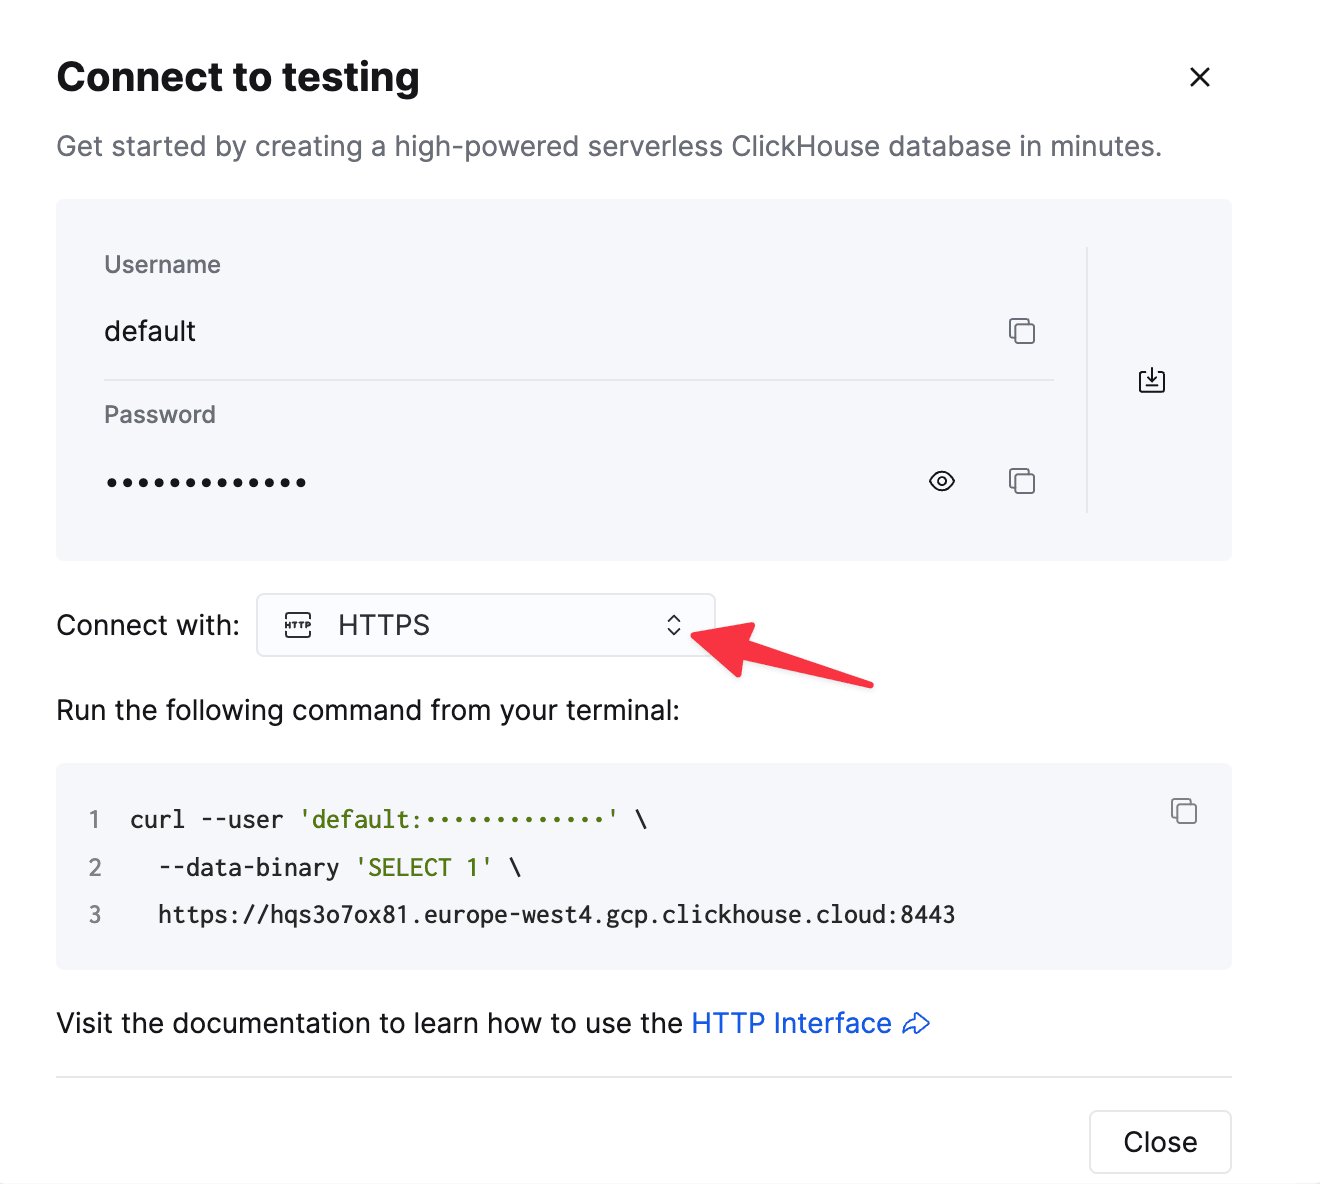
To connect to ClickHouse with HTTP(S) you need this information:
| Parameter(s) | Description |
| ------------------------- | -------------------------------------------------------------------------------------------------------------- |
| `HOST` and `PORT` | Typically, the port is 8443 when using TLS or 8123 when not using TLS. |
| `DATABASE NAME` | Out of the box, there is a database named `default`, use the name of the database that you want to connect to. |
| `USERNAME` and `PASSWORD` | Out of the box, the username is `default`. Use the username appropriate for your use case. |
The details for your ClickHouse Cloud service are available in the ClickHouse Cloud console.
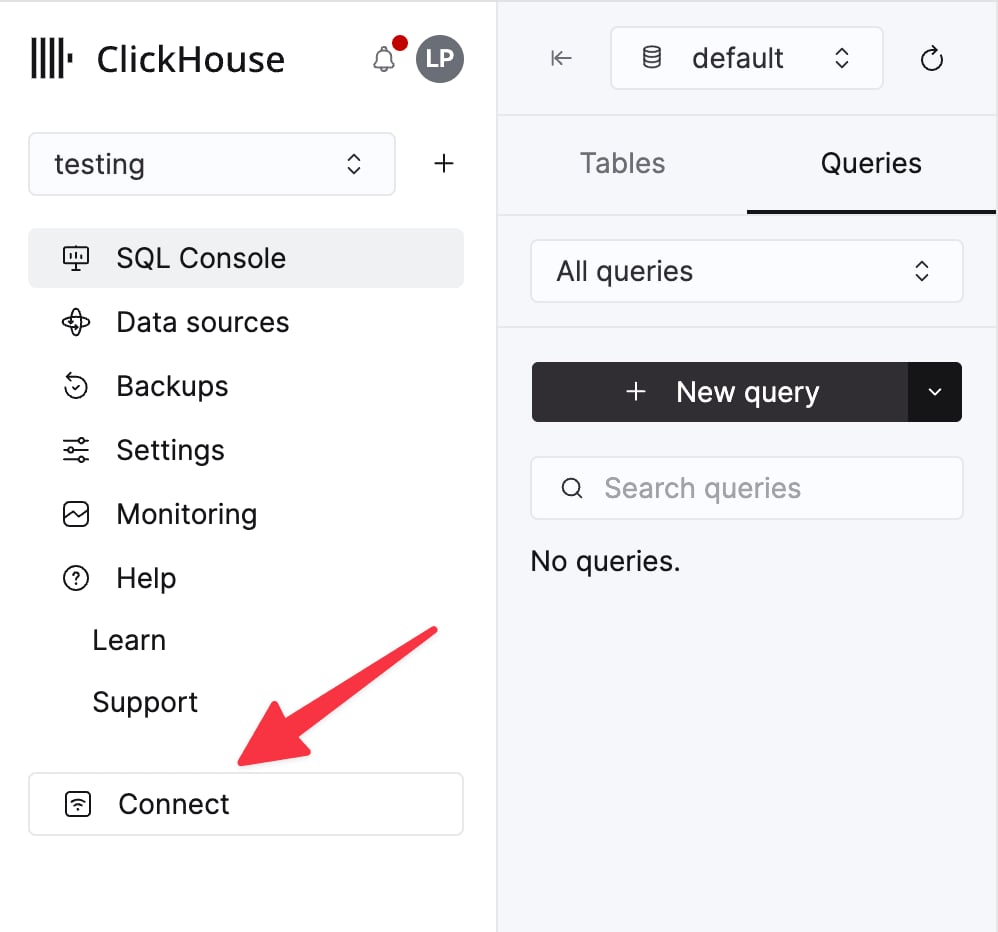
Select a service and click **Connect**:
Choose **HTTPS**. Connection details are displayed in an example `curl` command.
If you're using self-managed ClickHouse, the connection details are set by your ClickHouse administrator.
We assume you have downloaded the Confluent package and installed it locally. Follow the installation instructions for installing the connector as documented [here](https://docs.confluent.io/kafka-connect-jdbc/current/#install-the-jdbc-connector).
If you use the confluent-hub installation method, your local configuration files will be updated.
For sending data to ClickHouse from Kafka, we use the Sink component of the connector.
Download and install the ClickHouse JDBC driver `clickhouse-jdbc--shaded.jar` from [here](https://github.com/ClickHouse/clickhouse-java/releases). Install this into Kafka Connect following the details [here](https://docs.confluent.io/kafka-connect-jdbc/current/#installing-jdbc-drivers). Other drivers may work but haven't been tested.
Common Issue: the docs suggest copying the jar to `share/java/kafka-connect-jdbc/`. If you experience issues with Connect finding the driver, copy the driver to `share/confluent-hub-components/confluentinc-kafka-connect-jdbc/lib/`. Or modify `plugin.path` to include the driver - see below.
Follow [these instructions](https://docs.confluent.io/cloud/current/cp-component/connect-cloud-config.html#set-up-a-local-connect-worker-with-cp-install) for setting up a Connect relevant to your installation type, noting the differences between a standalone and distributed cluster. If using Confluent Cloud the distributed setup is relevant.
The following parameters are relevant to using the JDBC connector with ClickHouse. A full parameter list can be found [here](https://docs.confluent.io/kafka-connect-jdbc/current/sink-connector/index.html):
* `_connection.url_` - this should take the form of `jdbc:clickhouse://<clickhouse host>:<clickhouse http port>/<target database>`
* `connection.user` - a user with write access to the target database
* `table.name.format`- ClickHouse table to insert data. This must exist.
* `batch.size` - The number of rows to send in a single batch. Ensure this set is to an appropriately large number. Per ClickHouse [recommendations](/docs/reference/statements/insert-into#performance-considerations) a value of 1000 should be considered a minimum.
* `tasks.max` - The JDBC Sink connector supports running one or more tasks. This can be used to increase performance. Along with batch size this represents your primary means of improving performance.
* `value.converter.schemas.enable` - Set to false if using a schema registry, true if you embed your schemas in the messages.
* `value.converter` - Set according to your datatype e.g. for JSON, `io.confluent.connect.json.JsonSchemaConverter`.
* `key.converter` - Set to `org.apache.kafka.connect.storage.StringConverter`. We utilise String keys.
* `pk.mode` - Not relevant to ClickHouse. Set to none.
* `auto.create` - Not supported and must be false.
* `auto.evolve` - We recommend false for this setting although it may be supported in the future.
* `insert.mode` - Set to "insert". Other modes aren't currently supported.
* `key.converter` - Set according to the types of your keys.
* `value.converter` - Set based on the type of data on your topic. This data must have a supported schema - JSON, Avro or Protobuf formats.
If using our sample dataset for testing, ensure the following are set:
* `value.converter.schemas.enable` - Set to false as we utilize a schema registry. Set to true if you're embedding the schema in each message.
* `key.converter` - Set to "org.apache.kafka.connect.storage.StringConverter". We utilise String keys.
* `value.converter` - Set "io.confluent.connect.json.JsonSchemaConverter".
* `value.converter.schema.registry.url` - Set to the schema server url along with the credentials for the schema server via the parameter `value.converter.schema.registry.basic.auth.user.info`.
Example configuration files for the Github sample data can be found [here](https://github.com/ClickHouse/kafka-samples/tree/main/github_events/jdbc_sink), assuming Connect is run in standalone mode and Kafka is hosted in Confluent Cloud.
Ensure the table has been created, dropping it if it already exists from previous examples. An example compatible with the reduced Github dataset is shown below. Not the absence of any Array or Map types that aren't currently not supported:
```sql theme={null}
CREATE TABLE github
(
file_time DateTime,
event_type Enum('CommitCommentEvent' = 1, 'CreateEvent' = 2, 'DeleteEvent' = 3, 'ForkEvent' = 4, 'GollumEvent' = 5, 'IssueCommentEvent' = 6, 'IssuesEvent' = 7, 'MemberEvent' = 8, 'PublicEvent' = 9, 'PullRequestEvent' = 10, 'PullRequestReviewCommentEvent' = 11, 'PushEvent' = 12, 'ReleaseEvent' = 13, 'SponsorshipEvent' = 14, 'WatchEvent' = 15, 'GistEvent' = 16, 'FollowEvent' = 17, 'DownloadEvent' = 18, 'PullRequestReviewEvent' = 19, 'ForkApplyEvent' = 20, 'Event' = 21, 'TeamAddEvent' = 22),
actor_login LowCardinality(String),
repo_name LowCardinality(String),
created_at DateTime,
updated_at DateTime,
action Enum('none' = 0, 'created' = 1, 'added' = 2, 'edited' = 3, 'deleted' = 4, 'opened' = 5, 'closed' = 6, 'reopened' = 7, 'assigned' = 8, 'unassigned' = 9, 'labeled' = 10, 'unlabeled' = 11, 'review_requested' = 12, 'review_request_removed' = 13, 'synchronize' = 14, 'started' = 15, 'published' = 16, 'update' = 17, 'create' = 18, 'fork' = 19, 'merged' = 20),
comment_id UInt64,
path String,
ref LowCardinality(String),
ref_type Enum('none' = 0, 'branch' = 1, 'tag' = 2, 'repository' = 3, 'unknown' = 4),
creator_user_login LowCardinality(String),
number UInt32,
title String,
state Enum('none' = 0, 'open' = 1, 'closed' = 2),
assignee LowCardinality(String),
closed_at DateTime,
merged_at DateTime,
merge_commit_sha String,
merged_by LowCardinality(String),
review_comments UInt32,
member_login LowCardinality(String)
) ENGINE = MergeTree ORDER BY (event_type, repo_name, created_at)
```
Start Kafka Connect in either [standalone](https://docs.confluent.io/cloud/current/cp-component/connect-cloud-config.html#standalone-cluster) or [distributed](https://docs.confluent.io/cloud/current/cp-component/connect-cloud-config.html#distributed-cluster) mode.
```bash theme={null}
./bin/connect-standalone connect.properties.ini github-jdbc-sink.properties.ini
```
Insert messages to Kafka using the [script and config](https://github.com/ClickHouse/kafka-samples/tree/main/producer) provided. You will need to modify github.config to include your Kafka credentials. The script is currently configured for use with Confluent Cloud.
```bash theme={null}
python producer.py -c github.config
```
This script can be used to insert any ndjson file into a Kafka topic. This will attempt to infer a schema for you automatically. The sample config provided will only insert 10k messages - [modify here](https://github.com/ClickHouse/clickhouse-docs/tree/main/docs/integrations/data-ingestion/kafka/code/producer/github.config#L25) if required. This configuration also removes any incompatible Array fields from the dataset during insertion to Kafka.
This is required for the JDBC connector to convert messages to INSERT statements. If you're using your own data, ensure you either insert a schema with every message (setting \_value.converter.schemas.enable \_to true) or ensure your client publishes messages referencing a schema to the registry.
Kafka Connect should begin consuming messages and inserting rows into ClickHouse. Note that warnings regards "\[JDBC Compliant Mode] Transaction isn't supported." are expected and can be ignored.
A simple read on the target table "Github" should confirm data insertion.
```sql theme={null}
SELECT count() FROM default.github;
```
```response theme={null}
| count\(\) |
| :--- |
| 10000 |
```
Recommended further reading
* [Kafka Sink Configuration Parameters](https://docs.confluent.io/kafka-connect-jdbc/current/sink-connector/sink_config_options.html#sink-config-options)
* [Kafka Connect Deep Dive – JDBC Source Connector](https://www.confluent.io/blog/kafka-connect-deep-dive-jdbc-source-connector)
* [Kafka Connect JDBC Sink deep-dive: Working with Primary Keys](https://rmoff.net/2021/03/12/kafka-connect-jdbc-sink-deep-dive-working-with-primary-keys/)
* [Kafka Connect in Action: JDBC Sink](https://www.youtube.com/watch?v=b-3qN_tlYR4\&t=981s) - for those who prefer to watch over read.
* [Kafka Connect Deep Dive – Converters and Serialization Explained](https://www.confluent.io/blog/kafka-connect-deep-dive-converters-serialization-explained/#json-schemas)